Ceramic Coating: The Ultimate Solution for Protecting Your RV

Ceramic Coating is just what it sounds like: a thin, hardened material that is applied to your coach’s surface to provide a strong barrier against the elements. Essentially, Ceramic Coating helps prevent potential damage to your RV’s paint job.

As a rule of thumb, the earlier you coat your RV, the better. Moreover, always rely on the pros to get the job done. Our qualified Paint and Body Experts are factory-trained and certified by the product we use, so you know you’re getting the best results possible. While it’s a labor-intensive process, it’s certainly worth the time and effort.

Watch the video below to hear Mark Moniuszko, NIRVC’s Director of Paint and Body, and Angie Morell, Director of Sales, discuss the science behind Ceramic Coating, and its many benefits.

Ceramic Coating is a popular option for RVs for several reasons:

  1. Offers superior protection against damage and discoloration from scratches, weathering, UV rays, and contaminants such as road debris, rock chips, tree branches, water spots, bugs, and more.
  2. Is highly durable and can last for years without the need for frequent repainting.
  3. Enhances the overall appearance of your RV by providing a glossy, mirror-like finish.

Check out the video below to see how a Ceramic Coated RV shines! 

    The Ceramic Coating process entails a few important steps, all of which are completed by our Paint and Body Experts:

    1. Conduct a thorough paint inspection to evaluate the coach’s paint repair needs.
    2. Make any necessary paint corrections.
    3. Buff the coach for 30 hours. (Yes, 30 hours!)
    4. Wipe the coach down with 100% alcohol to remove dust, grime and film.
    5. Apply the Ceramic Coating.
    6. Allow the coating to fully cure indoors for about three days.

    Ceramic Coating offers a combination of protection and aesthetics that make it an excellent choice for RV owners looking to protect their investment and maintain their coach’s appearance over time. Learn more about Ceramic Coating as well as NIRVC’s other Paint and Body services.

    Note: We offer on-site ceramic coating services at all of our locations except Washington, D.C.

    Randy’s Famous French Fries

    If you know, you know… If you don’t, you need to get to an AIM Club event!

    Mmmm… Golden brown, crisp-fried in peanut oil, and perfectly seasoned, Randy’s hand-cut, fresh french fries are legendary. Definitely one of the secret perks of AIM Club membership. Something to look forward to at every AIM Rally, FMCA Rally, Tampa RV SuperShow and other events around the country. Some AIM Club members dream about those french fries. [This member can confirm.]

    Randy's Delicious French Fries
    Randy's Delicious French Fries

    [French Fry Photos (2) by Ruth Bernett Candler – AIM Club Member]

    [Randy The Rally Man preparing dinner at AIM Rally – Ellijay, GA]

    Meet Randy The Rally Man

    Randy, officially, is the AIM Club Event Operations Manager, a.k.a. “Randy The Rally Man,” as Heather Smith, AIM Events Manager, explains:

    “While half the team flies from destination to destination, Randy drives the truck and equipment trailer from Dallas, all over the country, with all of his supplies and everything else we need to put on a successful rally…”

    Including the distinctive white canvas tent, the big wooden bar, Randy’s grill and all the cooking equipment and supplies needed to feed 200 or more hungry AIM Club members and guests. Not to mention the signage and decorations, lights and power equipment, raffle prizes, gifts, welcome bags, and whatever else might be needed.

    Randy has been with AIM since the beginning, in 2017. Before that, he worked for National Indoor RV Centers in Lewisville, Texas (Dallas) for 13 years, valeting RVs for the dealership storage department. 

    When asked how he became the “Famous French Fry Guy” as AIM Event Operations Manager, Randy explained he used to cook for the sales staff on Saturdays at NIRVC: “They’d bring their own food, and I’d cook for them.”

    In addition to driving the truck & trailer, wrangling the equipment, and cooking his famous french fries, with whatever else is on the menu (also guaranteed to be delicious), Randy keeps a fairly low profile. Well, he’s a man of few words, but he is everywhere – involved in every event and activity, in some way.

    [Randy manning the AIM Club booth at the NIRVC display in Tucson, handing out tickets for the raffle.]

    Q&A with Randy Nevels – AIM Event Operations Manager

    Q: What’s your favorite thing about your job?

    A: “I like cooking for people.”

    He goes on to talk about the people he meets and their appreciation. Randy says some AIM members want to help him cook, and that’s always nice.

    When asked if they’re helping out to learn all his secrets, he says, with a grin:

    “They can’t remember the secrets. I don’t tell them everything.” 😉

    Q: What has been your favorite AIM Event?

    A: “They’re all good. I’ve been whitewater rafting; been to the top of the mountain in Big Sky, Montana, made a snowman up there; fourbying in Granby, CO… all the adventures we get to go on.”

    Q: What do you like to do when you’re at home?

    The AIM Team is on a full travel schedule throughout the year, with back-to-back AIM Club Rallies, NIRVC Events (Customer Appreciation Rallies and Grand Openings); sometimes back-to-back-to-back with FMCA Rallies and other events.

    When they do make it back to the AIM Club Base at NIRVC – Dallas, it’s still a full-time job getting everything ready to go for the next series of events: unloading stuff from previous events; cleaning the cookers, grills, and other equipment; stocking up fresh supplies and materials.

    A: Randy tries to take time off when he can, three vacation days here and there, before heading out of town again and spending time with his girlfriend. When he’s home, he likes to relax. He cooks sometimes. He works on his antique truck: a 1995 Ford F150 4WD with 45K miles, in perfect condition. “There’s always a project.”

    Back to those Famous French Fries

    Q: How many potatoes does it take to make fresh fries at the events?

    A: For an AIM Rally, with 100 coaches (about 200 people), it takes 100 lbs of potatoes per meal (“one cookin”). The process, in general (no spoilers!): 100 lbs of potatoes chopped, soaked, cooked twice in peanut oil, “with seasoning.”

    “We always cook more than what we need, never want to run out. That’s one of Brett’s policies (Brett Davis, CEO of NIRVC – an AIM Club Sponsor): ‘Never run out.’”

    Randy once asked one of the AIM Members:

    “Why do you like the french fries so much?”

    Answer: “Because they’re fresh, homemade, and then you season. Your secret sauce, that’s the bomb.”

    Randy replied: “They’re just potatoes.”

    “No they’re not.” [Can confirm!]

    Randy and his Famous French Fries are truly legendary.

    Randy The Rally Man, as AIM Event Operations Manager, is integral to the success of every AIM Club event. His famous french fries are just one of the things that will keep you coming back to AIM Club Rallies & Events again and again. And maybe even dreaming about french fries!

    National Indoor RV Centers blogger Sherri Caldwell profile image

    Sherri Caldwell is the founder of BooksAndTravelUSA.com – Full-time RV Travel Blog & Book Club/U.S. Literacy Project. With her husband, Russ, she is currently living, working, and traveling full-time in their 2016 Entegra Aspire: Charlie-The-Unicorn RV.

    RV Sanitation Systems

    Understanding your RV sanitation systems can prevent some foul problems

    Motorhomes are self-contained with a fresh water system as well as holding tanks to handle waste water from the various plumbing fixtures. While dealing with waste water isn’t the most glamorous part of owning a motorhome, it is nonetheless an important part. Unlike a residential plumbing system like in your home, an RV has a number of things that have to be kept in mind and taken care of or else you’ll be in for a few messy and smelly problems. Fortunately, it’s not that bad if you understand how things work and pick up a few tips to help keep them working as it should. Let’s first look at how an RV’s waste water system is constructed.

    Your RV Has Two Water Systems – Not One

    To begin with, there are really two systems, not just one. The gray water system handles the waste water from the sink drains, shower drain and dishwasher, if equipped. The black water system handles the waste from the toilets. This method provides for two separate holding tanks, one to hold the black water and one to hold the gray. The reasoning behind this began in the early days of RV use. Drainage from sinks and showers contributed more volume than waste water from the toilets and needed to be drained more frequently. In addition, the gray water was relatively clean and could oftentimes be allowed to drain onto the ground, although many locations no longer allow that due to local public health laws. On the other hand, the black water wasn’t very sanitary and needed to be disposed of in a proper dump station or sewer connection. Having the two separate tanks made it possible to have multiple dump cycles rather than dumping all the waste at the same time. Another benefit to the two-tank system is that the gray water tank is relatively clean because it’s mostly soapy water while the human waste and toilet paper found in the black tank can cake up inside the tank walls, causing tank level sensors to foul and give errant readings.

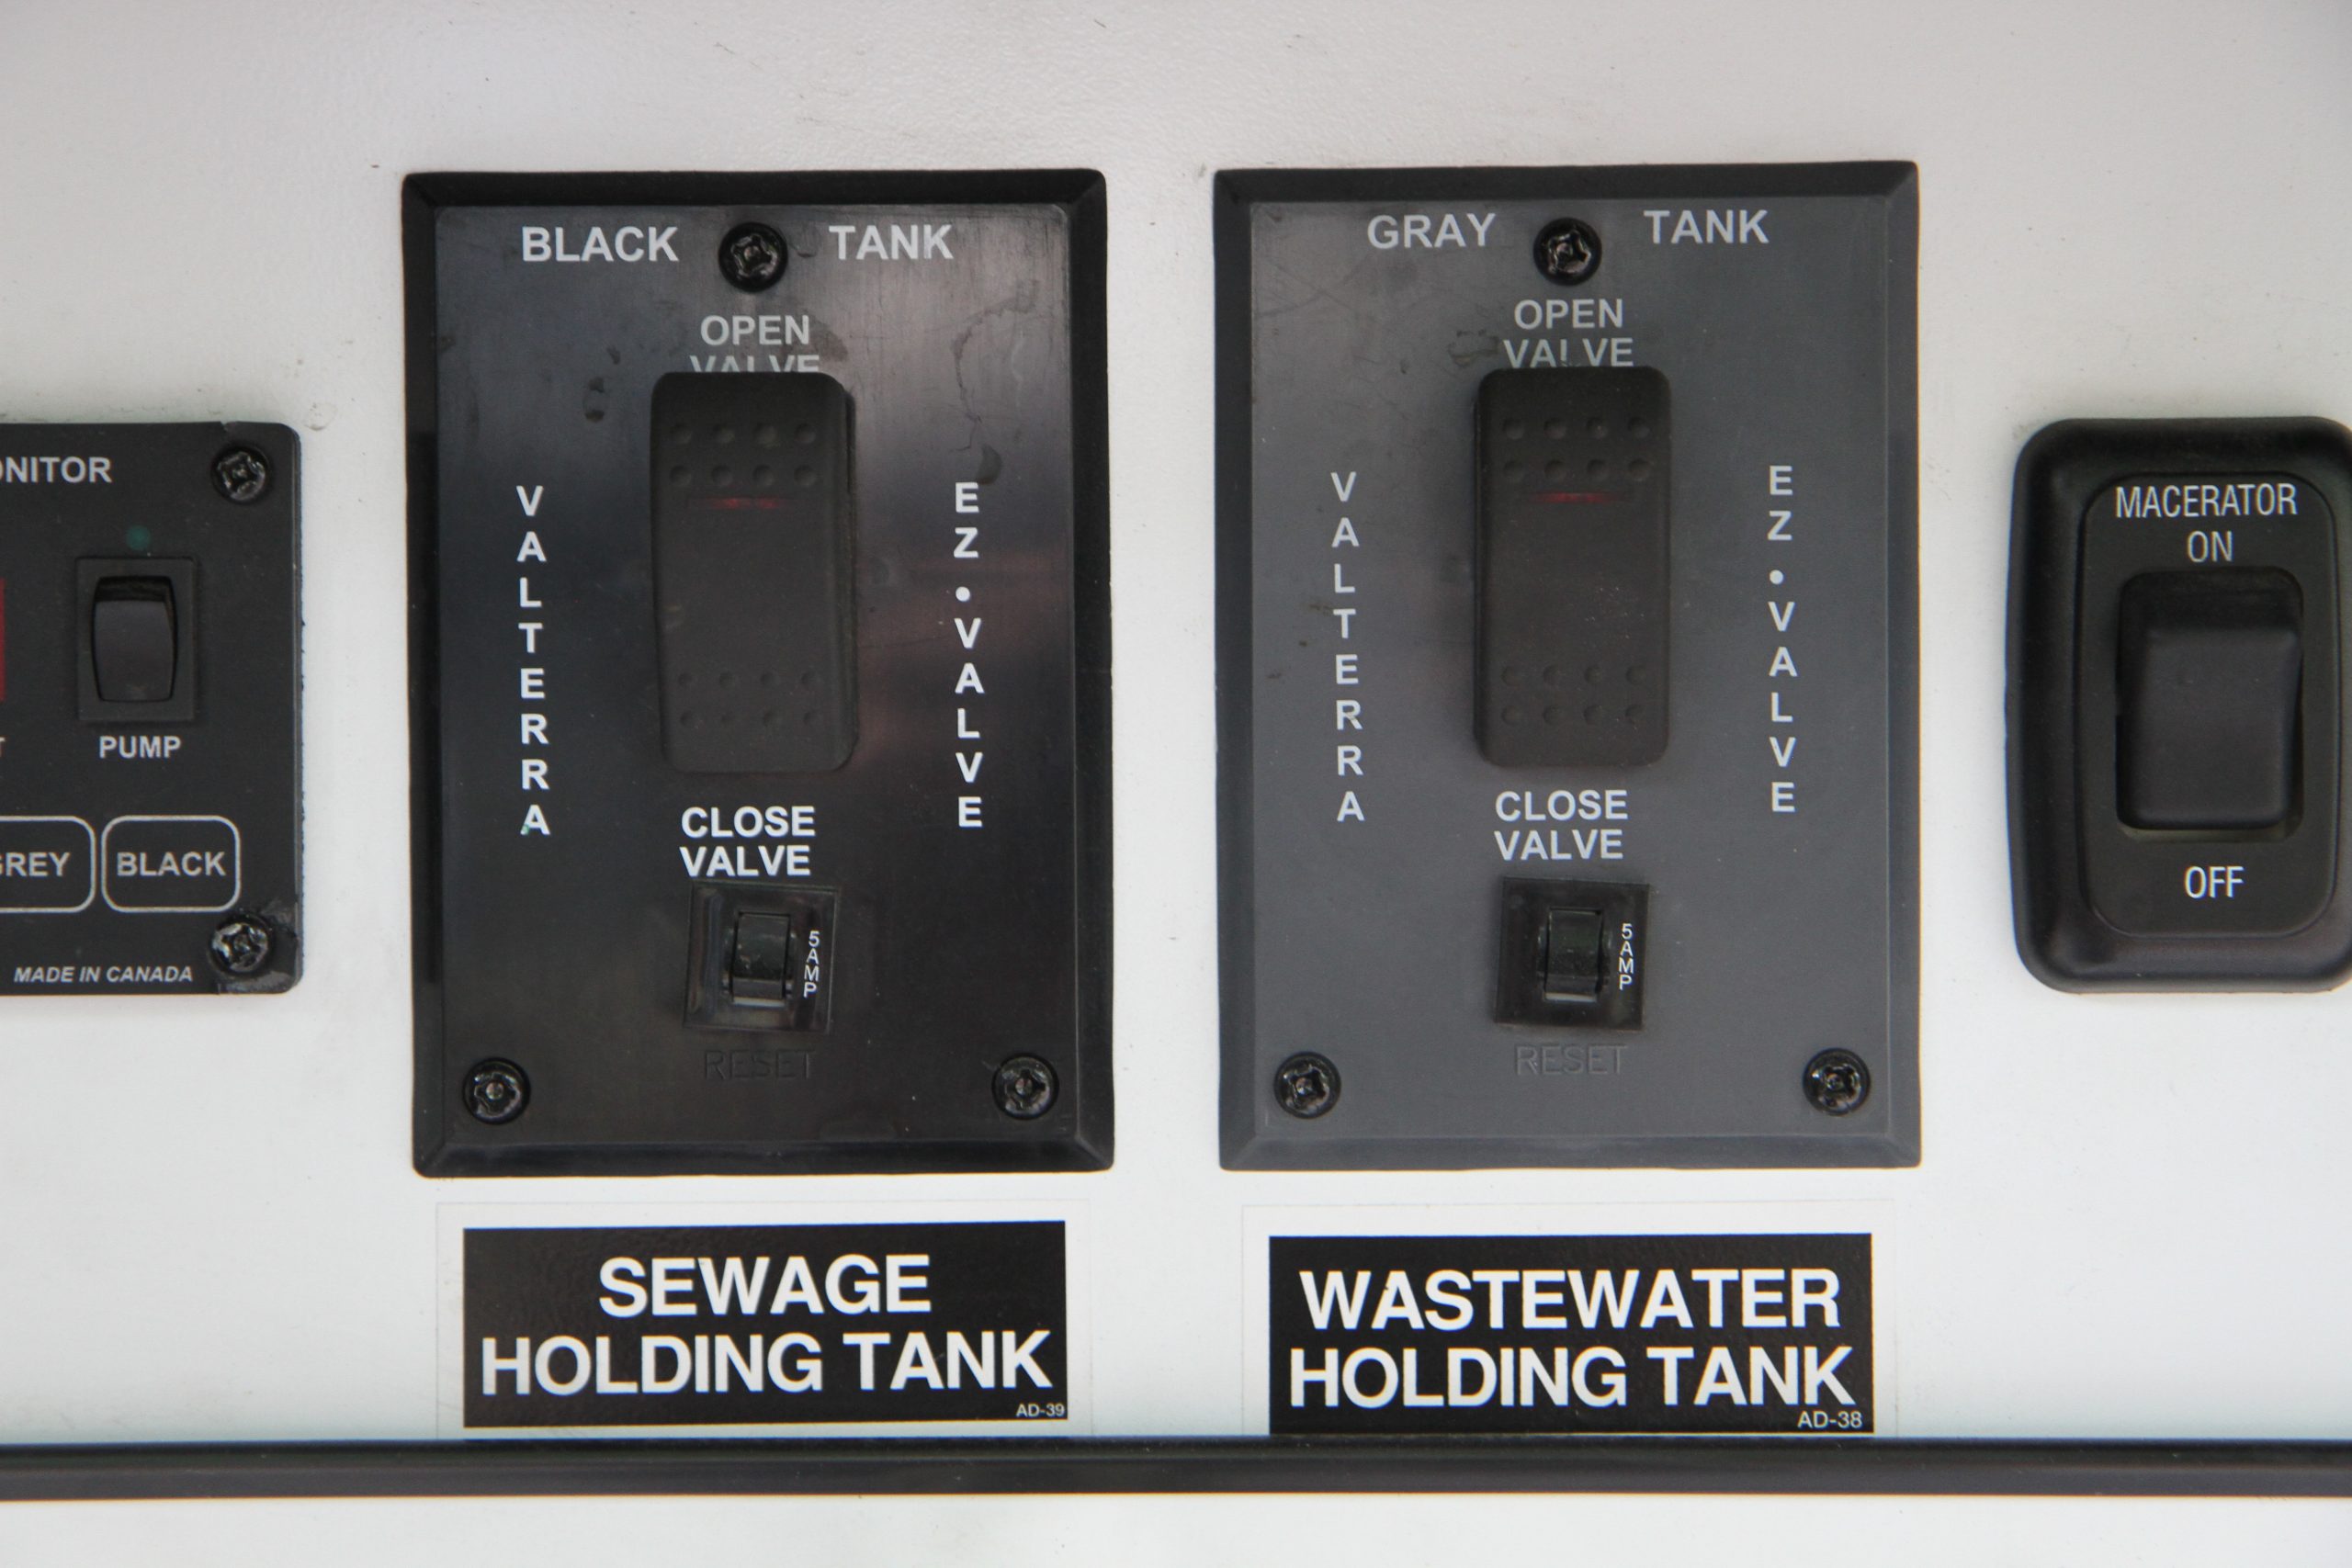
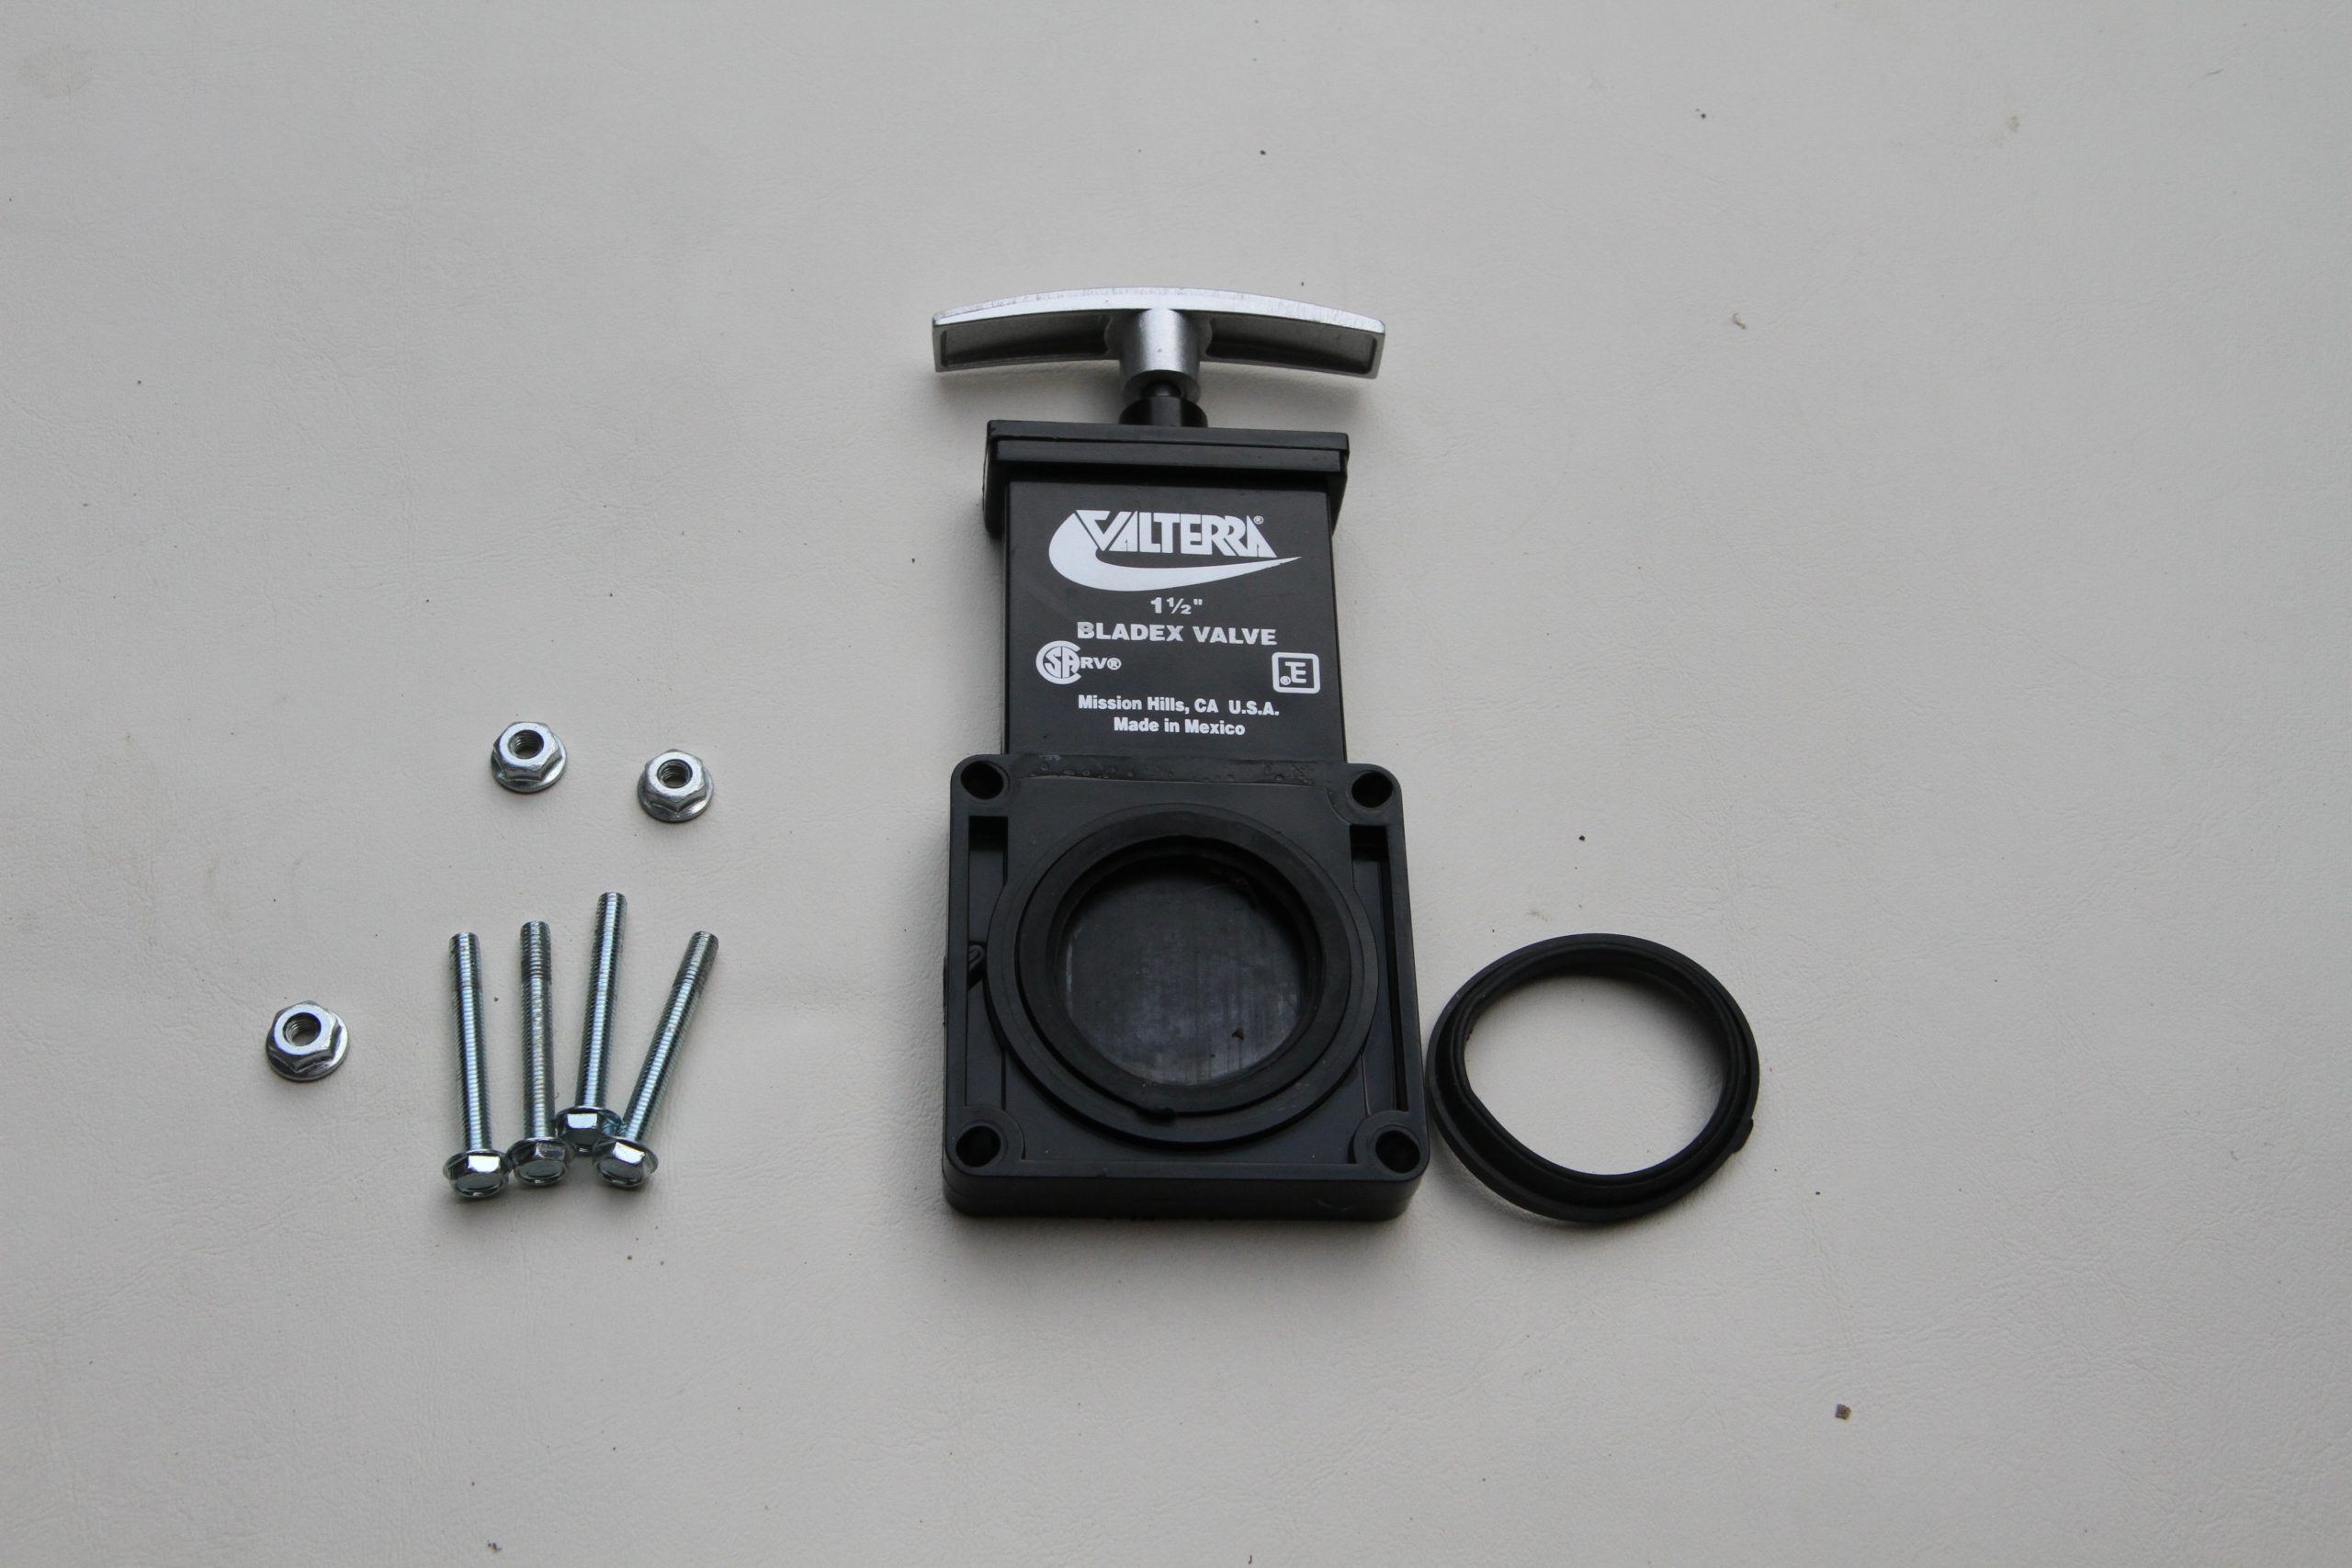
    The vast majority of motorhomes have a single sewer connection used to connect the sewer hose to the holding tanks. A pair of dump valves, one for each holding tank, connects via a wye connector to this common outlet. These valves are blade type valves to prevent clogging and can be either manually operated or electrically operated with a remote switch.

    National-Indoor-RV-Centers-blog-RV-sanitation-systems-motorhome-sewer-tanks

    A set of remote electric dump valve switches in our Entegra Coach.

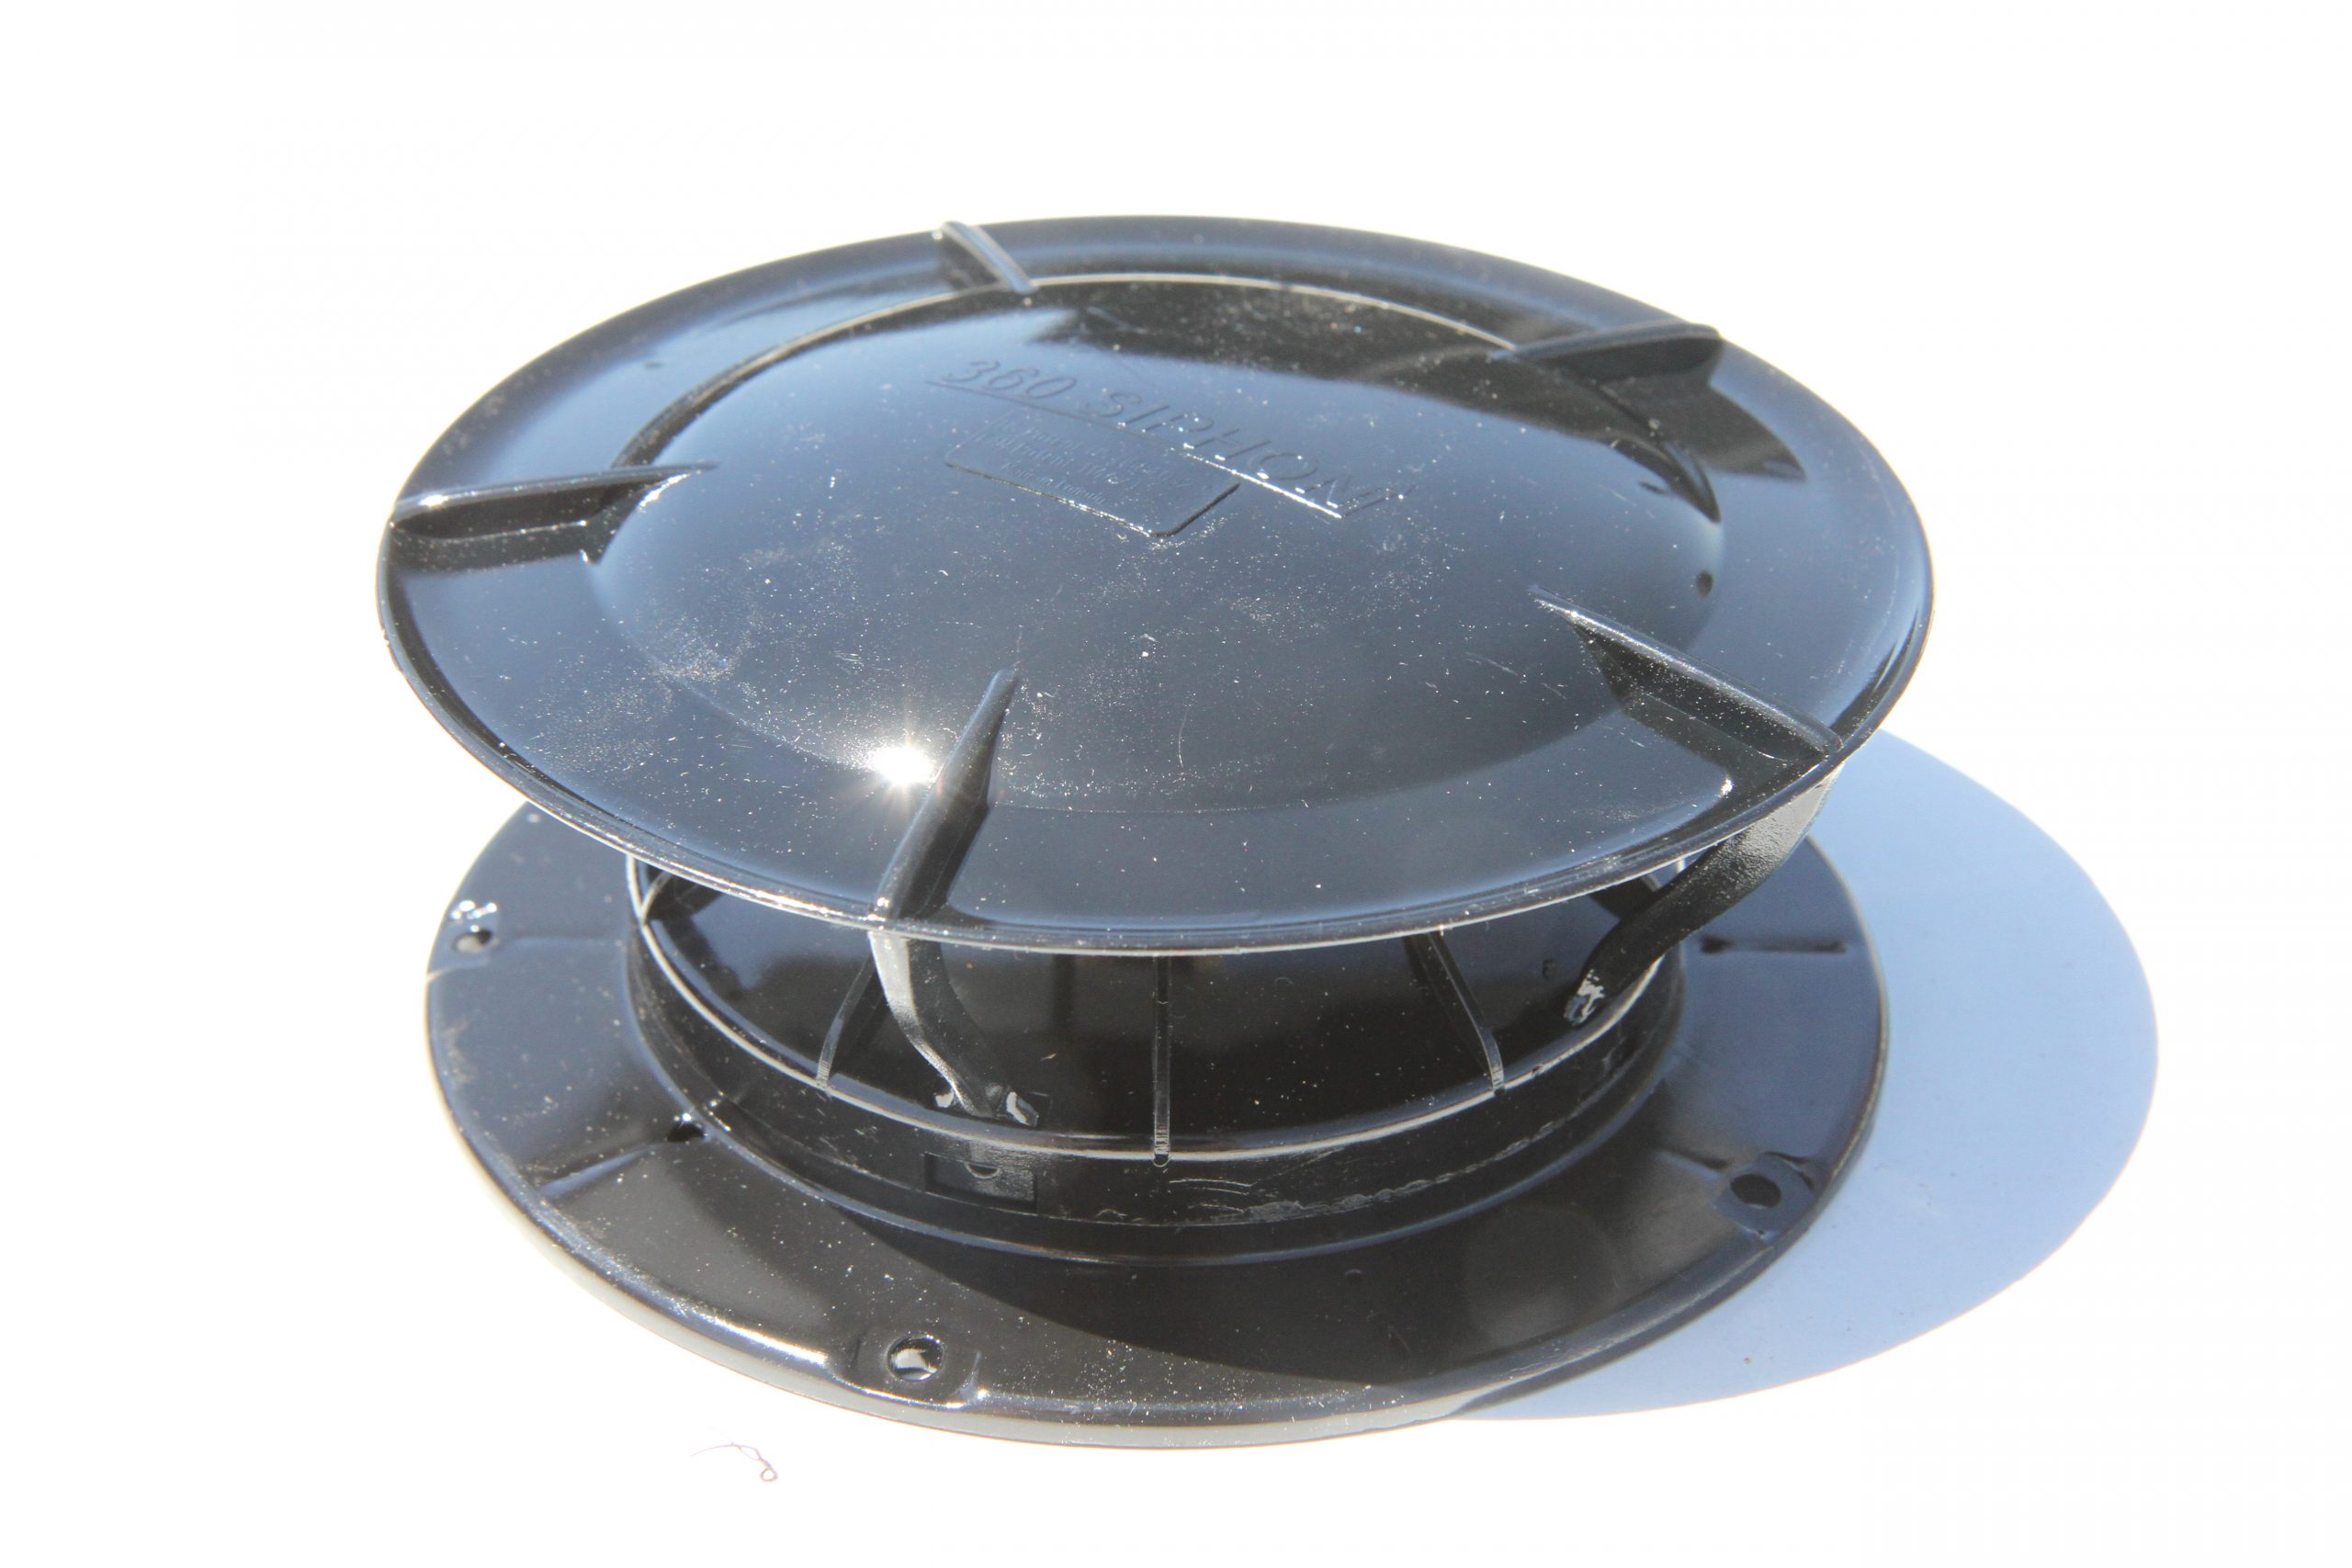
    Each tank is connected to a vent stack that extends out of the roof to eliminate a vacuum from forming in the tank when draining and expansion as the tank is being used. It also allows for odors to vent from the tank. You may have a pair of vent stacks for the two holding tanks, or they may be tee’d together into one common vent stack. A hood is applied to the vent stack to prevent rainwater or debris from entering the tanks via the vent stack. These hoods can be simple rain caps or venturi style fittings that allow the wind to help ventilate the tanks.

    National-Indoor-RV-Centers-blog-RV-sanitation-systems-motorhome-sewer-tanks-rooftop-vent

    Rooftop vents, such as this 360 Siphon, are required to ventilate the holding tanks and provide makeup air when draining the tanks.

    Sensors

    Of course, you’d never know when you have to dump your holding tanks without some kind of indicator. Early tank designs used three sensor probes that were inserted into the tank. One was located at the one-third level, another at the two-thirds level and one at the very top of the tank. These sensors were inserted through the sidewall of the tank and would conduct electricity when wet. A wiring harness connected them to a monitor panel inside the coach to display the tank levels. If the tank was full, all four LEDs would illuminate. If the fluid level in the tank reached the two-thirds level, only three LEDs would light up. At one-third, only two would light up and if below one-third, only the bottom “empty” LED would be lit.

    This system worked for years but had a few drawbacks. For one, the sensors easily fouled and gave false readings, so it was imperative to keep the tanks as clean as possible. Another concern was their accuracy. If the tank level was just below the two-thirds sensor, it would register one-third full on the display. You might think you have plenty of room left in the tank but all you had to do was add a little bit of water to the tank and it instantly jumped to two-thirds full, so you never really knew exactly how full the tank was.

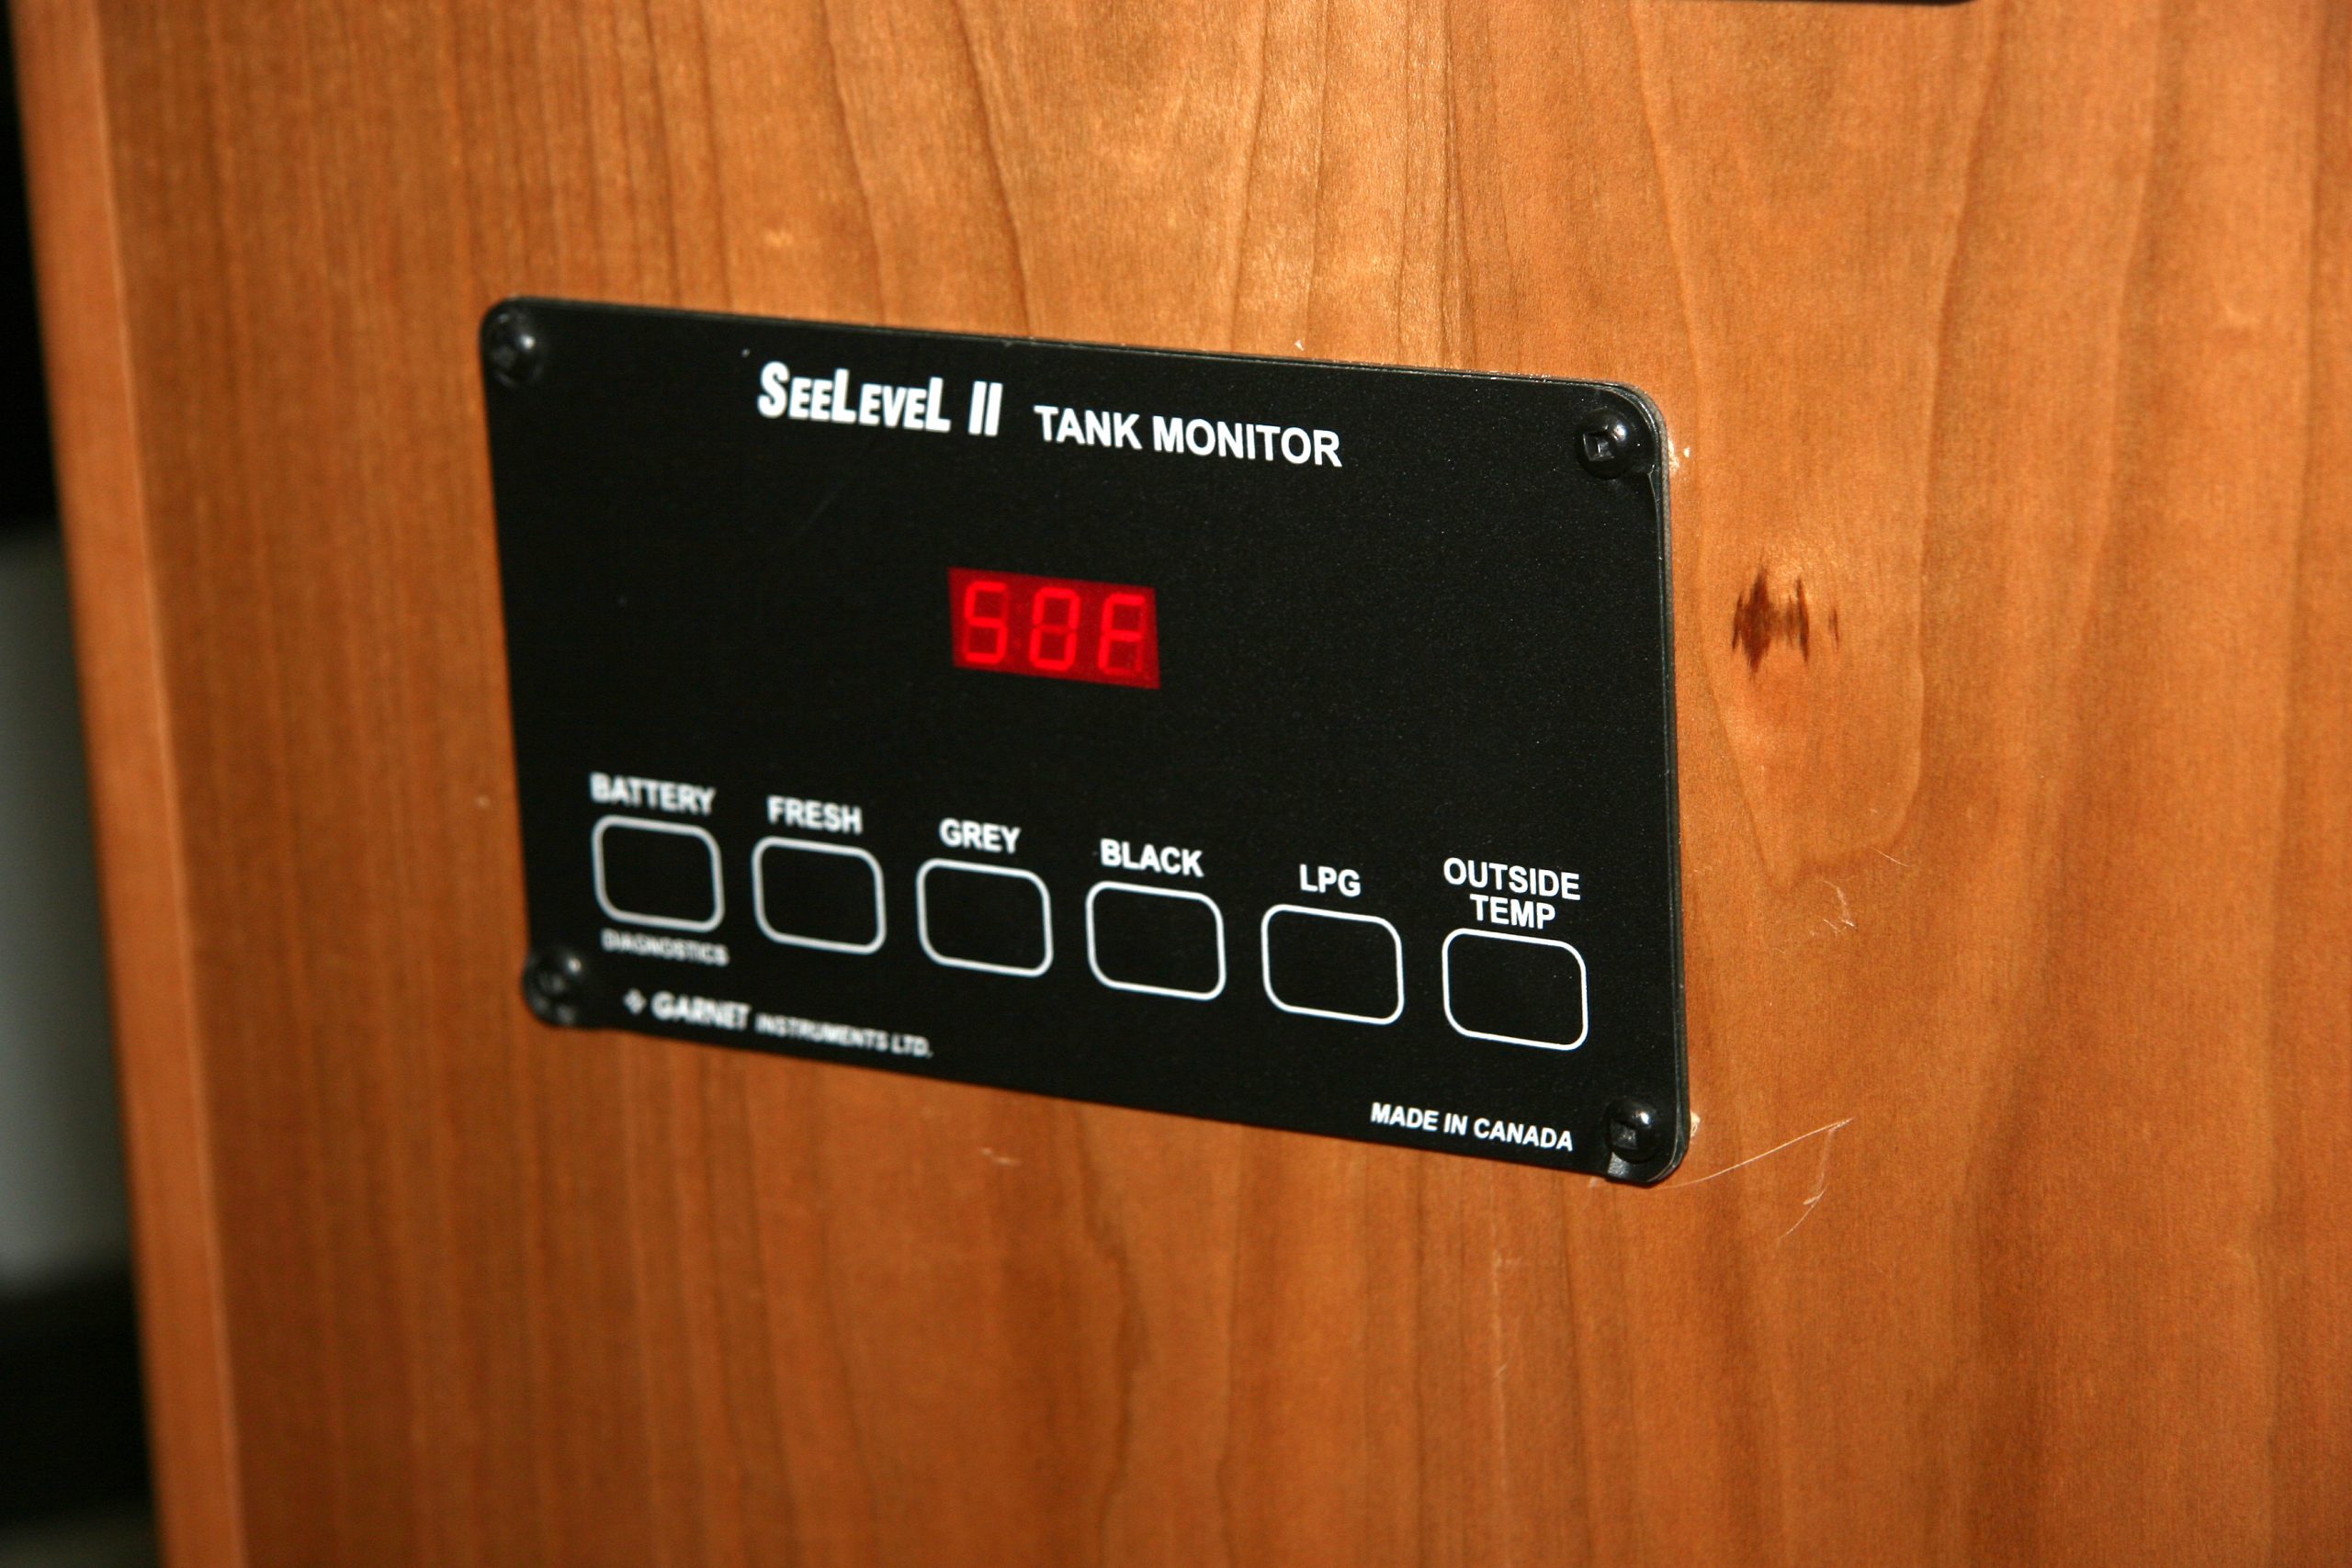
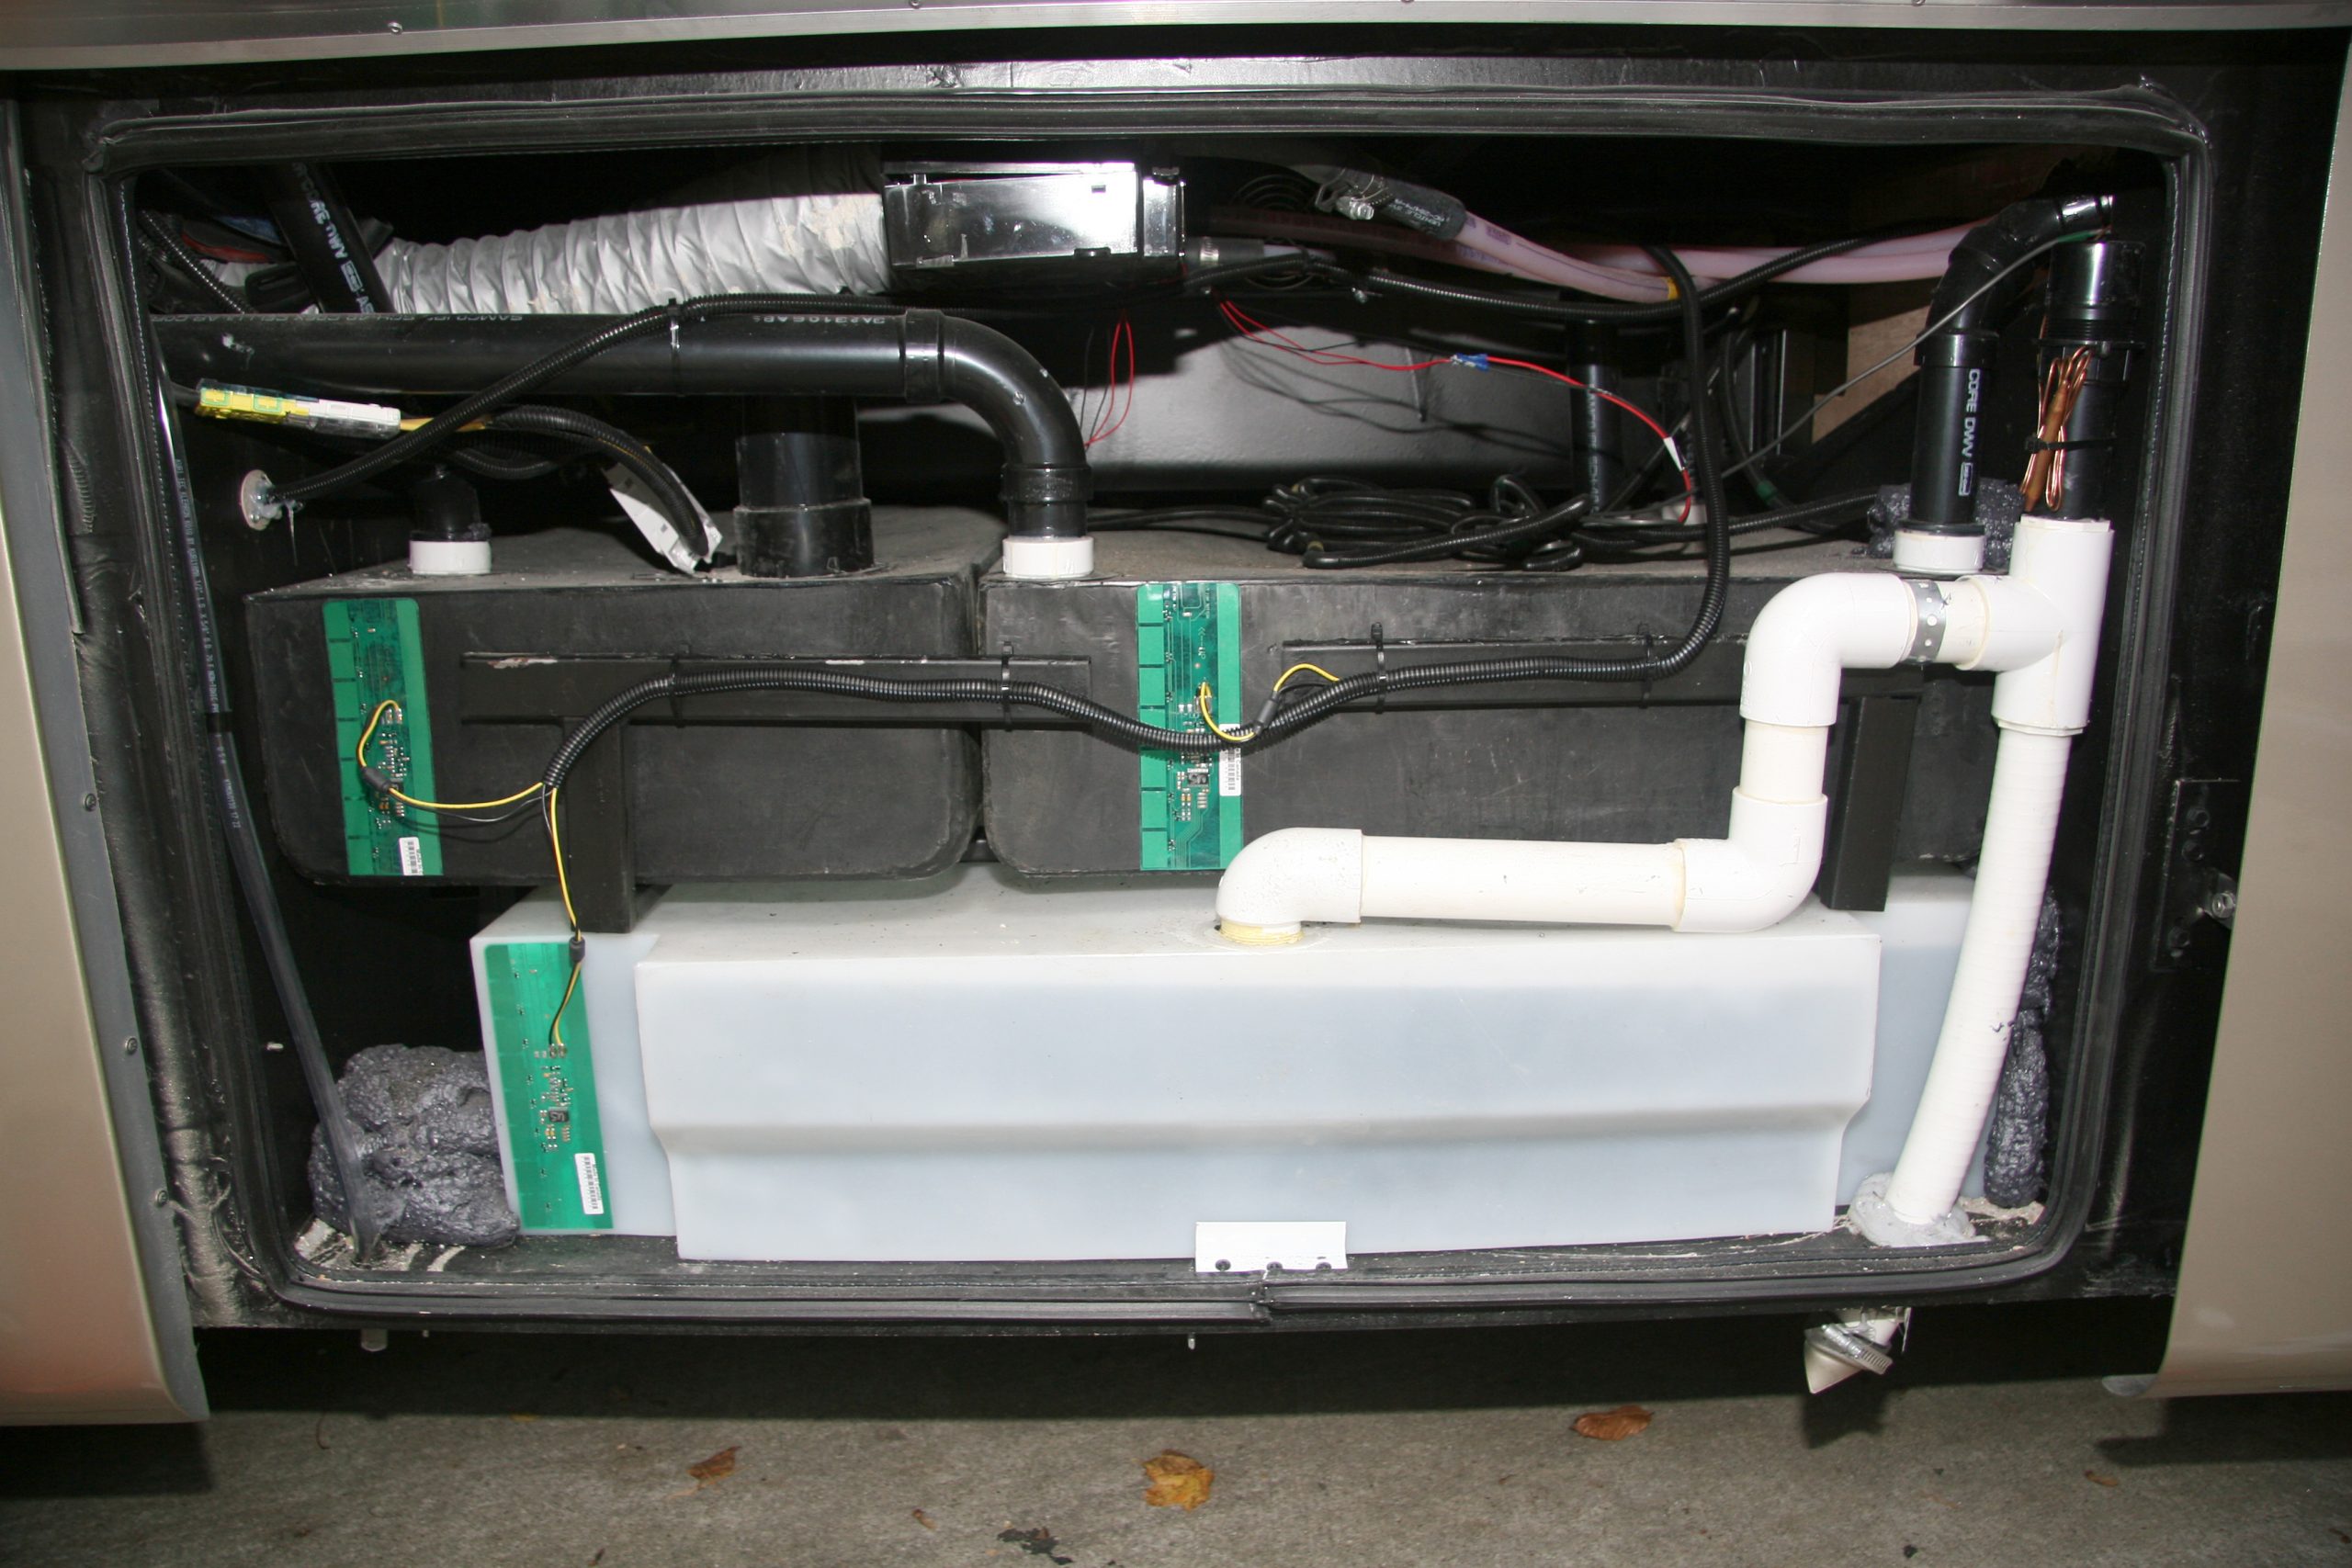
    The next big improvement was the SeeLevel tank measurement system. This system used external sensors that used adhesive to attach to the outside of the tank. These sensors were full length and used radio waves to determine the precise level of the tank’s contents.

    National-Indoor-RV-Centers-blog-RV-sanitation-systems-motorhome-sewer-tanks-seelevel
    National-Indoor-RV-Centers-blog-RV-sanitation-systems-motorhome-sewer-tanks

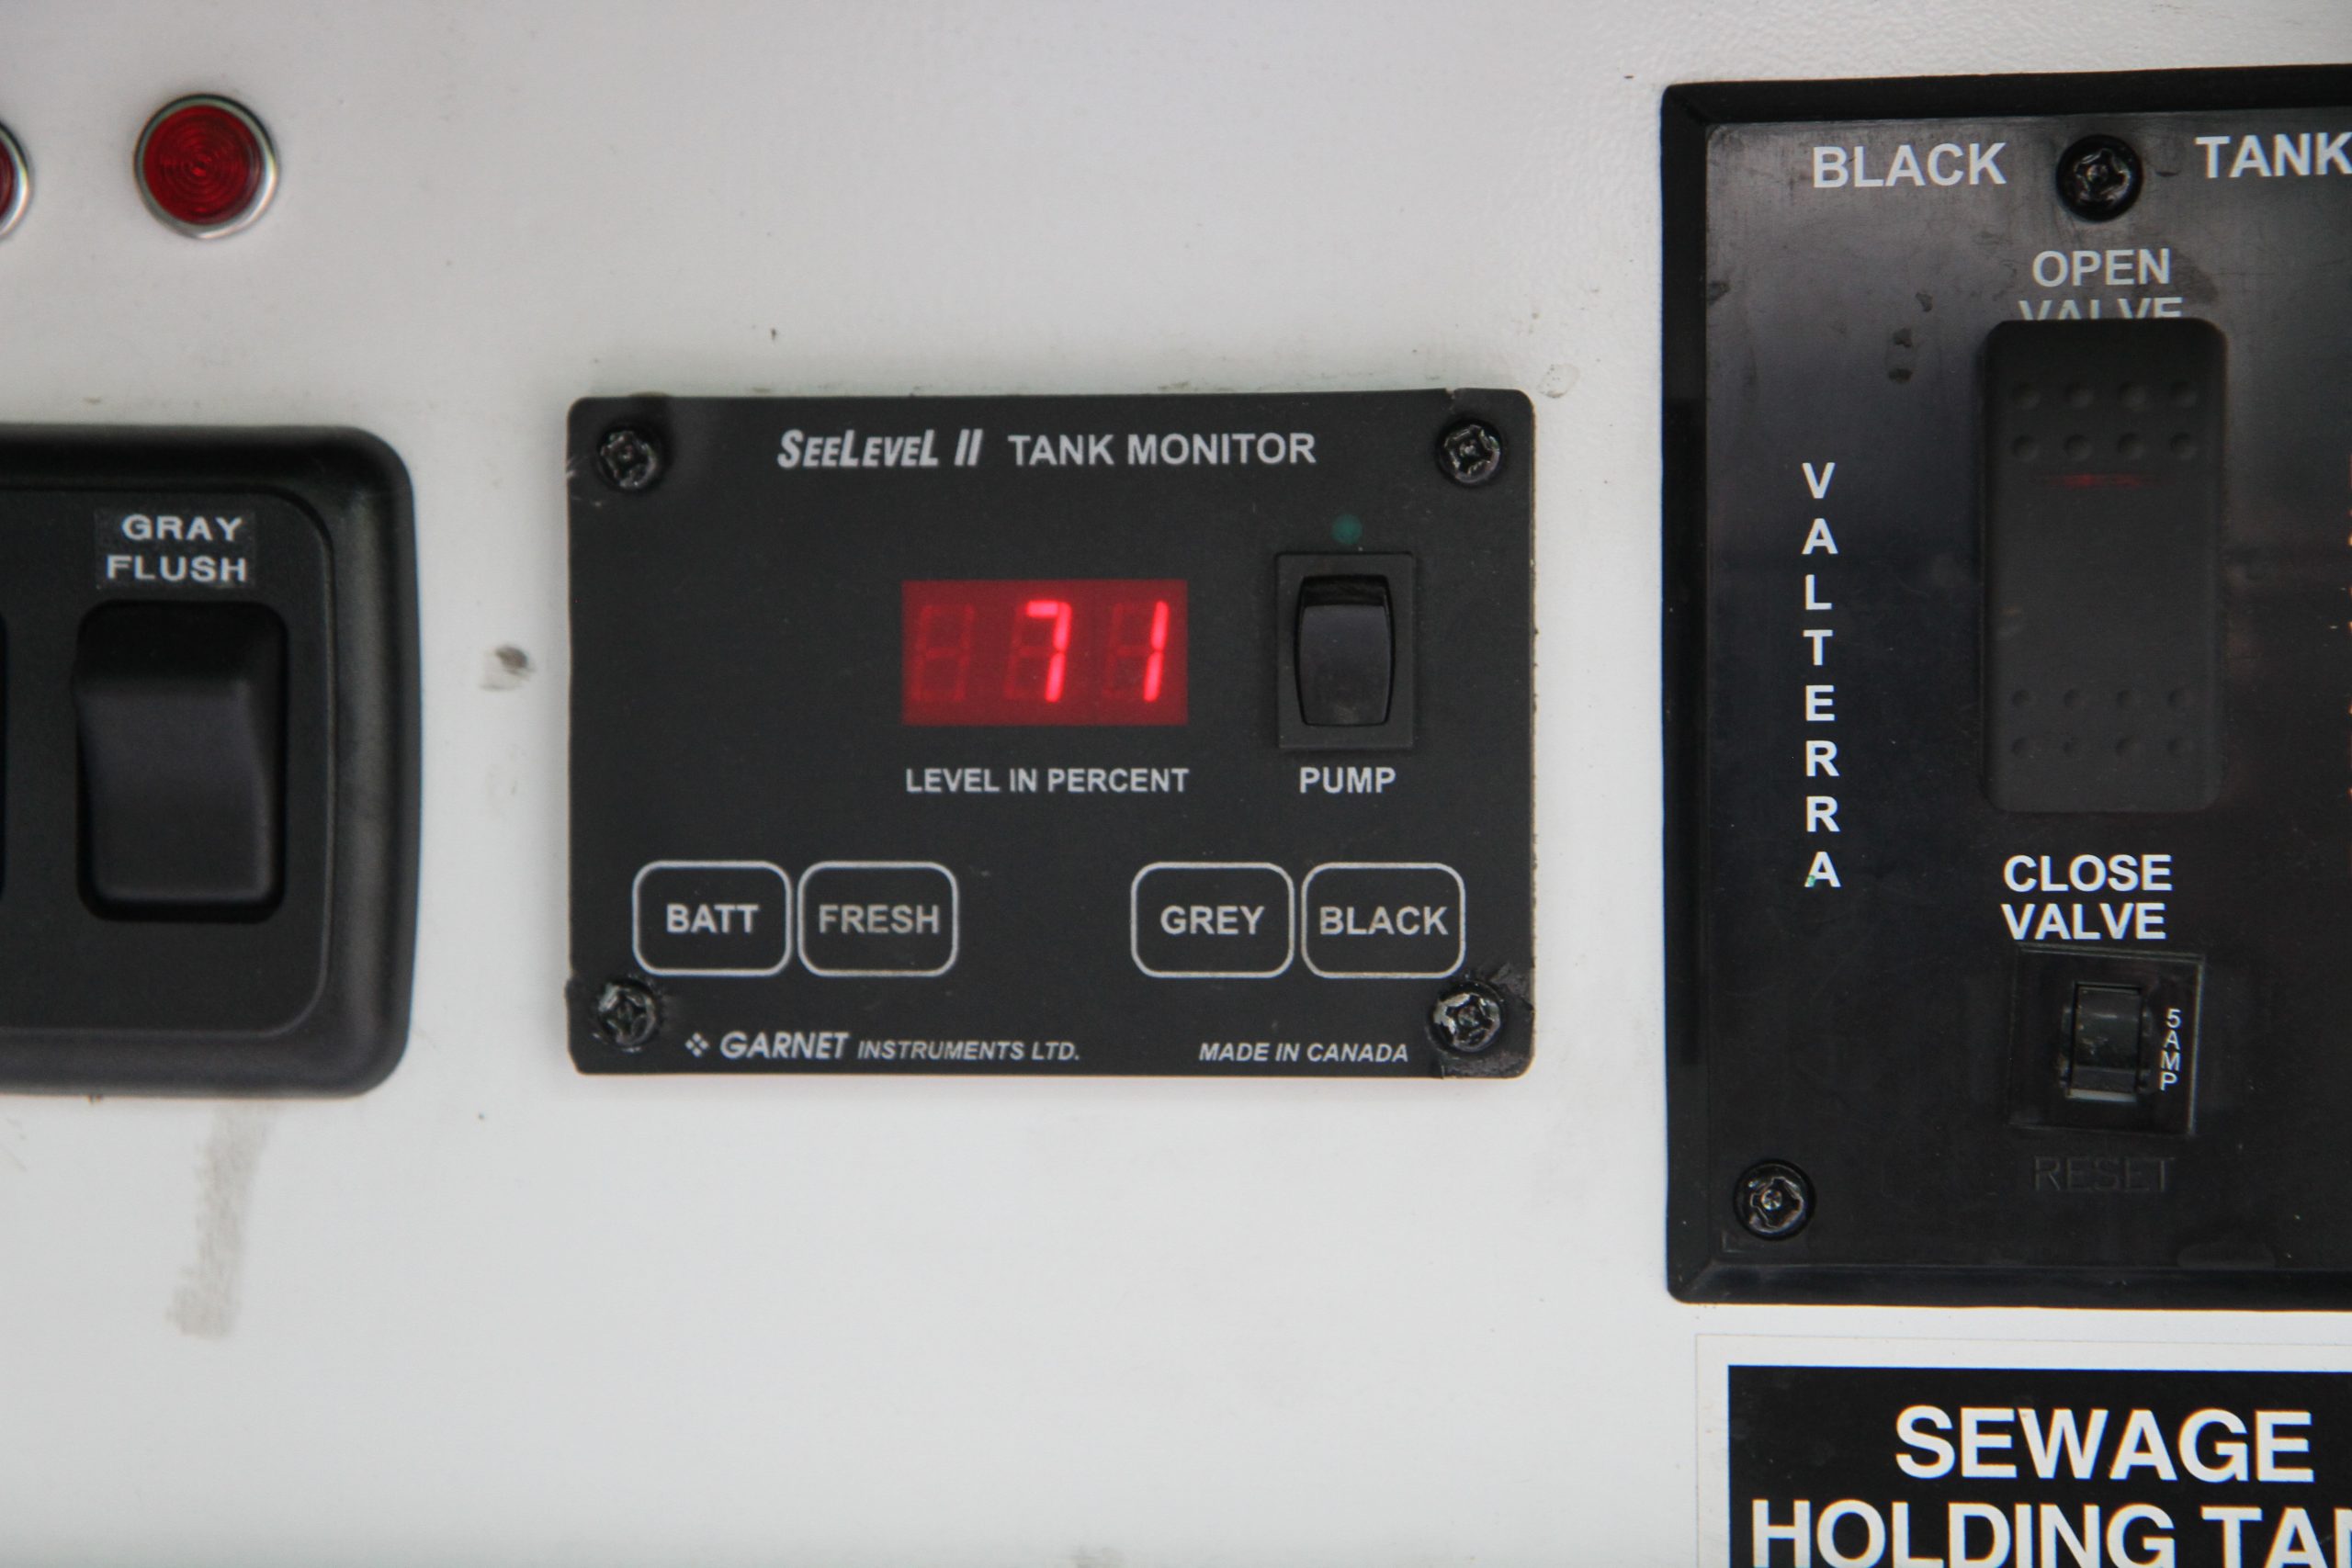
    The SeeLevel system uses digital sensors that are externally mounted to the tank and displays the levels in 2% increments on a digital display within the coach.

    A second SeeLevel display panel can be mounted in the wet bay to monitor tank levels when draining or filling the tanks.

    In addition, the external mount prevented the sensor from fouling. The only time an errant reading was displayed was if the inside tank wall was seriously caked up and needed a major cleaning. The display panel inside the coach was a digital display that reported in actual percentages, usually with 2-4% accuracy. The displays were available in multiple configurations that could cover the LP tank level if needed as well as switches for water pumps. Multiple displays meant you could have one display inside the coach with a second display in the wet bay. Eventually this sensor technology also found its way into the multiplex wiring systems, such as Firefly’s VegaTouch system, so that it could be displayed on their central touch screen panel.

    National-Indoor-RV-Centers-blog-RV-sanitation-systems-motorhome-sewer-tanks

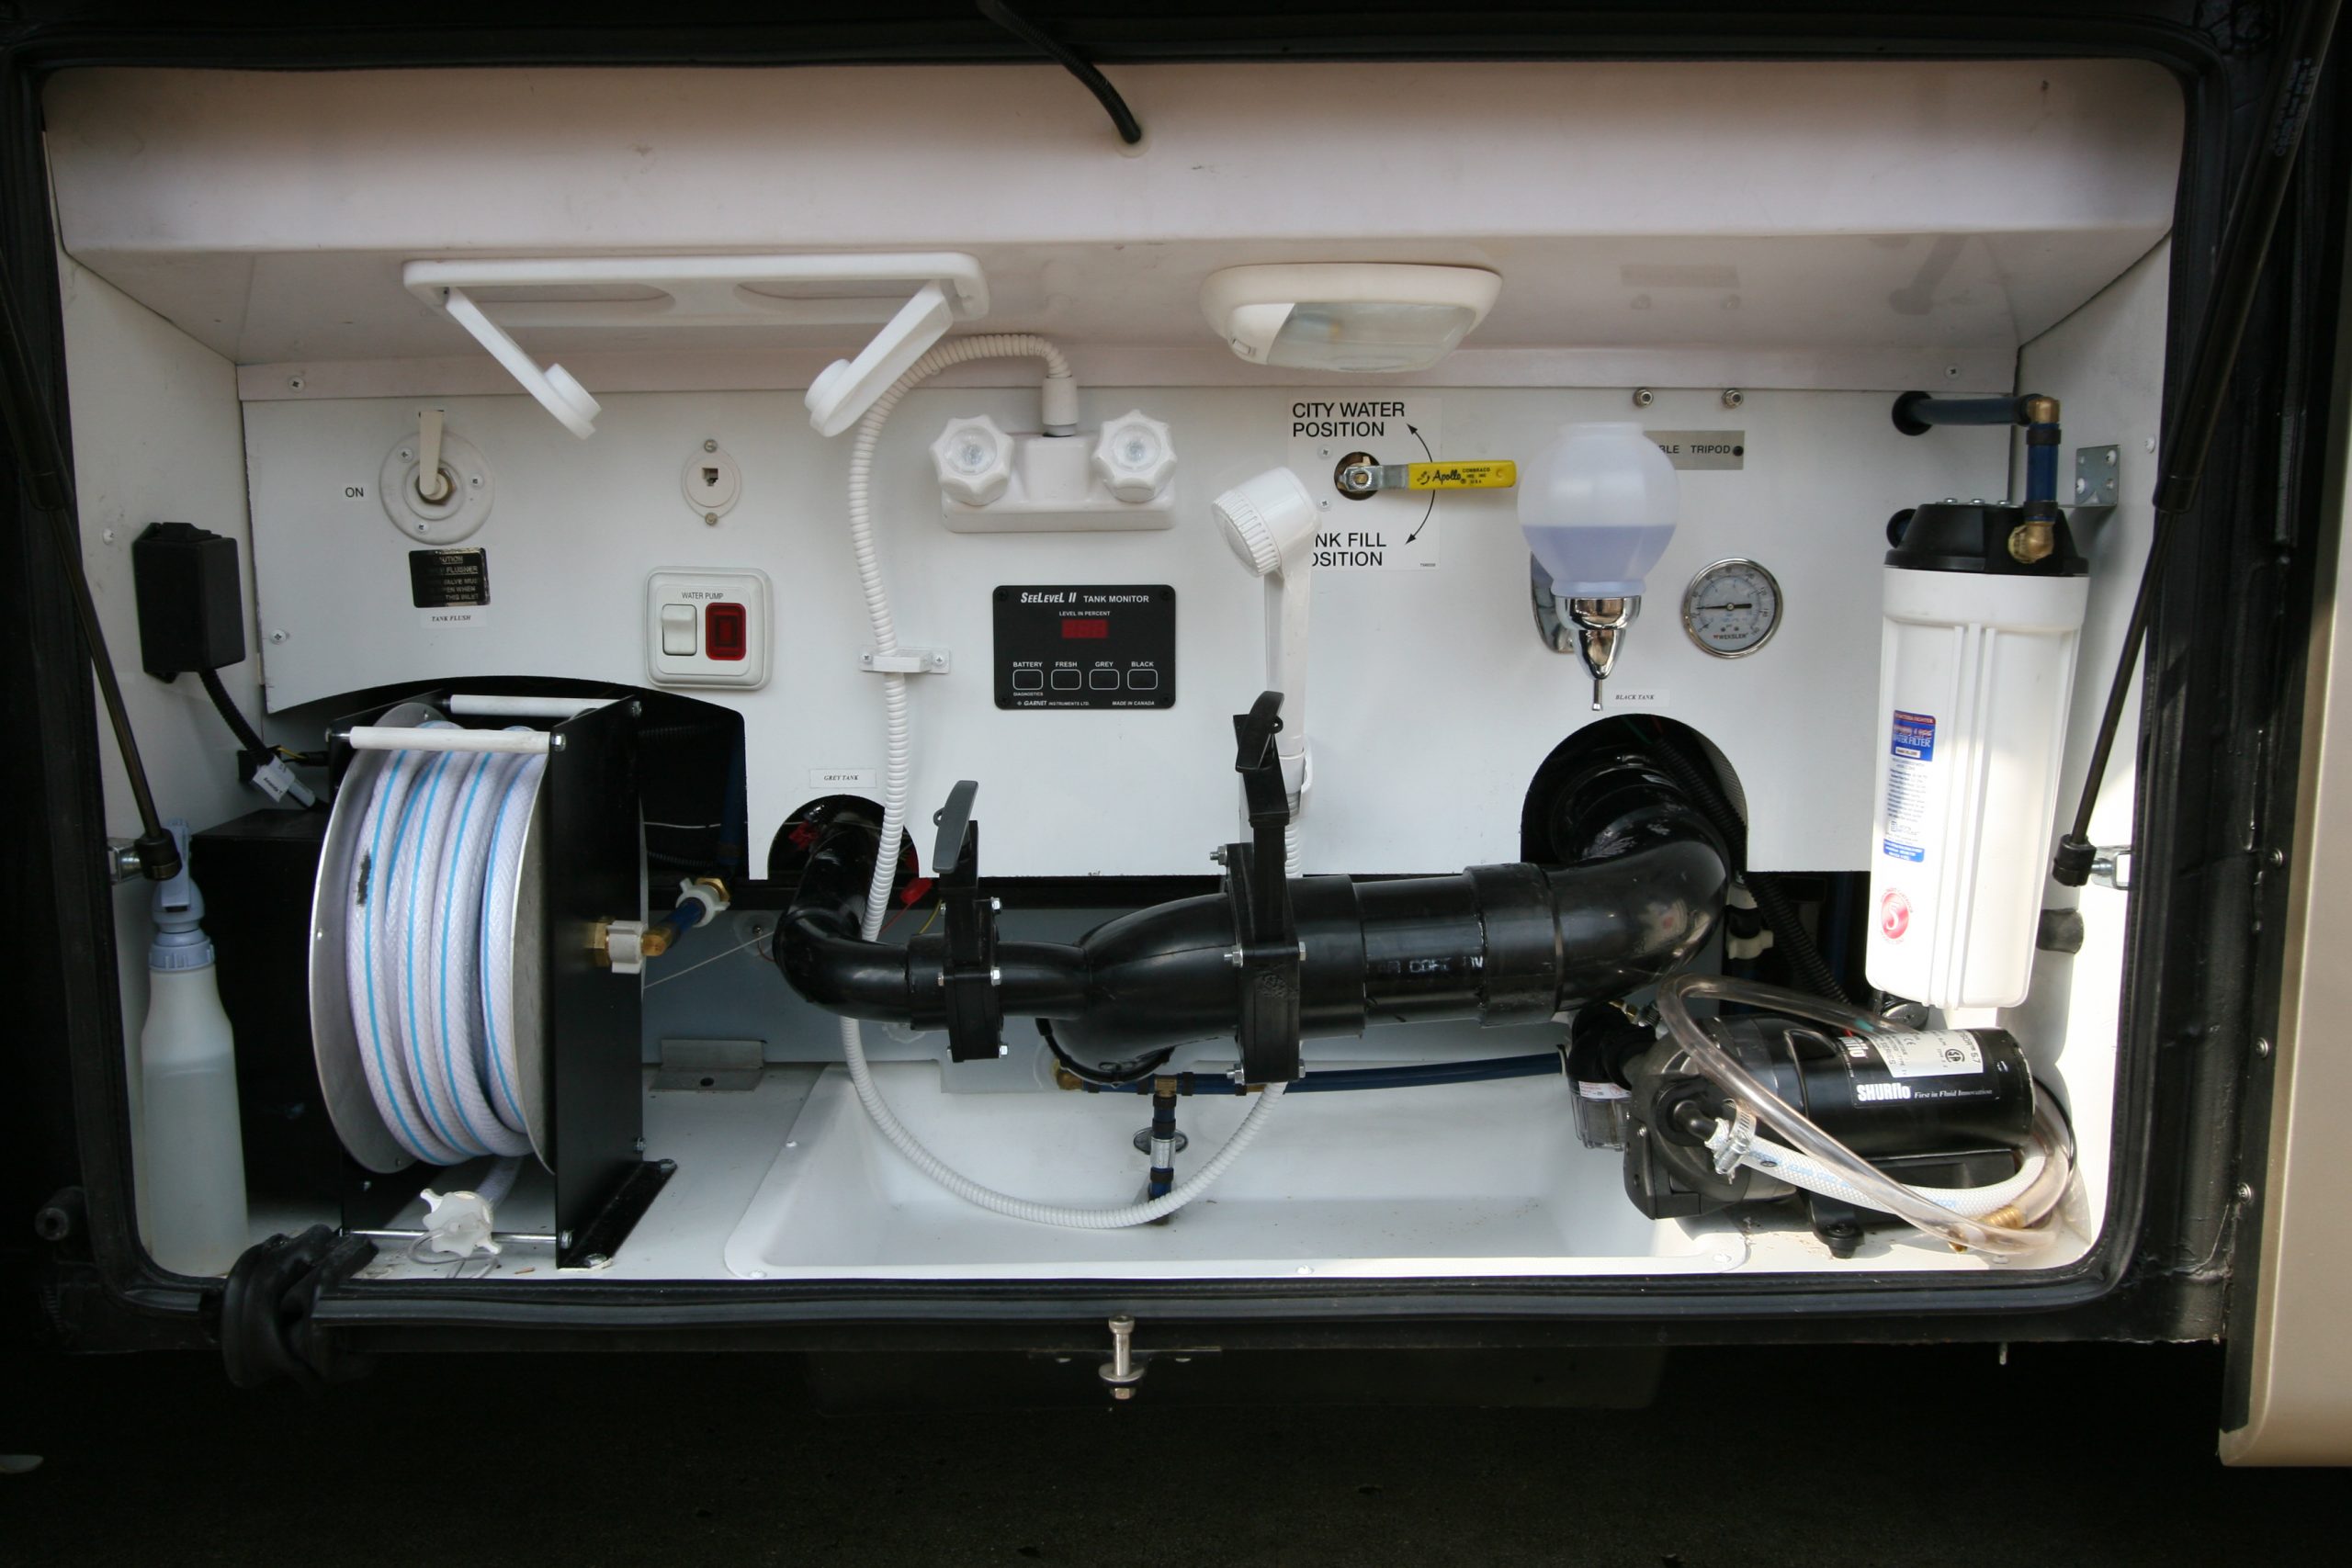
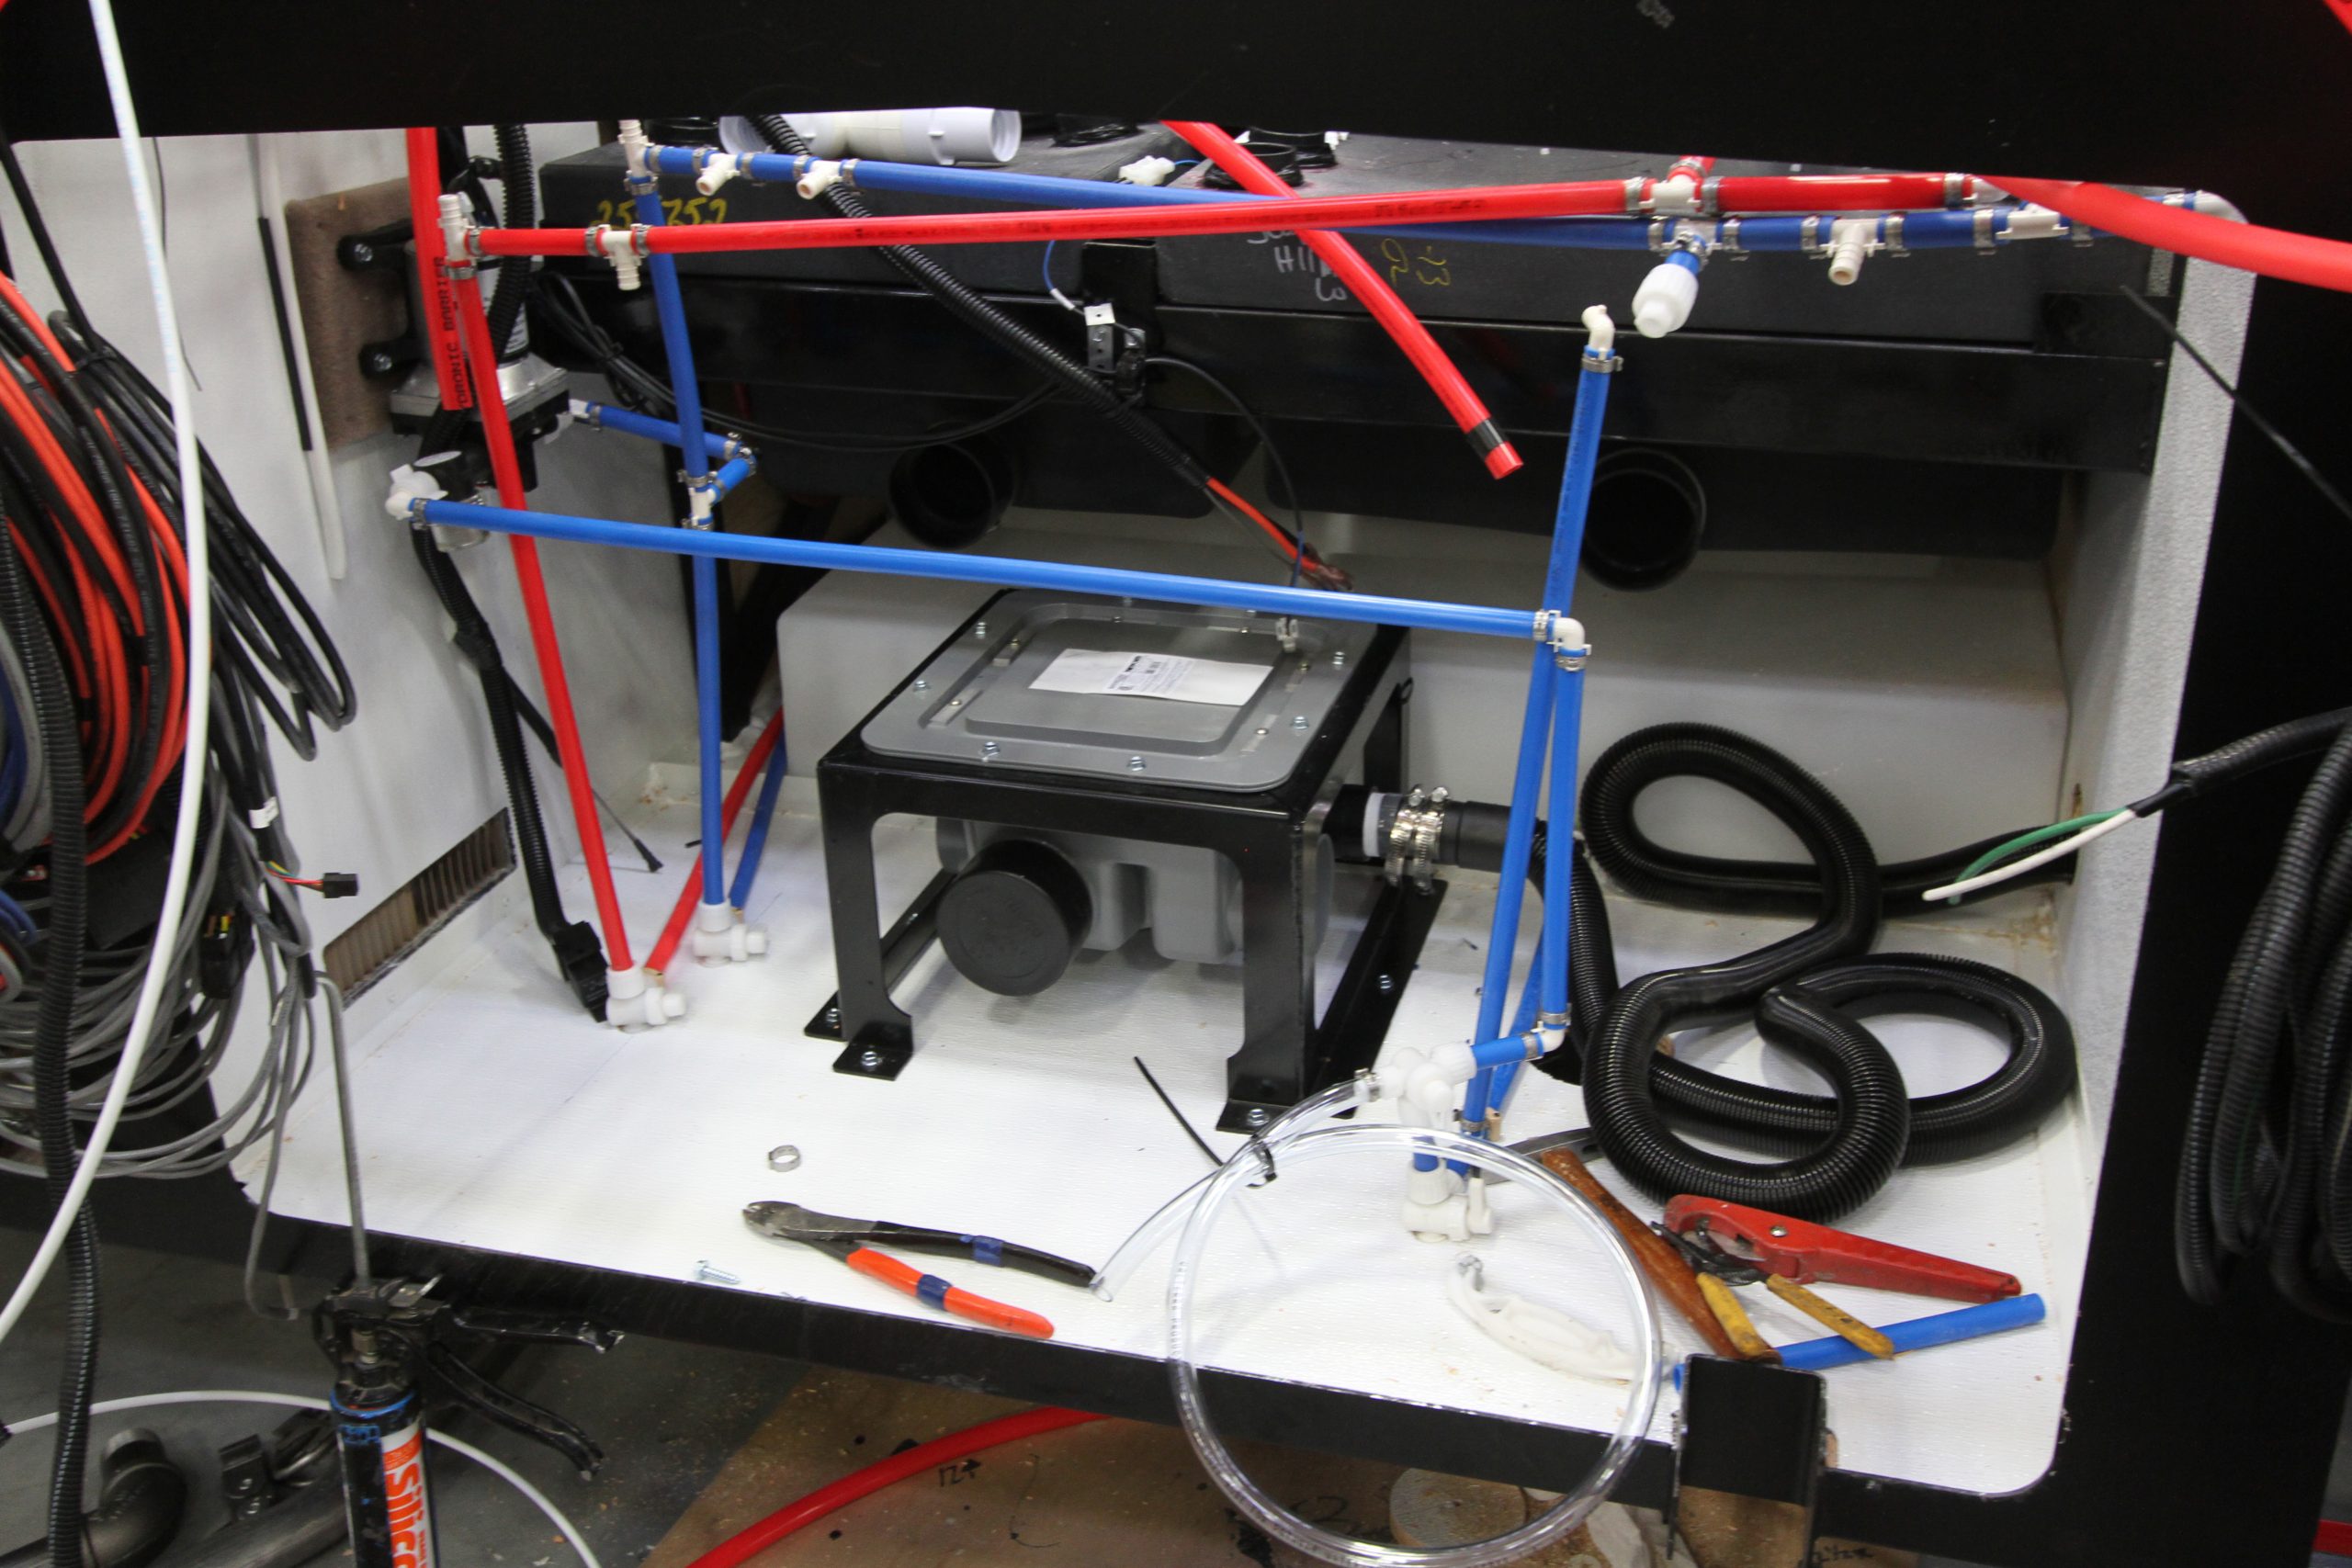
    Typical basement wet bay from my Allegro Bus, showing water filter, hose reel, dump valves, water pump and all valves and controls.

    RV Toilets

    While sinks, showers, dishwashers and laundry centers aren’t that much different than what you would find in a sticks and bricks home, the toilets used in an RV are markedly different. A residential toilet has a large water closet that acts as a storage tank for clean flush water. It also has a trap that fills with water to prevent any sewer gas from backing up into the home. When you press the flush lever the tank water runs into the bowel with a vengeance, rinsing the bowl and using gravity to flush the water down into the sewer. The tank then refills with water to be ready for the next flush. An RV needs to conserve water because both the freshwater and holding tanks are limited in size, so a different design is used. In most cases an RV toilet consists of a blade valve that is kept closed except when flushing. These gravity dump toilets are placed directly over the black water holding tank. The blade valve is either operated manually via a foot pedal or electrically via a wall mounted switch. When you activate the flush mechanism, the blade valve opens to allow the waste to fall into the tank below and a measured amount of flush water is expelled to rinses the bowl and provide some water to the holding tank to prevent the waste from drying out.

    National-Indoor-RV-Centers-blog-RV-sanitation-systems-motorhome-sewer-tanks

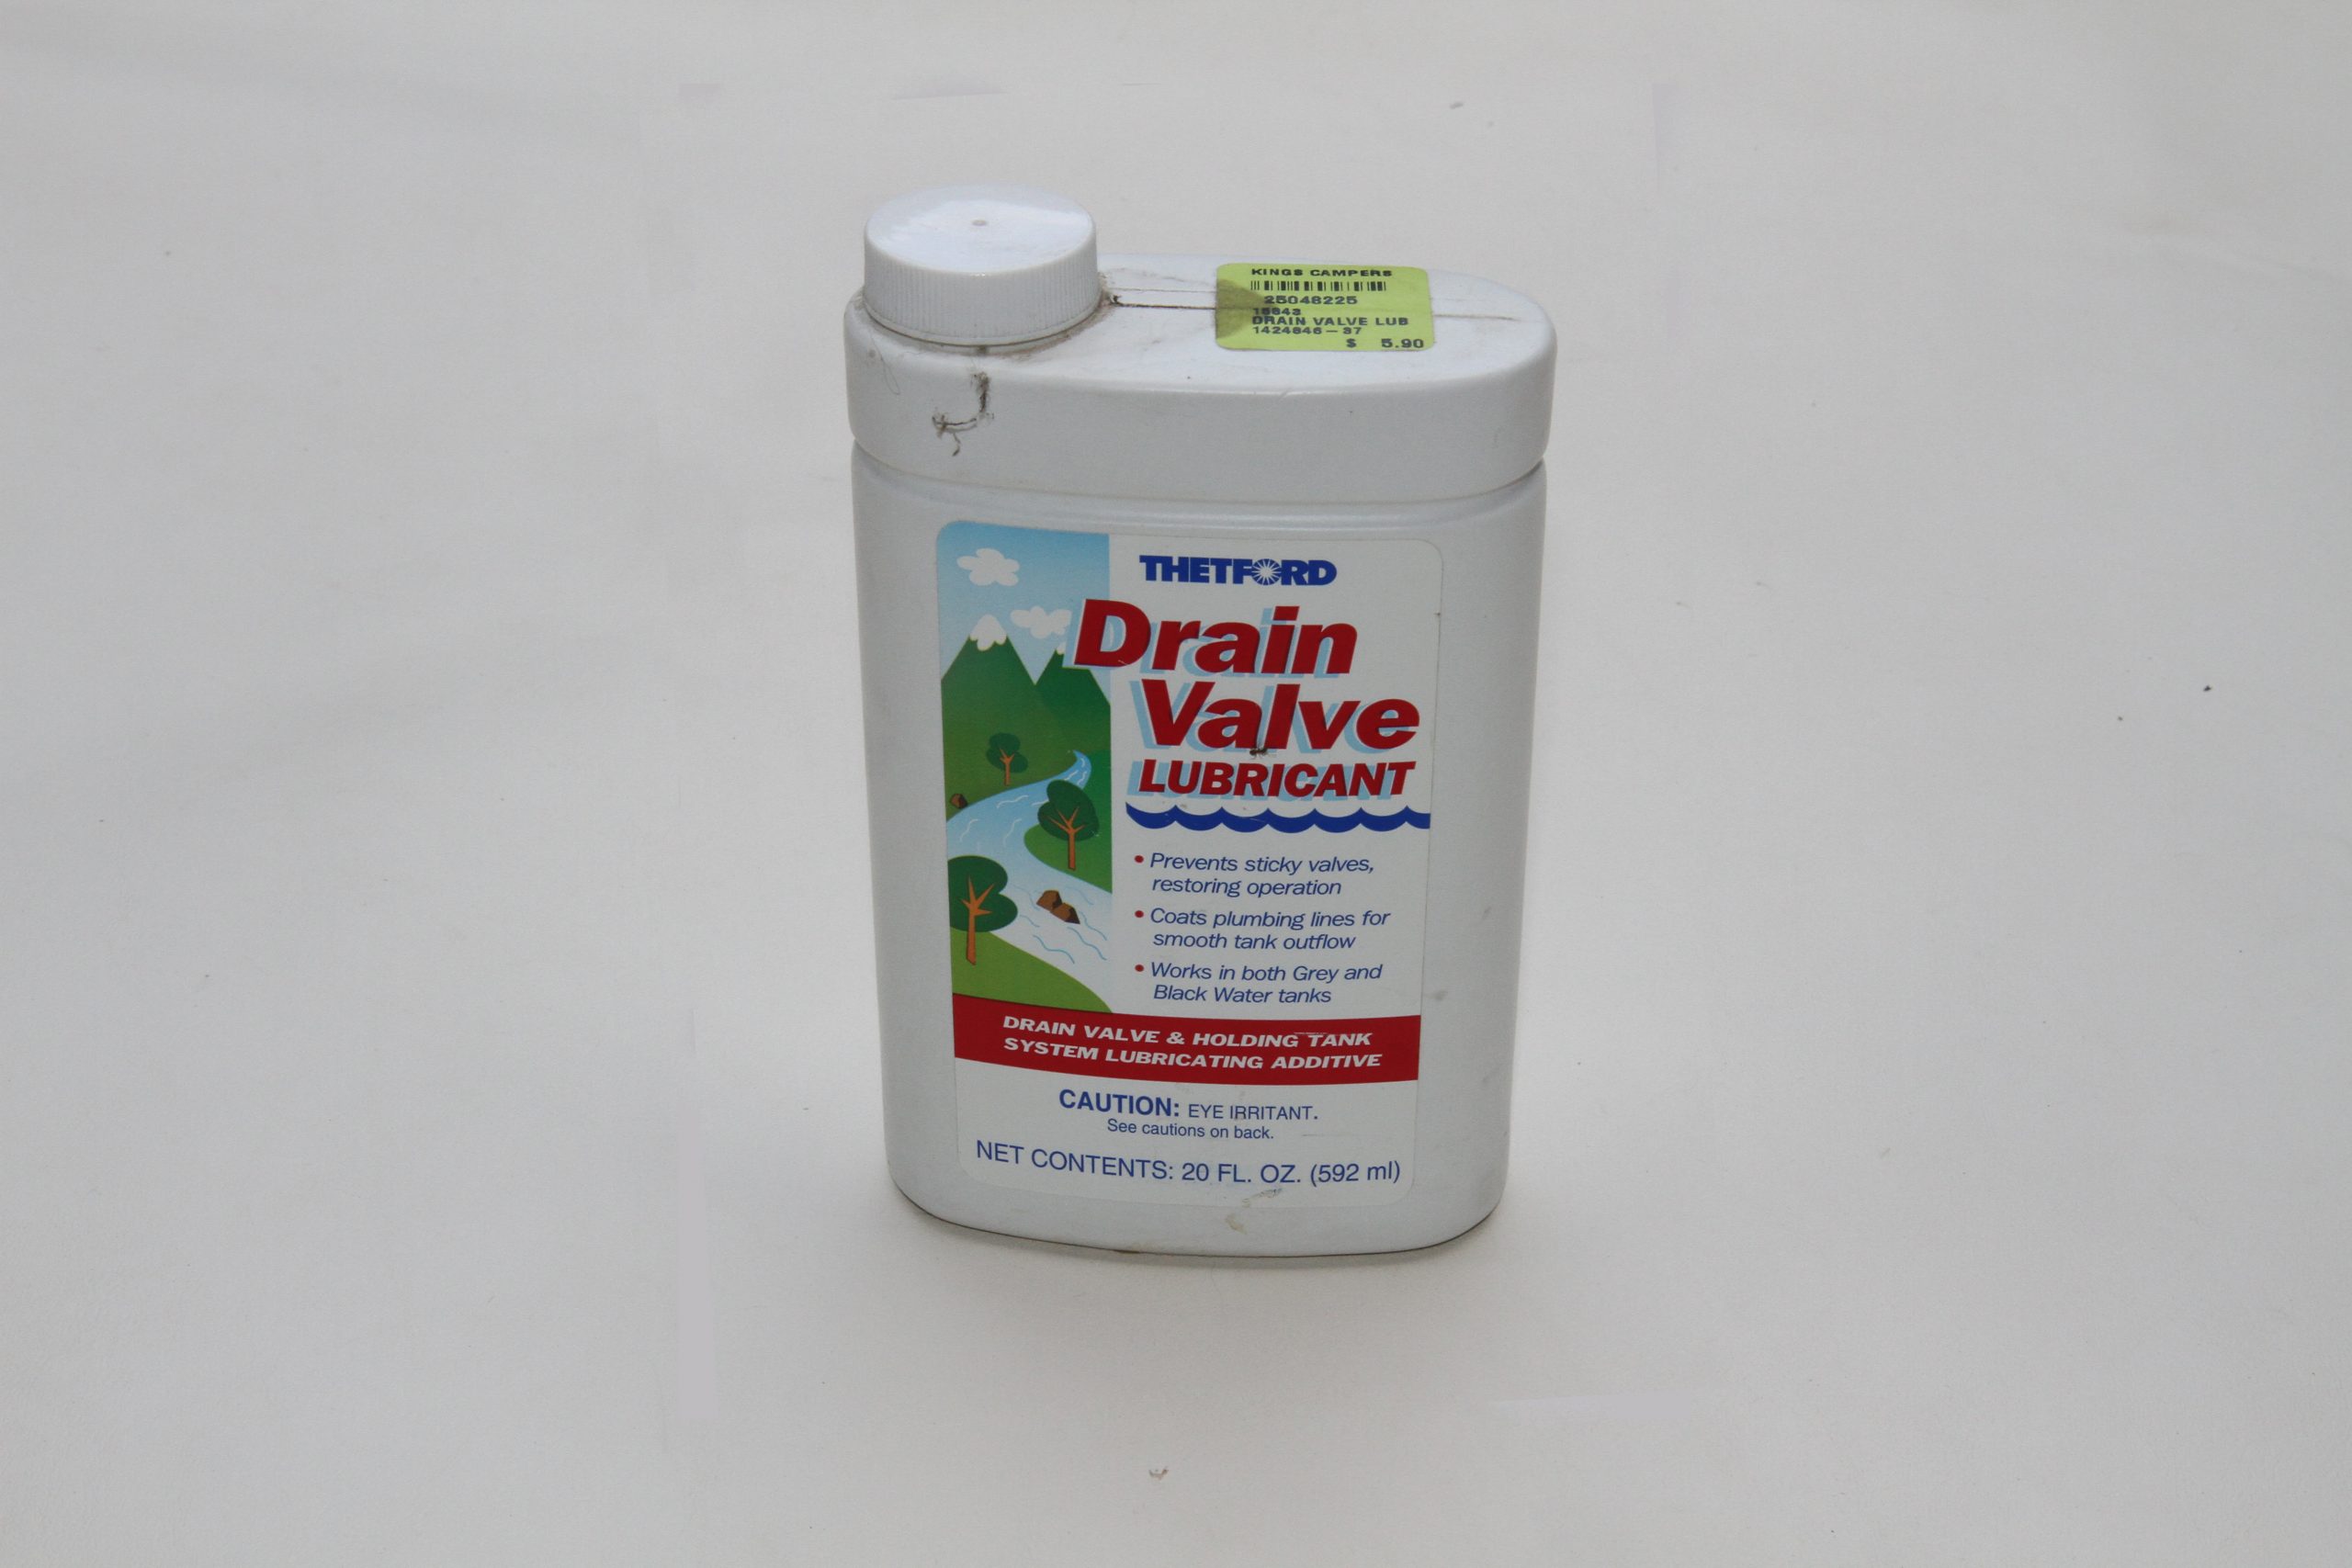
    If the dump valve blades get sticky a drain valve lubricant can be added to the tank to help free it up.

    In some cases, it’s not possible to locate the toilet directly over the black tank. This is especially true when your coach has a 1.5 bath floorplan with one toilet midship and another in the rear bath. In that case, a macerator toilet is used. A macerator toilet uses a motorized grinder to grind the waste up and pump it to the black tank regardless of where the tank is located. Instead of a blade valve, this style does use a small trap filled with water. When you push the flush button, the bowl fills with more water and then the macerator kicks in and pumps the waste through a smaller 1-1/4” line to the black holding tank. Then it adds some more water to the bowl. Macerators are necessary when the black tank isn’t located beneath the toilet. The only real disadvantage to them, other than cost, is that they do use more water when flushing than a direct gravity dump toilet, which can be a concern when boondocking with a limited water supply. However, the extra water used helps to keep the solids in the black tank suspended and will keep the tank walls cleaner.

    National-Indoor-RV-Centers-blog-RV-sanitation-systems-motorhome-sewer-tanks

    Macerators use a smaller diameter 1-1/4 to 1-1/2” hose and can pump the waste uphill and for longer distances than a gravity dump 3” sewer connection.

    RV Sewer Hoses and Fittings

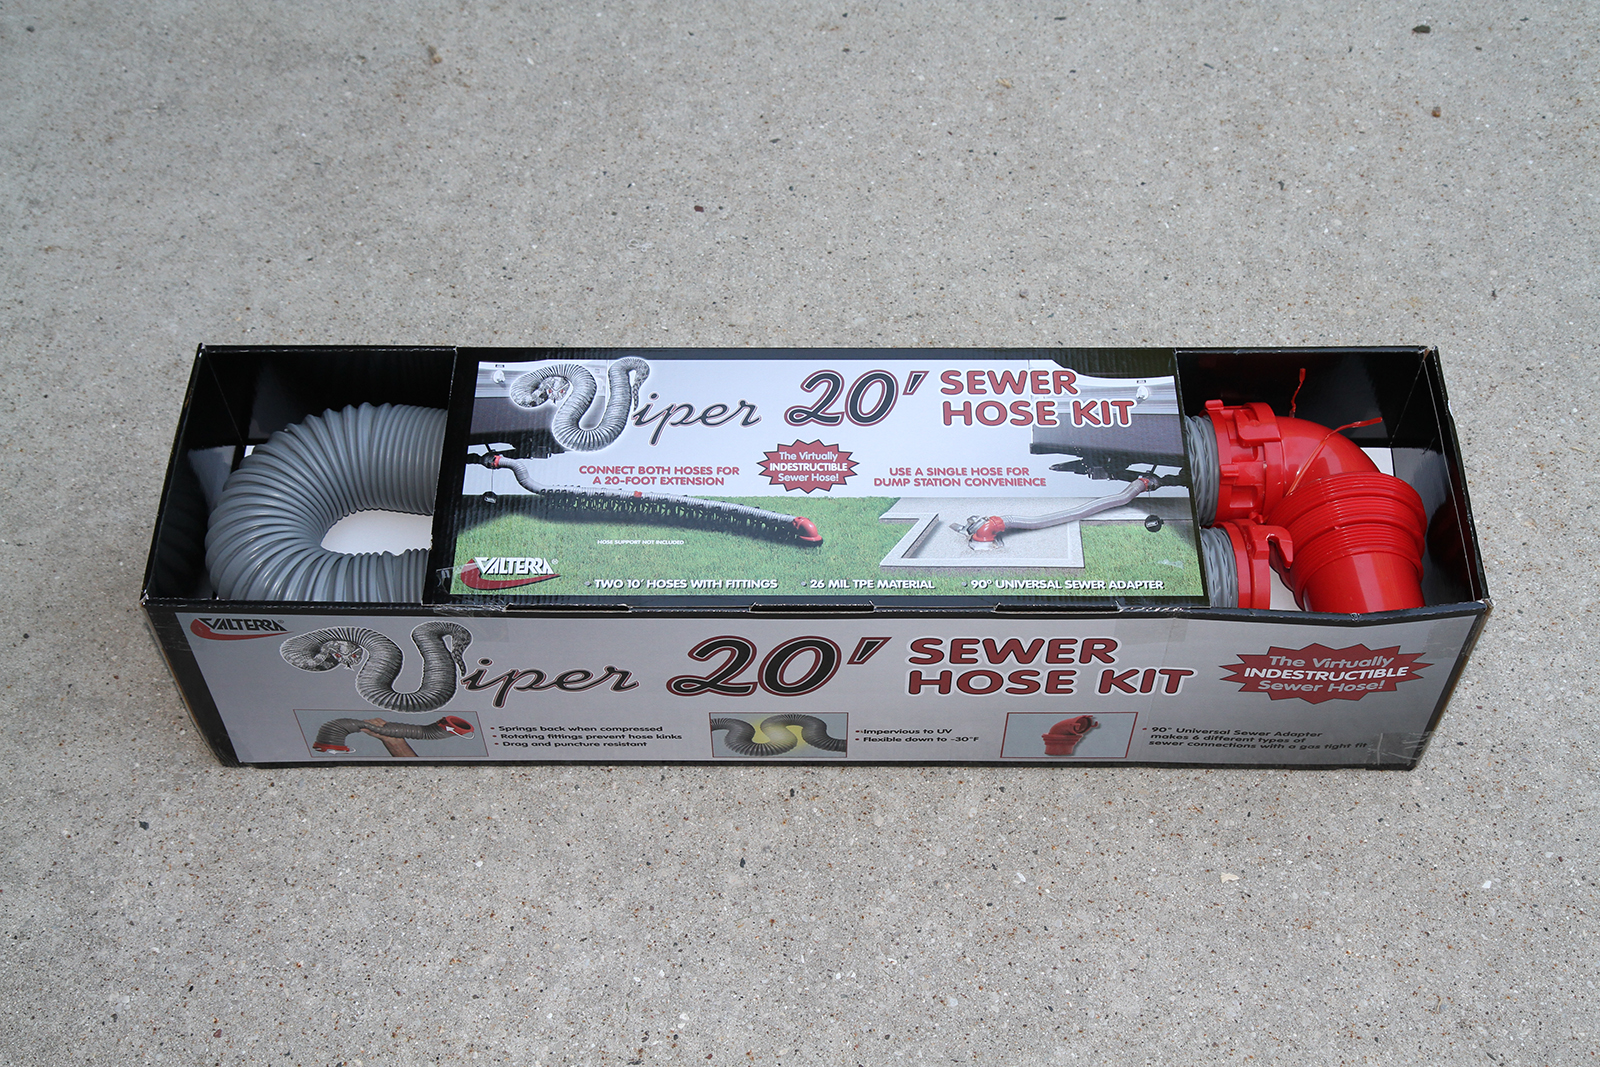
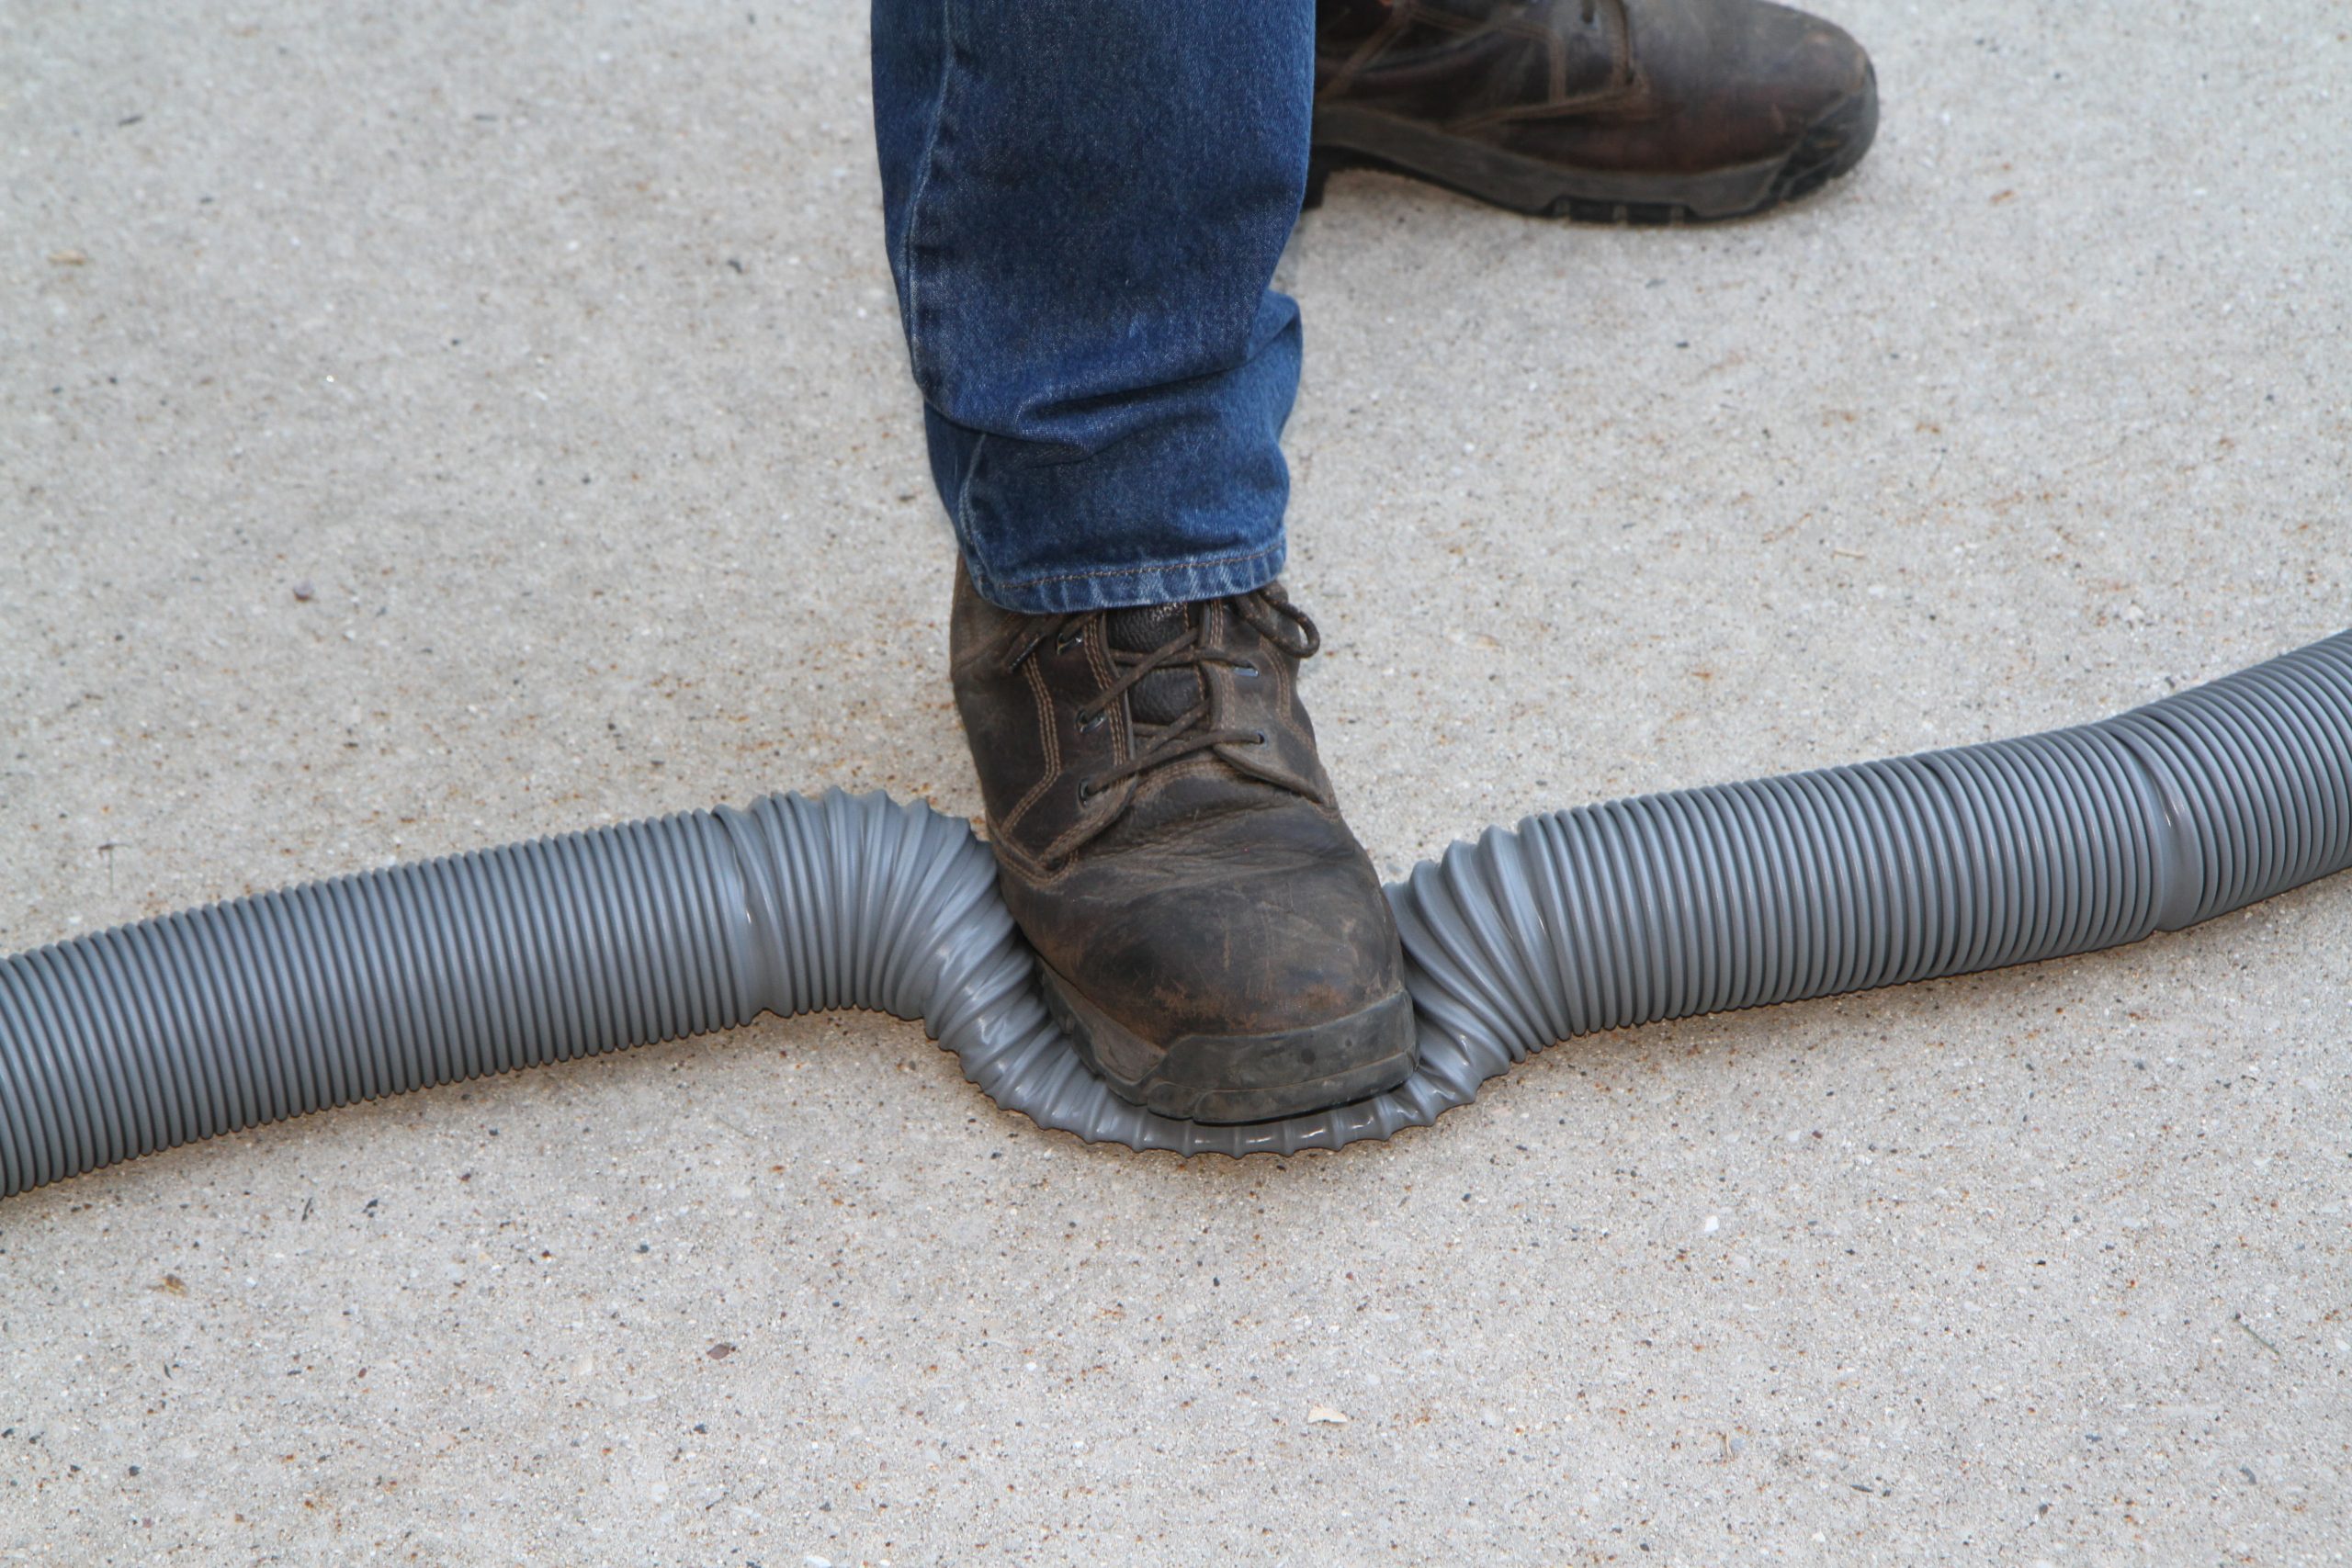
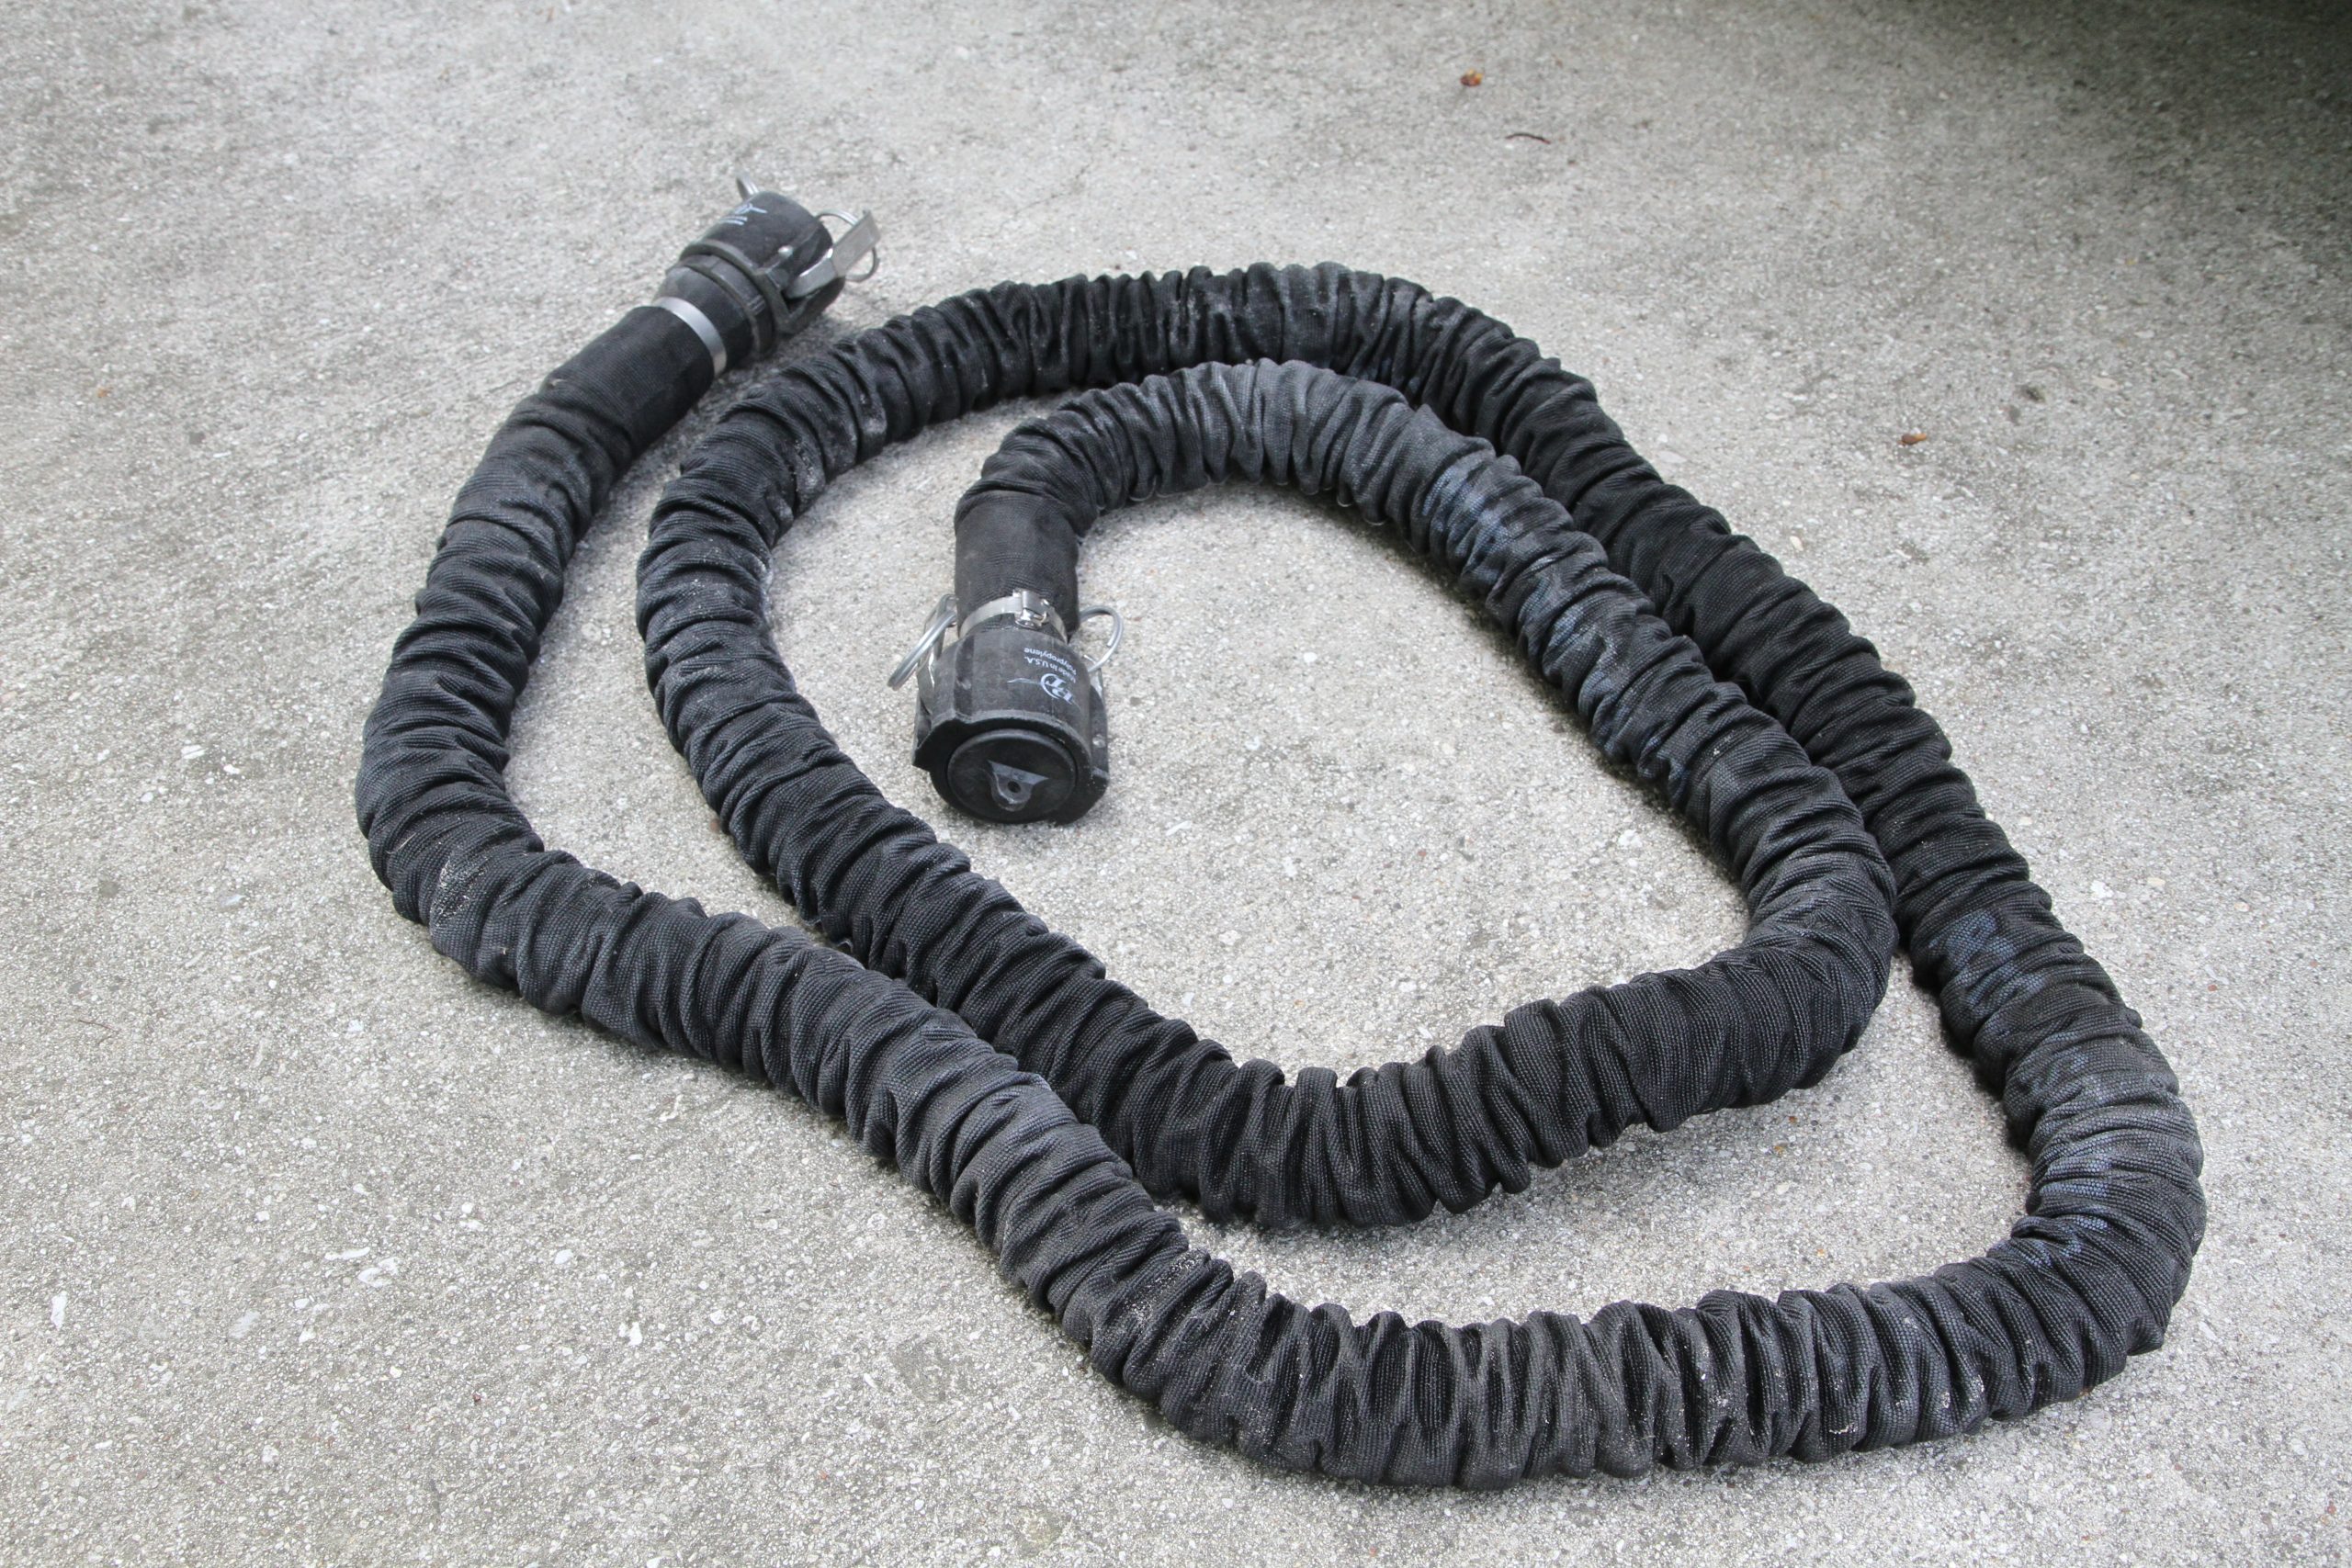
    You need to have a way to transfer the waste from the tanks to a sewer connection or dump station so that requires a sewer hose. Sewer hoses use a common 3” inside diameter hose with an industry standard bayonet connection. These “slinky” hoses are typically vinyl with a spiral wire reinforcement to prevent the hose from collapsing and come in various grades. The cheapest hoses are very thin and won’t last very long. You will develop pinhole leaks, cracks and tears quickly. Upgrading to a heavier vinyl helps but even with the extra heavy-duty hoses, you’ll still have issues. Many motorhome owners have gone with Camco’s Rhino Flex hoses, which are a step up over traditional vinyl hoses. These hoses can hold their shape more easily and are quite a bit stronger. My personal choice is Valterra’s Viper sewer hose. The Viper hose is unique in that it doesn’t uses any helical wire in the hose. The spiral wire used in typical sewer hoses keeps the hose from collapsing but it also leaves a corrugated interior to the hose, which provides restriction when dumping and lots of crannies for waste sediment to pack up inside the hose. This requires additional water to rinse the hose clean. The Viper hose has no wire and the interior is smooth so it rinses clean. You can also step on it to crush it flat and it will bounce right back, unlike a corrugated wire hose which will remain flat and kinked. It also remains flexible at down to -20 degrees Fahrenheit, so it really blows all of the other hoses away.

    National-Indoor-RV-Centers-blog-RV-sanitation-systems-motorhome-sewer-tanks-valterra-viper-sewer-hose-kit
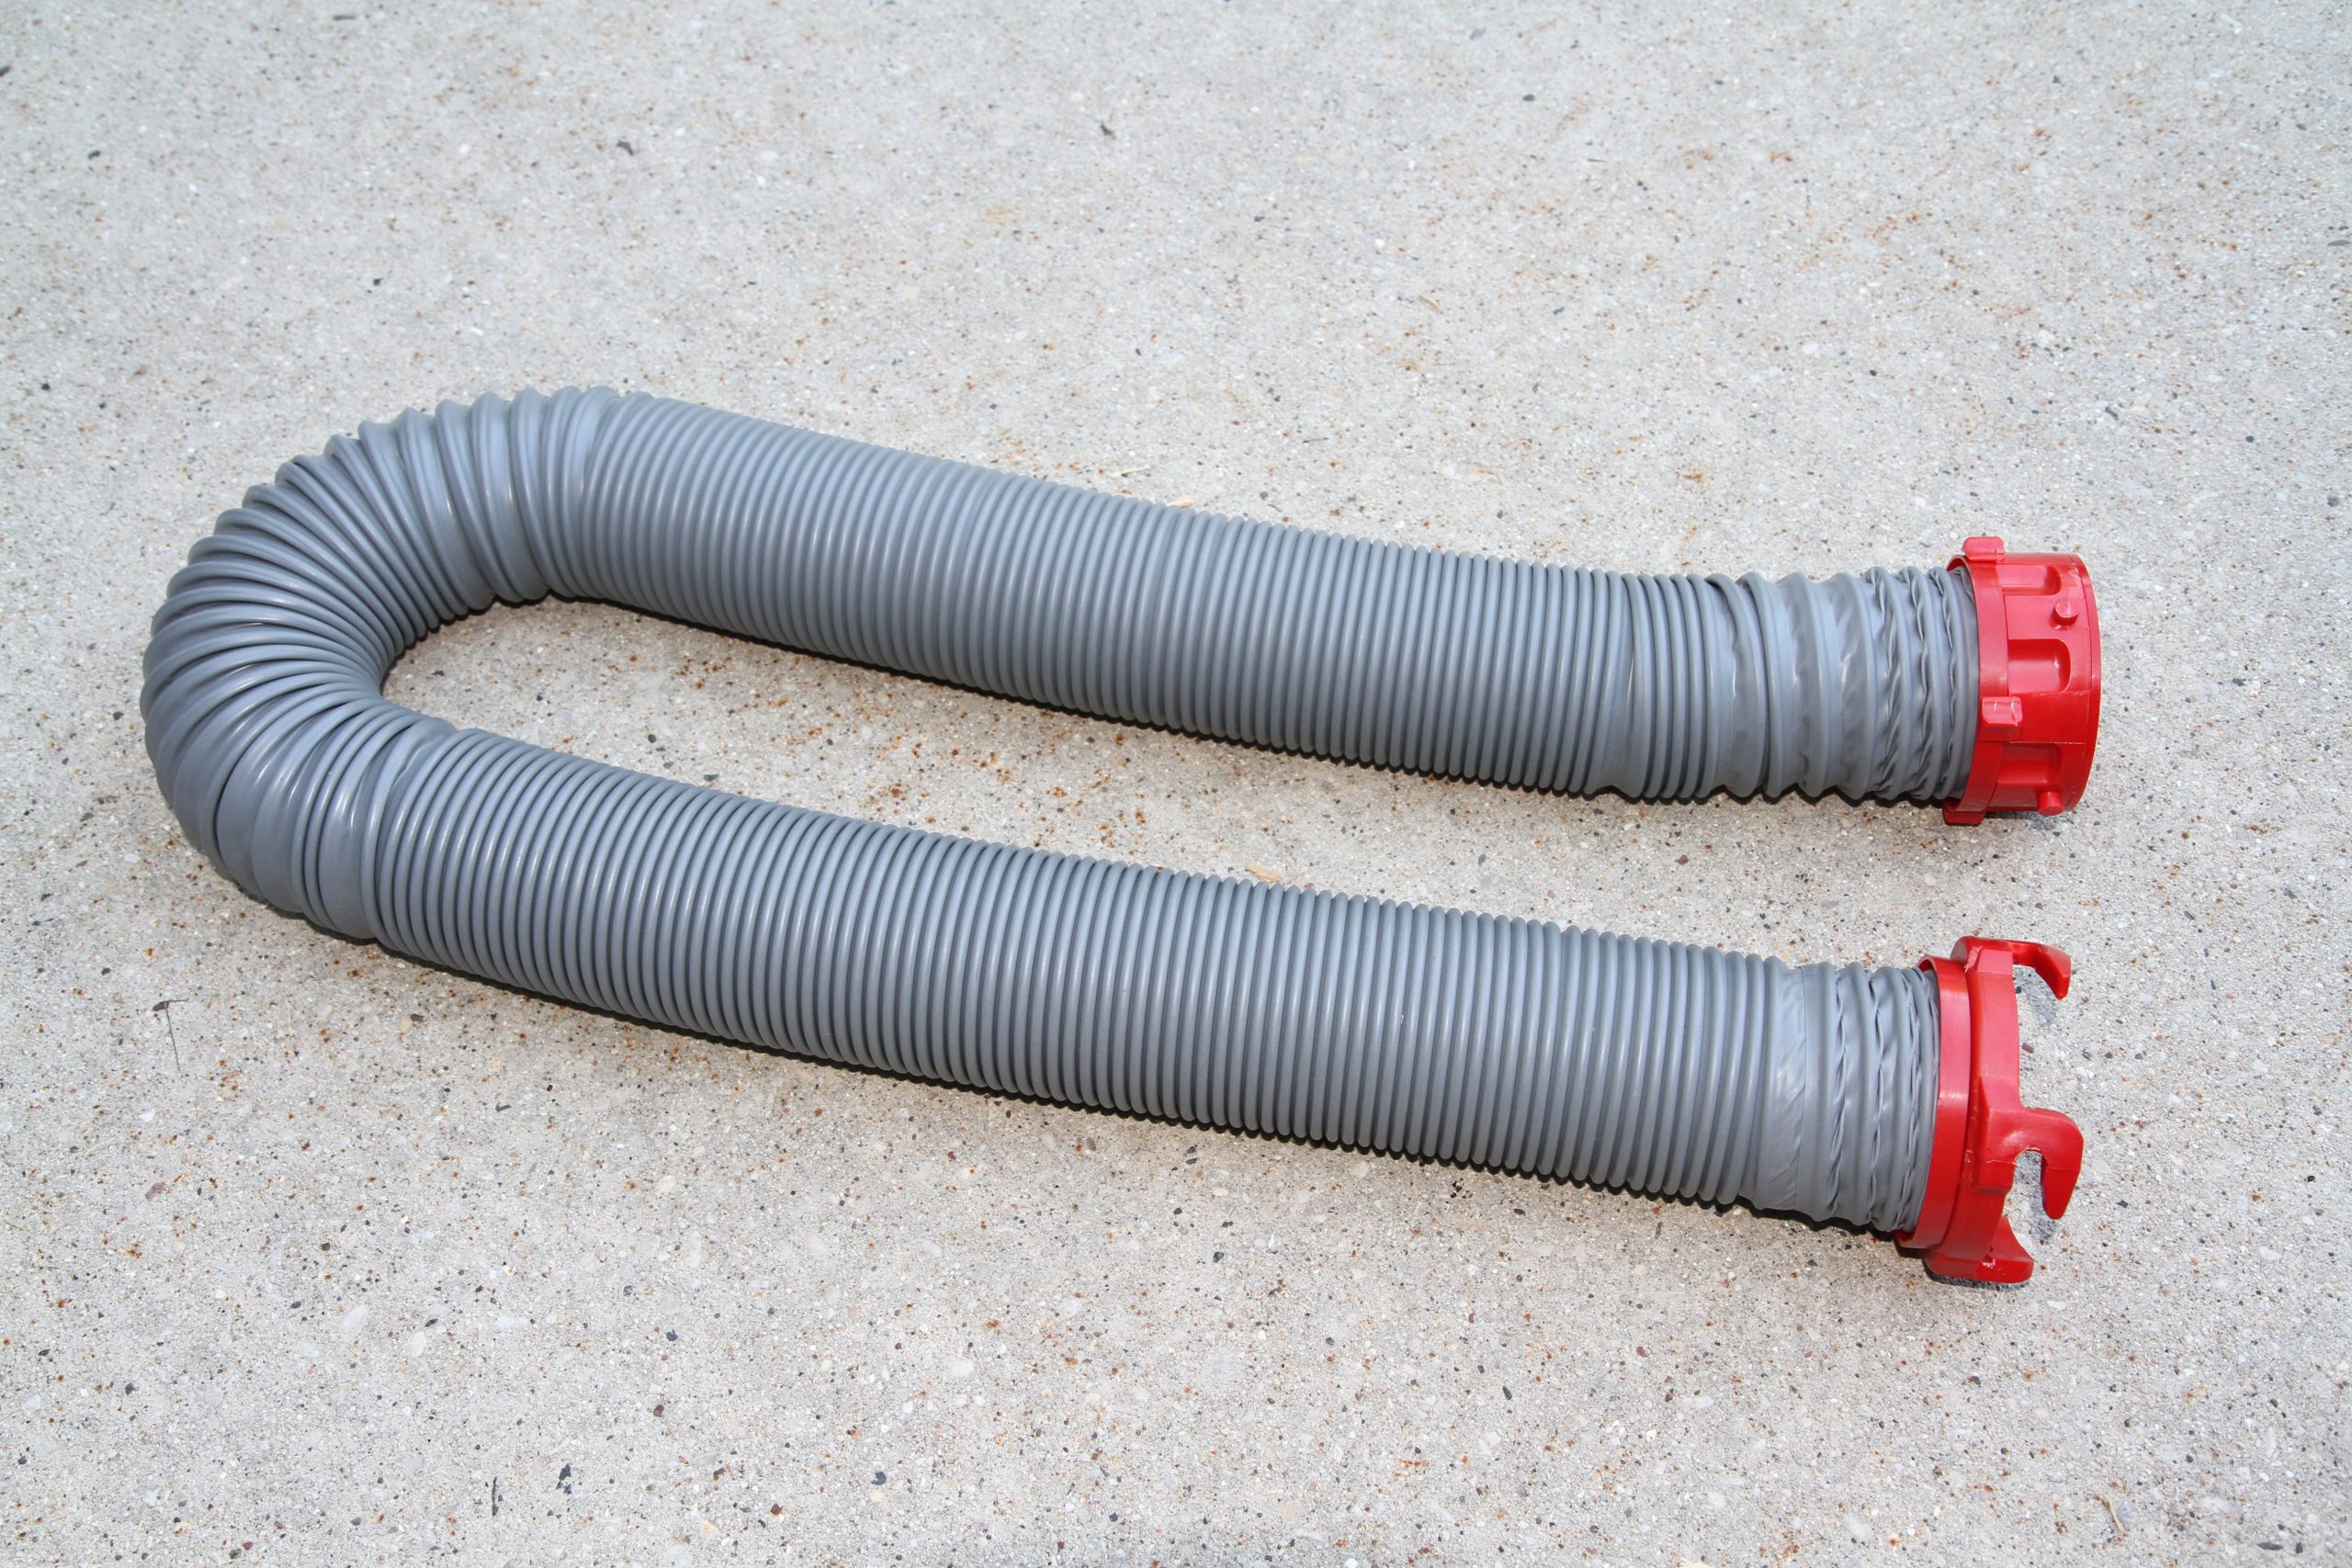
    National-Indoor-RV-Centers-blog-RV-sanitation-systems-motorhome-sewer-tanks-valterra-viper-extension-hose
    National-Indoor-RV-Centers-blog-RV-sanitation-systems-motorhome-sewer-tanks-valterra-viper-RV-sewer-hose

    Sewer hoses, such as this Valterra Viper are available in kits or as individual components.

    A Viper 10’ extension hose.

    The Viper hose has the ability to be crushed, yet return to its original shape.

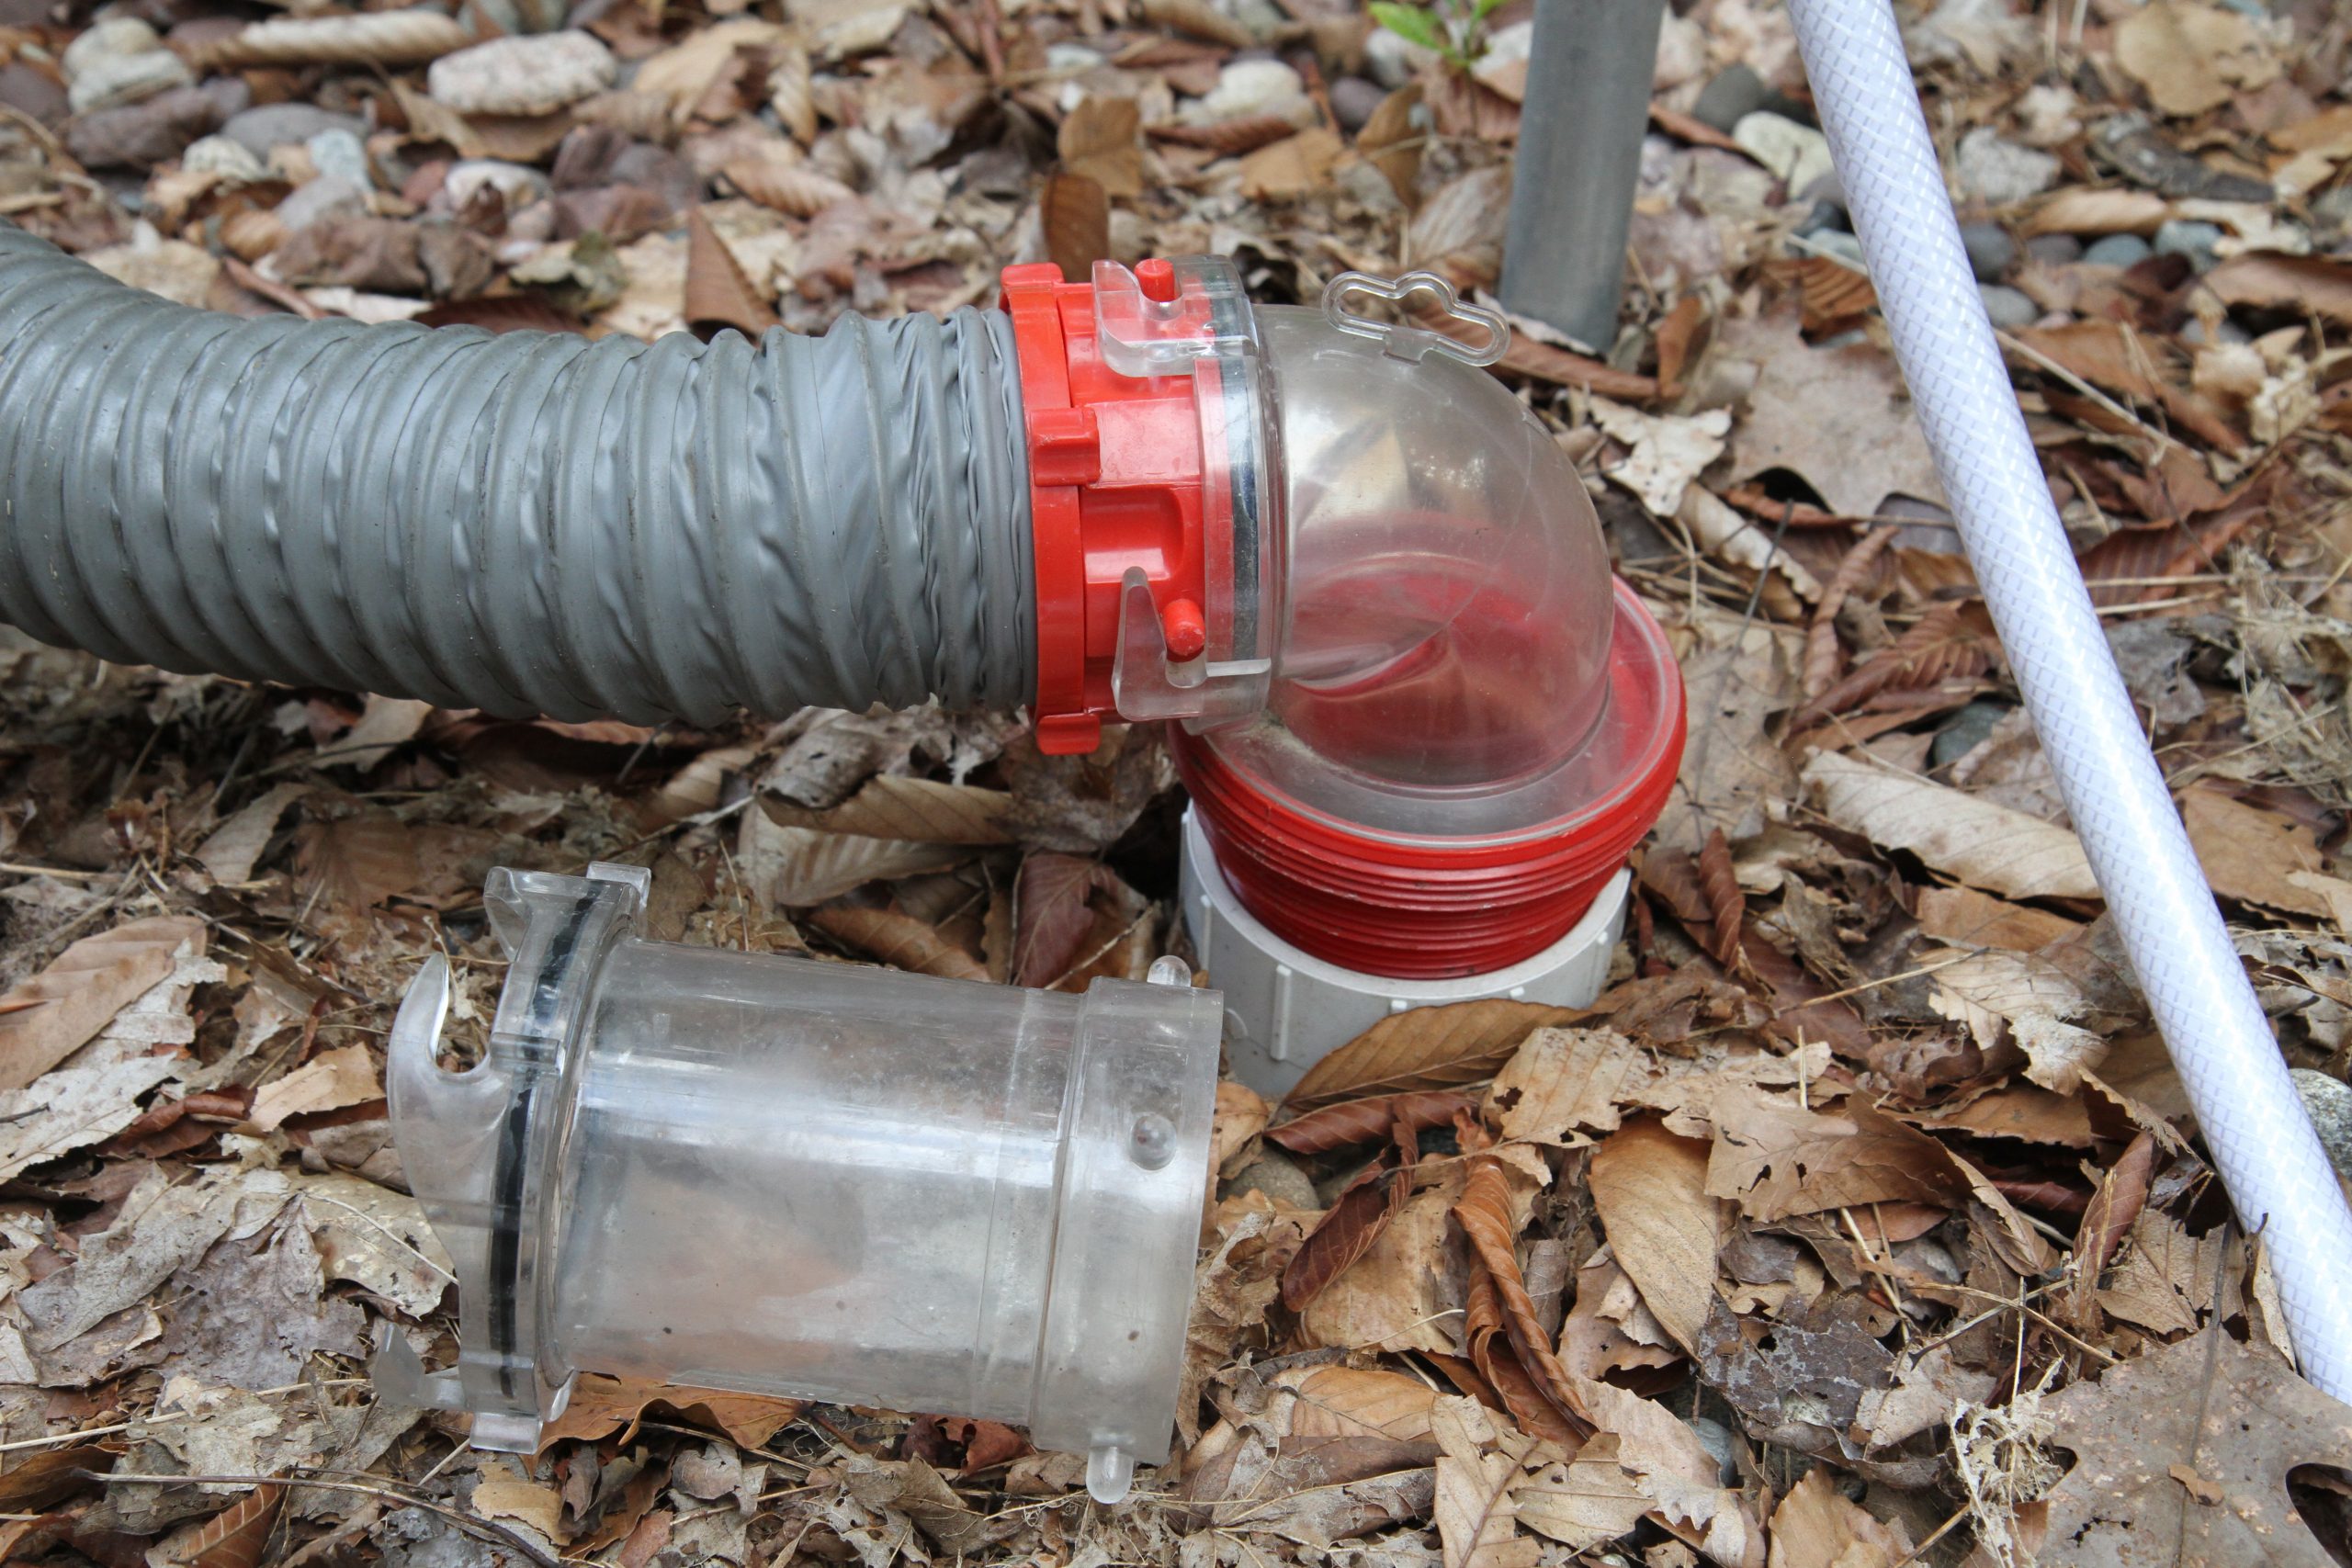
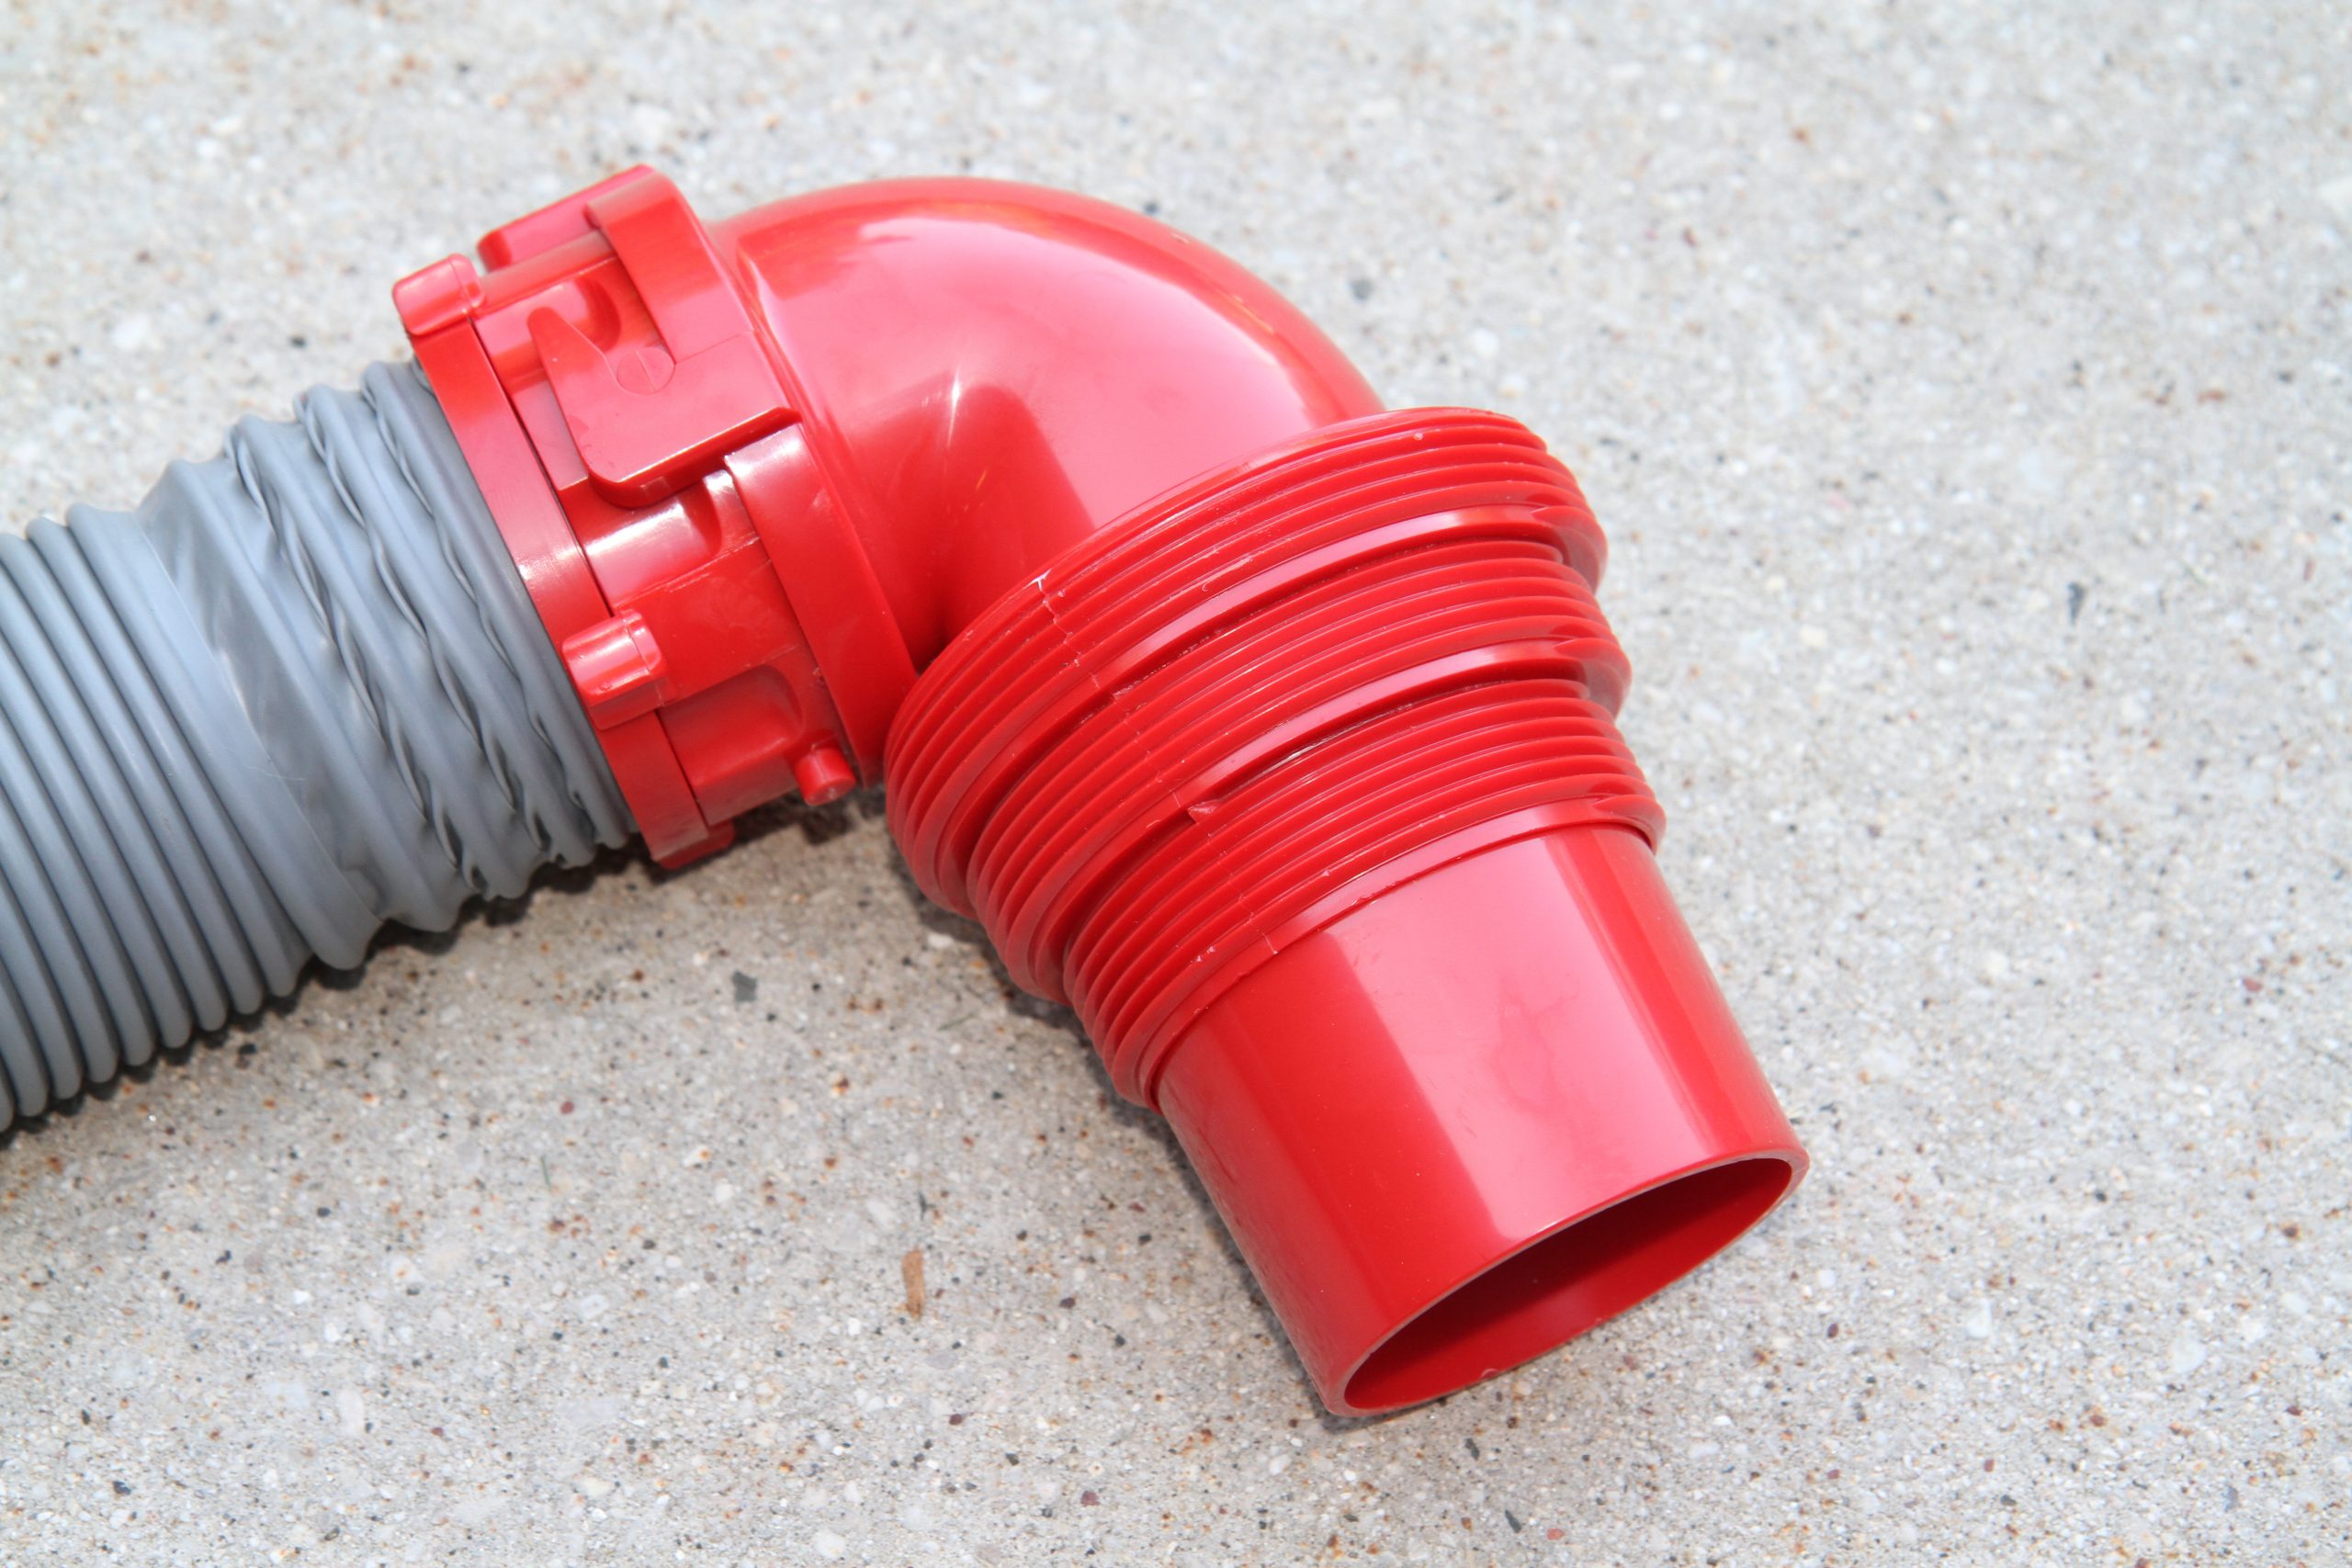
    Sewer hoses have a male and female bayonet connector so you can connect multiple hoses together if you need additional length. They typically are available in either 10’ or 20’ lengths. I prefer to use 10’ lengths because I can always use two to get to 20’ if I need the extra reach. Plus, I keep a third hose on hand in case I ever have a failure. Various fittings are available to connect to a sewer connection. A campground sewer connection may be as simple as a bare pipe sticking out of the ground or it can be a PVC pipe with either 3” or 4” pipe threads. The most common connector for any RV is a 90-degree elbow with a female bayonet connector to connect to your sewer hose and a long snout to insert into the sewer. Most have a slide-on threaded adaptor that is molded onto the snout. This adaptor has both 3” and 4” male pipe thread so that it can fit either size sewer pipe. If you find you are at a site with a bare unthreaded pipe, you can slide a rubber or silicone donut over the pipe. This will allow you to press the elbow into the unthreaded pipe when necessary. It’s also typically used at a dump station, where the sewer pipe is generally just a hole in the concrete pad. These elbows can also be found in clear plastic so that you can monitor the color of your waste. This is helpful when you are rinsing your black tank and want to know when it is clean. Clear pipes that can be inserted in line with the hose are also available.

    National-Indoor-RV-Centers-blog-RV-sanitation-systems-motorhome-sewer-tanks
    National-Indoor-RV-Centers-blog-RV-sanitation-systems-motorhome-sewer-tanks-90-degree-RV-sewer-elbow-attachment

    A threaded sewer elbow in clear plastic allows you to see when the tank flushing process has been thoroughly cleaned.

    90 degree sewer elbows are threaded for various size pipe threads and also a long snout to accept a donut for unthreaded sewer connections.

    Sewer hoses do have limited use because they use gravity to dump. If your motorhome’s sewer connection is fairly low and the campground sewer sticks out of the ground quite a bit, gravity isn’t going to work very well for you on this uphill battle. If it’s not too serious, you can just walk the hose from the coach to the sewer after dumping to drain the fluid resting in the hose manually.

    National-Indoor-RV-Centers-blog-RV-sanitation-systems-motorhome-sewer-tanks-macerator
    National-Indoor-RV-Centers-blog-RV-sanitation-systems-motorhome-sewer-tanks-macerator-hose

    Macerators grind up waste and can be portable or mounted in the coach, as in this Entegra.

    Macerators use a smaller diameter 1-1/4 to 1-1/2” hose and can pump the waste uphill and for longer distances than a gravity dump 3” sewer connection.

    Another option is a macerator. A macerator uses a motor to grind the waste and pump it uphill, similar to a macerator toilet. While a 3” slinky hose has a limited length and cannot go uphill, a macerator uses 1-1/4” or 1-1/2” hose that can pump uphill up to 9’ vertically and 100’ horizontally. Some of these models, such as the SaniCon Turbo, are installed permanently in the RV and feature a 3” bypass port for a slinky. Other models are portable and will connect to the coach’s bayonet fitting on the dump valve wye. They are a bit slower to dump that a 3” slinky but offer the ability to overcome gravity when dumping your tanks.

    National-Indoor-RV-Centers-blog-RV-sanitation-systems-motorhome-sewer-tanks

    Dump valves come in 3” and 1-1/2” sizes and are easy to replace. Replacement seal kits are also available.

    Operation and Cleaning

    Your gray water tank isn’t very fussy. As long as you scrape the heavy stuff off your dishes before washing them and keep from pouring oils and fats down the drain, your gray tank will remain pretty clean. The soapy shower water and dishwater help keep the inside of the gray water tank clean so that your sensors won’t give you any trouble. But your black water tank is a bit pickier, so you’ll need to pay attention to it to prevent any issues from appearing. The biggest problem with black tanks is that the waste can dry and cake up on the inside of the tank walls. This leads to unreliable sensor readings. The most important thing is to keep the waste fluid and don’t let it dry out. Saving water can be a disadvantage in that respect.

    It’s possible to use a gravity dump toilet with very little water usage. When the toilet’s blade valve opens, the solid waste and toilet paper can just fall through the gate and lay in a lump beneath if the tank is low on water. With continued use, this “pyramid of death” builds and you’ll need a construction crew to break it up. Avoid this by using plenty of water when you flush the toilet. When you dump the black tank, be sure to add plenty of water to the tank so that you aren’t starting out with a dry tank. This water will help to keep future waste additions soluble. Some users like to keep their gray tank dump valve open, but this can lead to a tank with dry sediment caked in it over time. It also allows for certain insects to leave the sewer and enter the coach – you may wind up sharing a shower with them.

    Many black tanks will have a flush mechanism installed. This is basically a spray head that sprays water around inside the tank. In some cases, this sprayer can rinse down any accumulated waste that is caked on the tank walls. In other cases, it’s limited to merely pushing any loose sediment on the floor of the tank to the dump valve. Frequent use of the sprayer whenever dumping the black tank is recommended. If you wait too long, the waste will cake up on the walls and be much harder to remove. If you find that this is the case, it’s best to mix up a solution of Pine Sol and fill the tank to about ¾ full, then drive to your next destination. The sloshing action while driving will help rinse the tank walls and put everything into suspension. Then dump immediately after arriving at your destination and finish off with the tank flushing attachment.

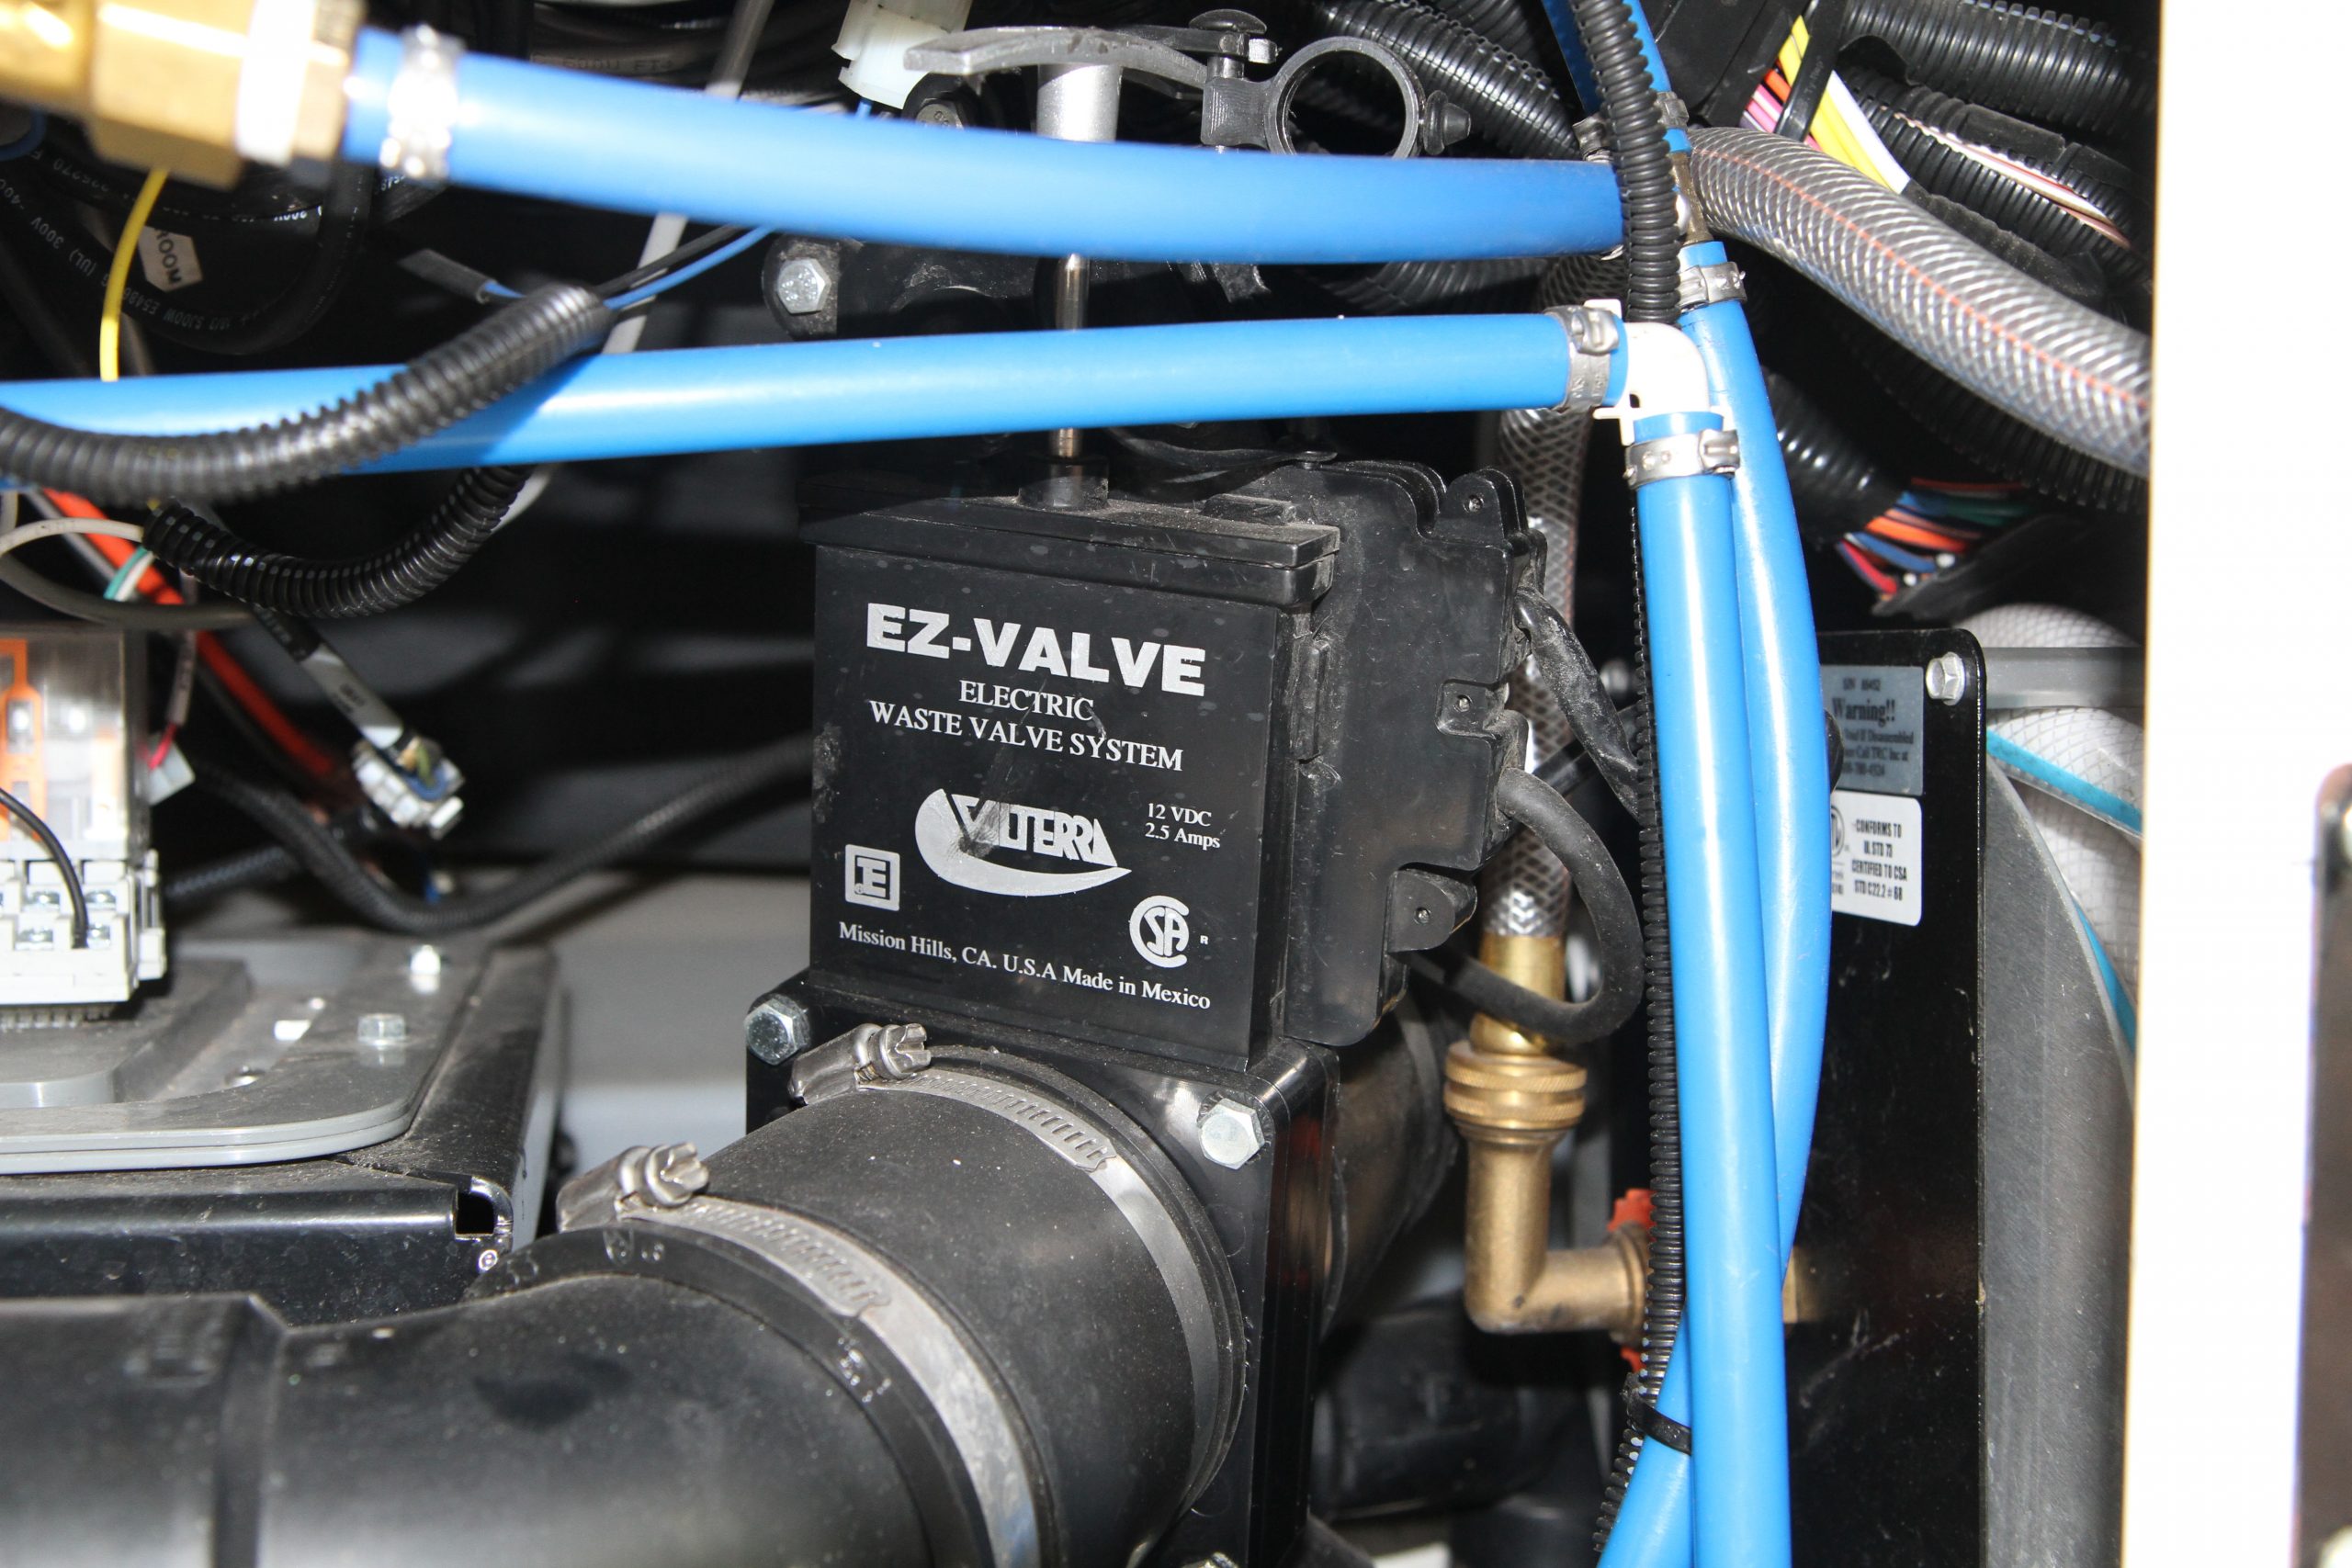
    National-Indoor-RV-Centers-blog-RV-sanitation-systems-motorhome-sewer-tanks-electic-dump-valve

    Electric dump valves can be located in hard to access areas, like this Entegra Coach, and can be remotely operated.

    Never leave the black tank dump valve open when camping or you’ll experience severe caking and bad sensor readings. Always keep the valve closed unless dumping. It’s a best practice to always dump your gray tank after the black tank. The onrushing flow of soapy gray tank water will help flush any black tank residue from your sewer hose.

    If you dump the black tank too often, you’ll never get the water level high enough to prevent waste from caking on the upper portion of the tank walls. Be sure to get the fluid level up high enough before dumping. Ideally, you can do this after a day’s drive to derive the benefit of the sloshing that has taken place. Also be sure to only put human waste and approved toilet paper into the black tank. Never put facial tissue or feminine products down the toilet. You don’t have to buy expensive “official” RV toilet paper from an RV dealer or camping supply store. You just need to use a septic safe paper that will dissolve and break up in water.

    You can test your choice of paper by doing the Mason jar test. Place a wad of toilet paper into a Mason jar and fill it about ¾ full of water. Screw on the lid and shake it for about 15 seconds. The wad of paper should now be dissolved into a bunch of fluff suspended in the water. If it is – you pass the test and it’s RV safe. If it’s still a wad of paper and hasn’t broken down – don’t use it in the RV because it will plug up the system.

    Chemicals and UViaLite

    This brings us to chemicals. A common misconception is that you need to add RV-specific chemicals to treat your waste tank. This is not quite true. Both human waste and toilet paper will dissolve in plain water. You don’t need tank treatment chemicals to do that. If you neglect your black tank, you may need some heavy-duty tank chemicals or Pine Sol to clean it but under normal use, you won’t. One thing chemicals do is deal with odors – although that’s not all it’s cracked up to be either.

    Some chemicals are nothing more than perfume. They don’t remove the odors, but they mask it by adding a more favorable scent to the tank. Other chemicals include enzymes that do react with the odors, but enzymes are organic organisms that take 5-7 days to become active. Most RV owners don’t wait that long to dump their tank, so they are basically flushing away good money every time they dump.

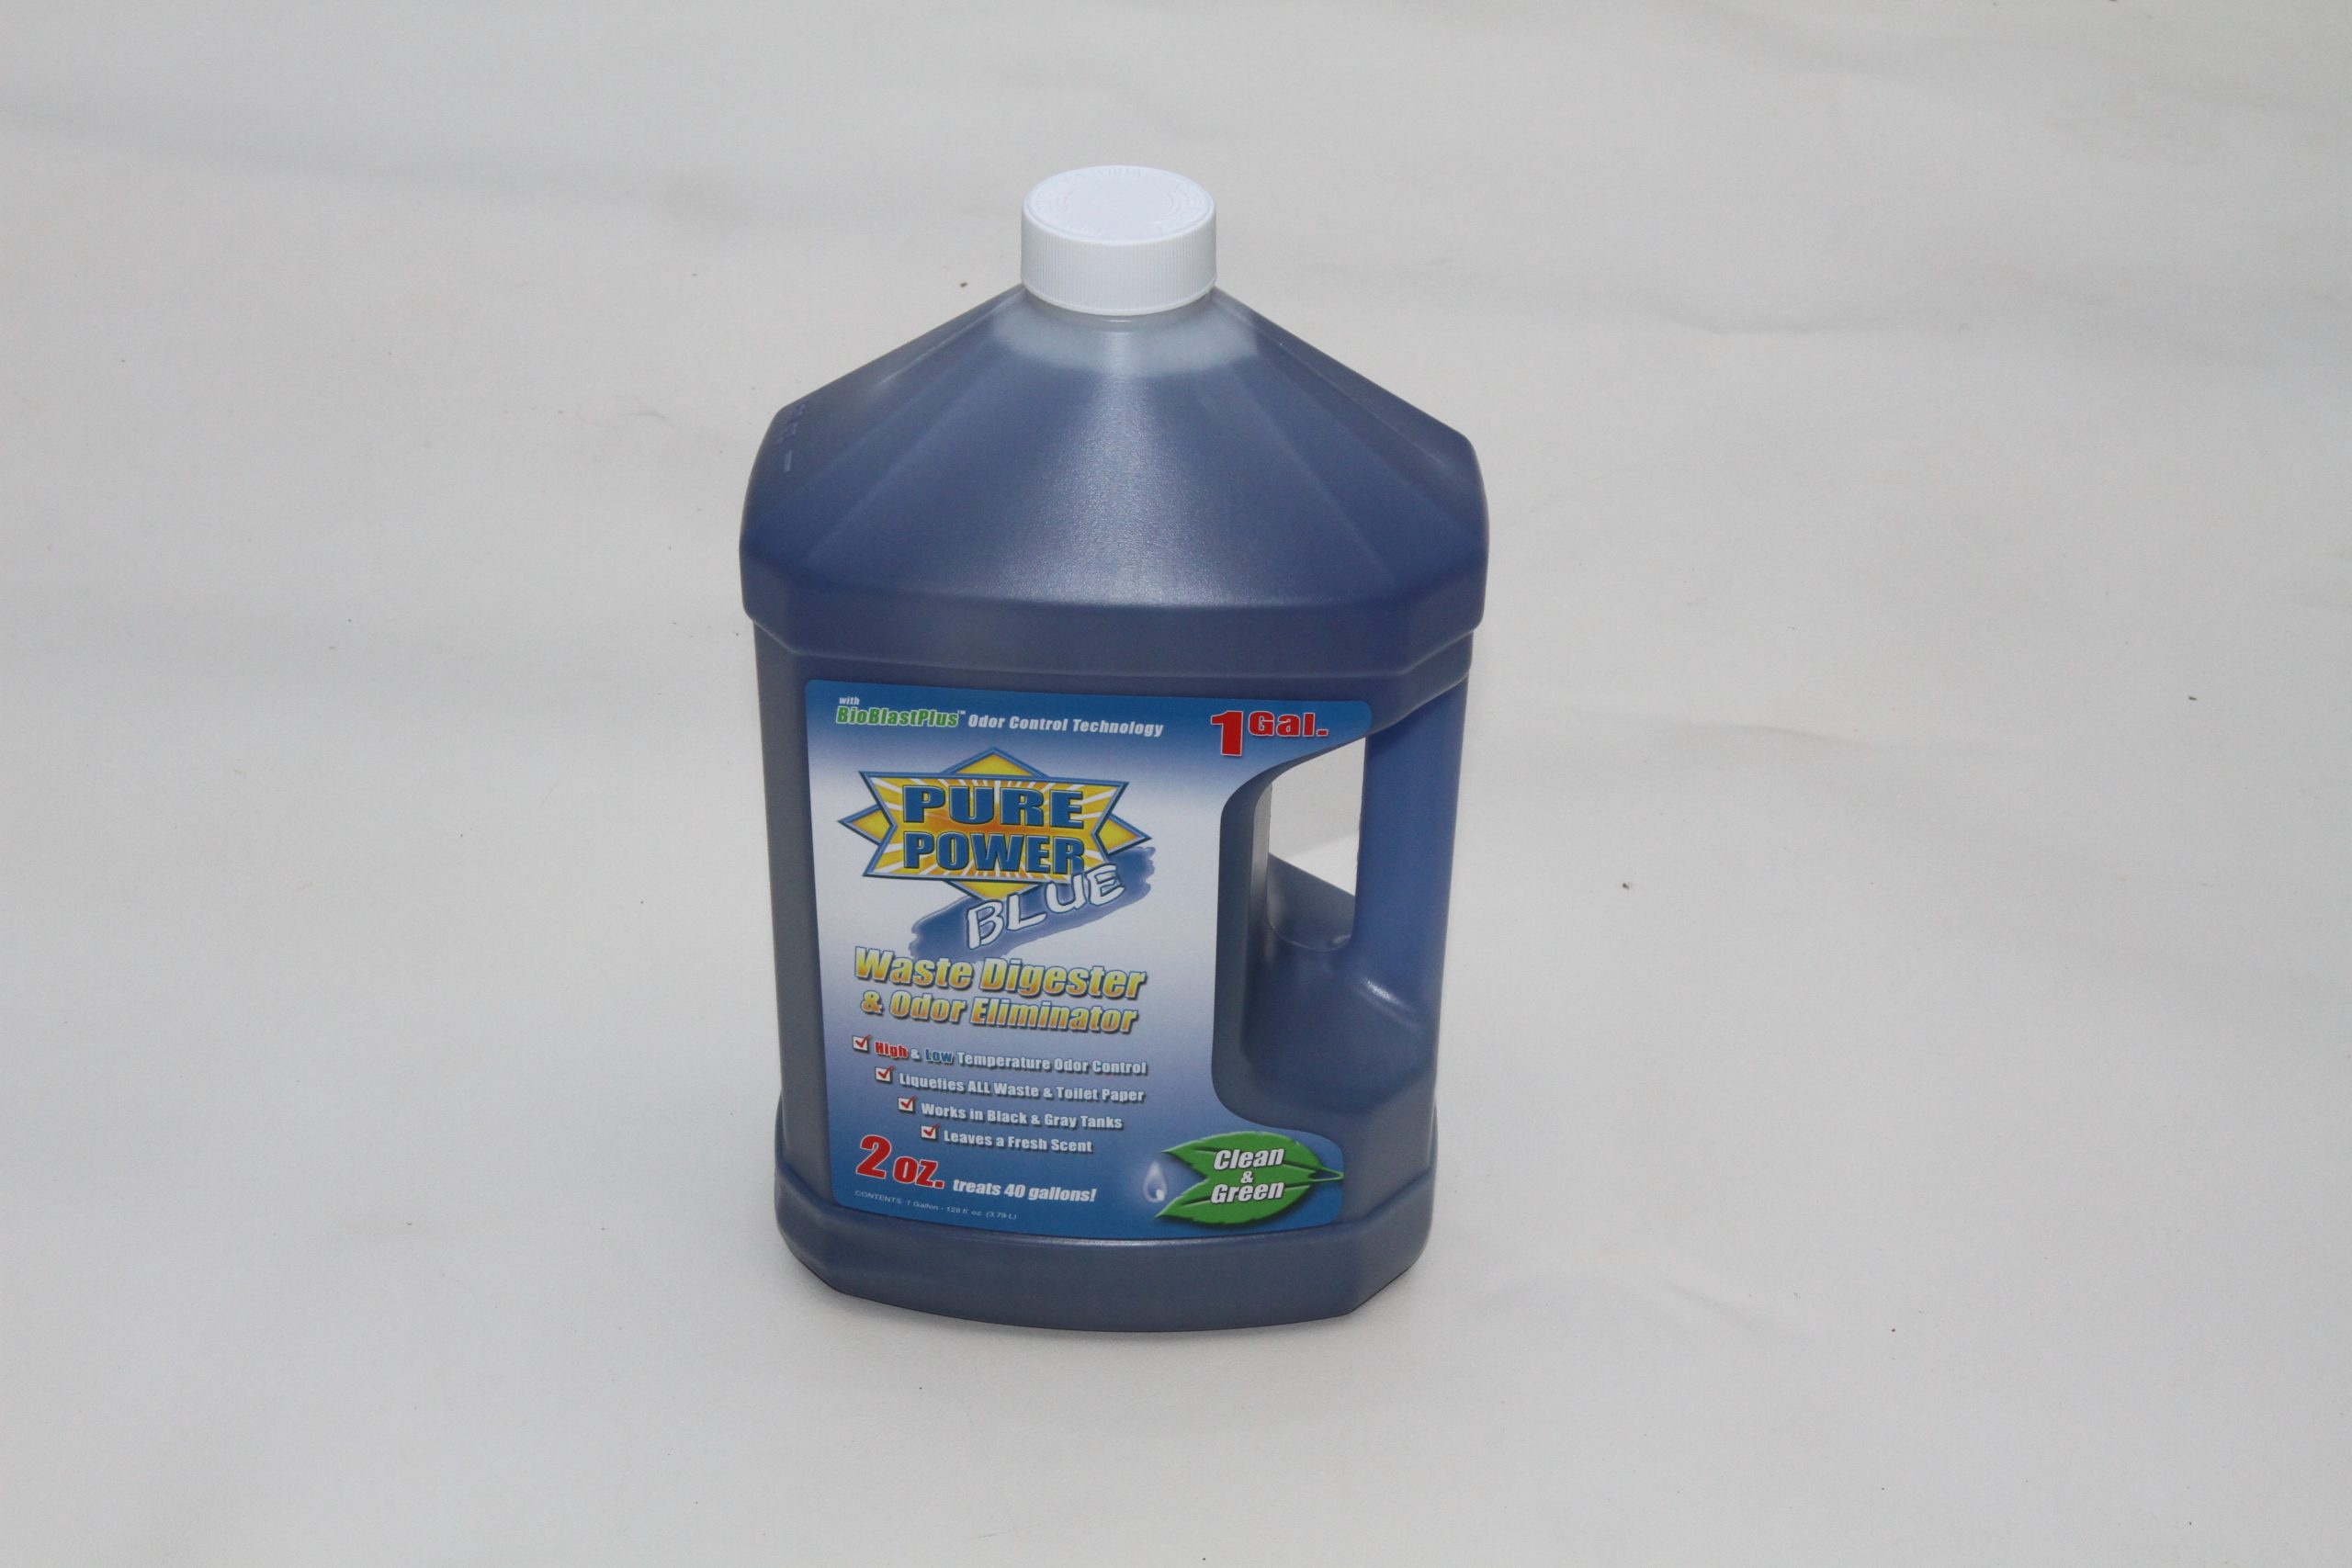
    National-Indoor-RV-Centers-blog-RV-sanitation-systems-motorhome-sewer-tanks-pure-power-blue

    Liquid waste digester, such as this Pure Power Blue, will help treat solid waste to prevent clogs and prevent odors.

    A great system that I am familiar with is the UViaLite system. I first noticed this system when reviewing an American Coach for a magazine article I wrote for another publication. I also noticed this system on a Thor diesel coach on another article and have since learned that other manufacturers are looking at implementing this system.

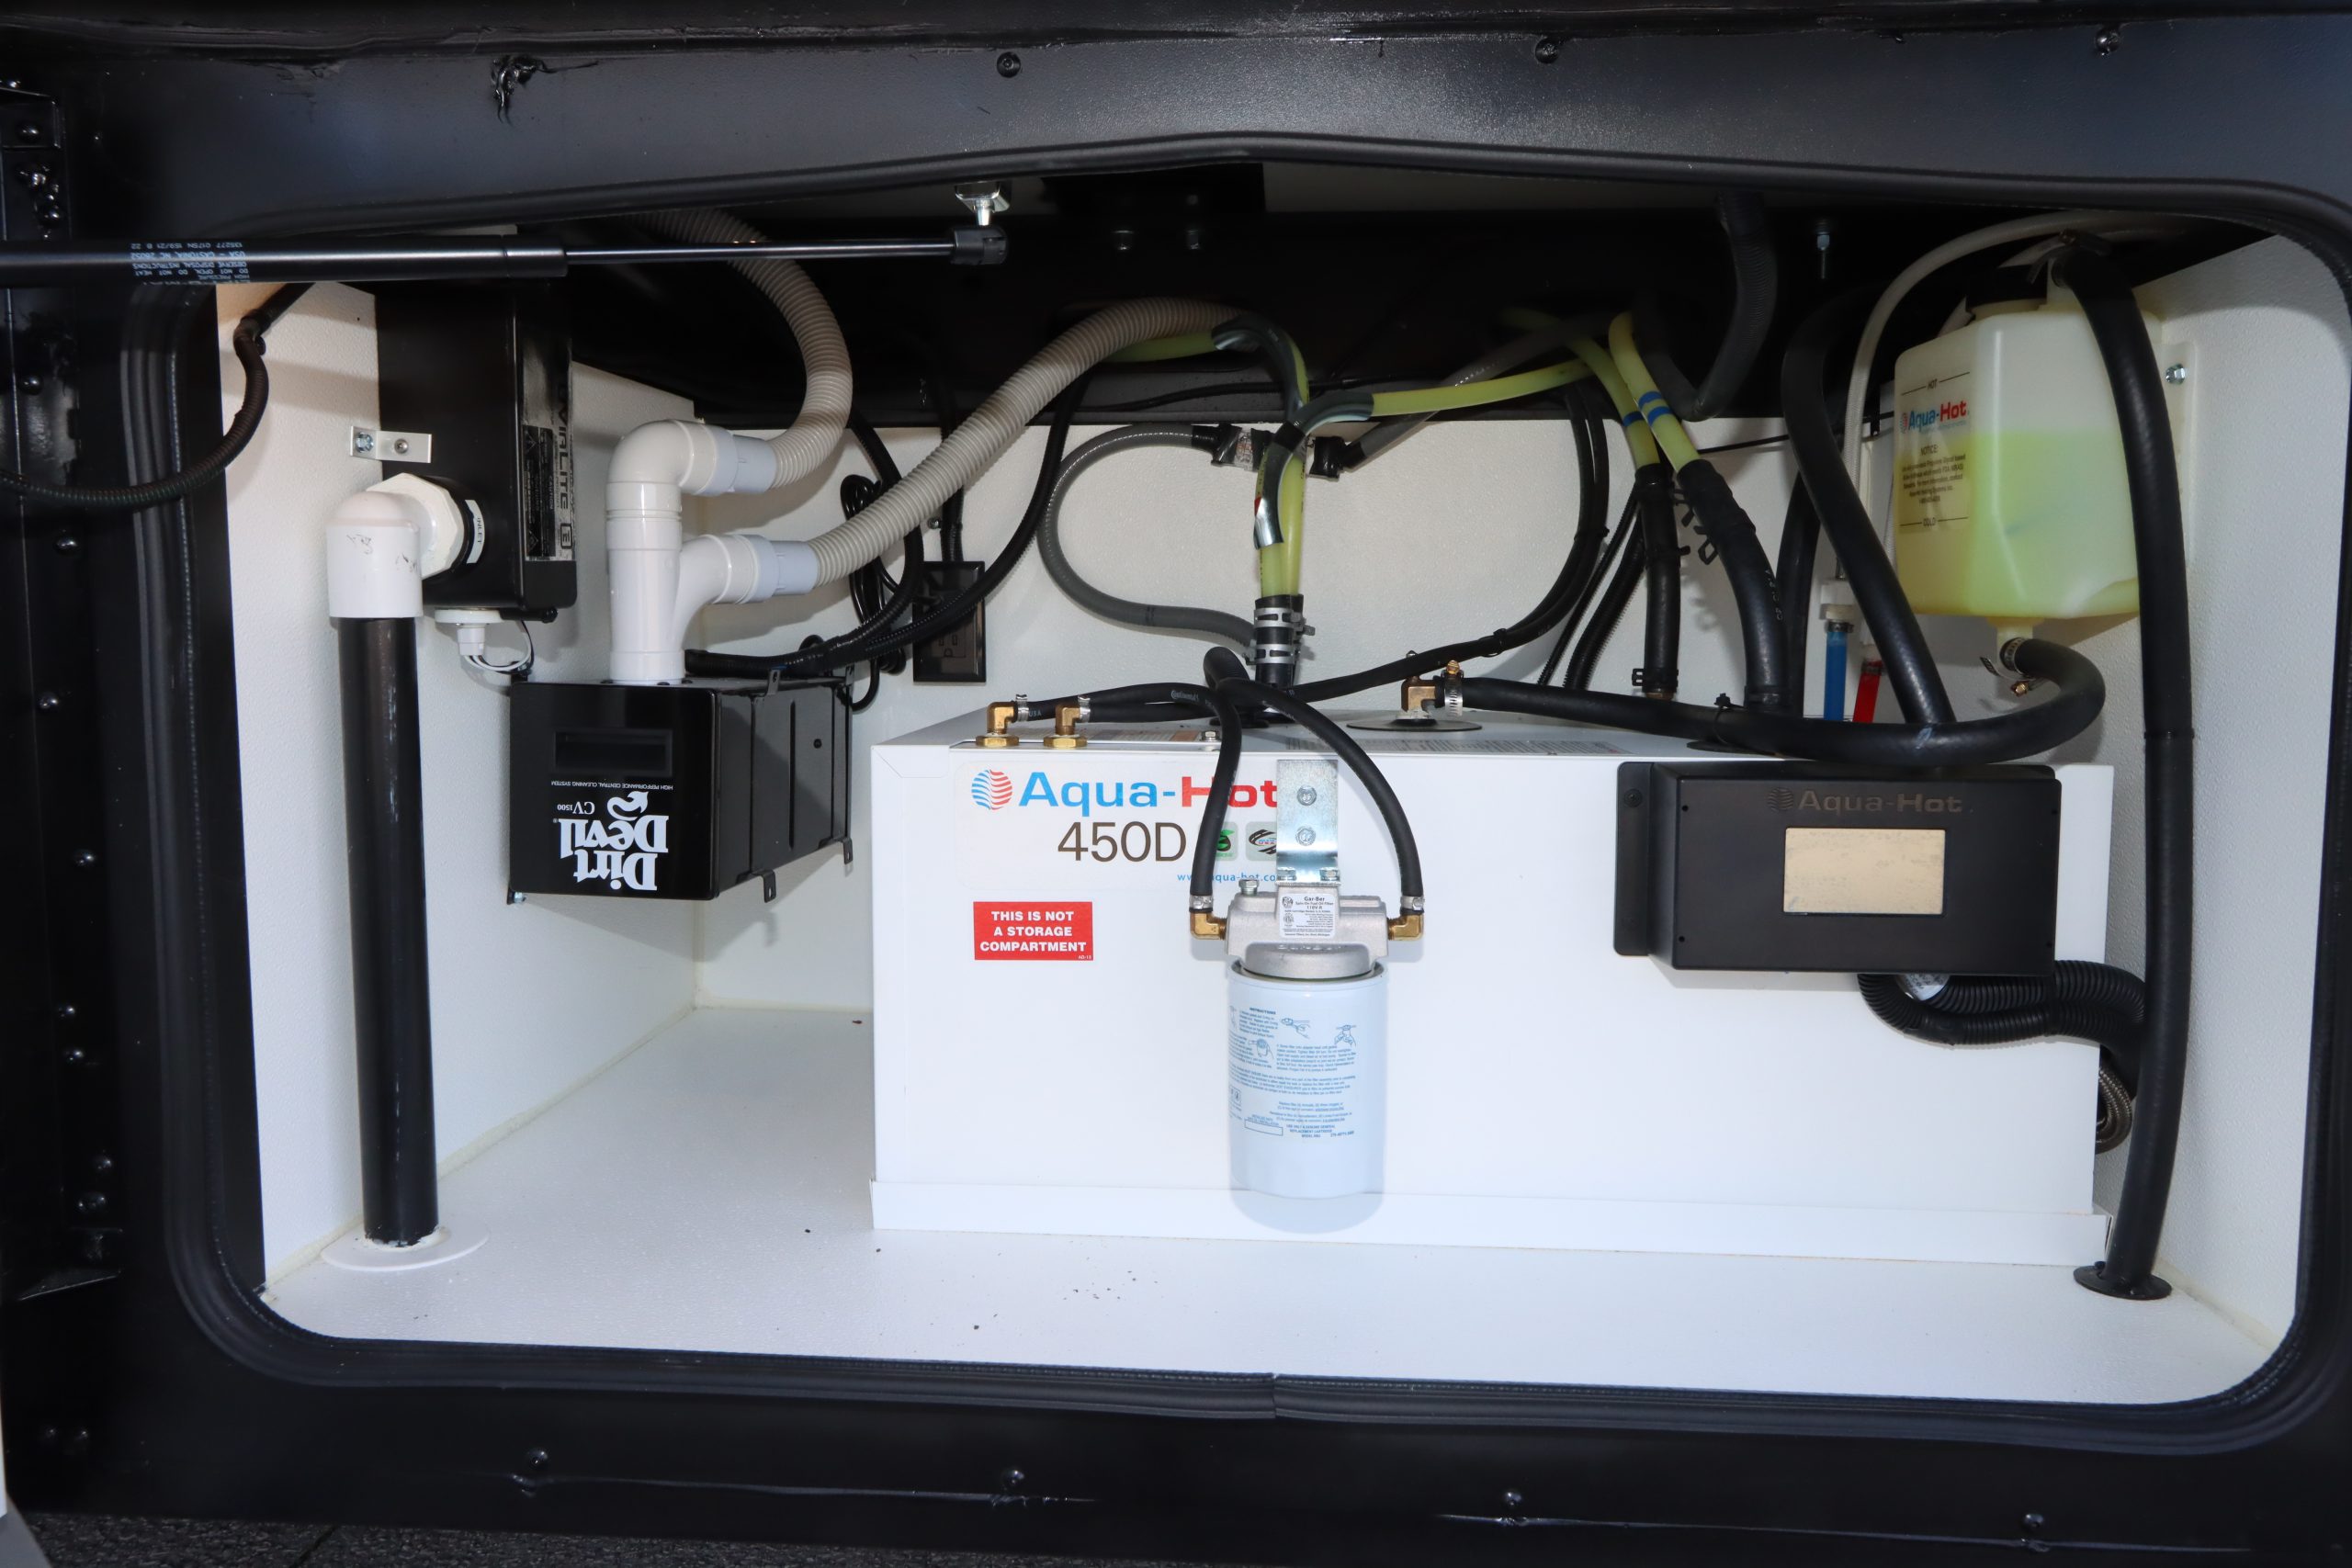
    National-Indoor-RV-Centers-blog-RV-sanitation-systems-motorhome-sewer-tanks-uvialite-waste-tank-ventilation-system

    This particular bay on an American Coach shows the UViaLite waste tank ventilation system installed.

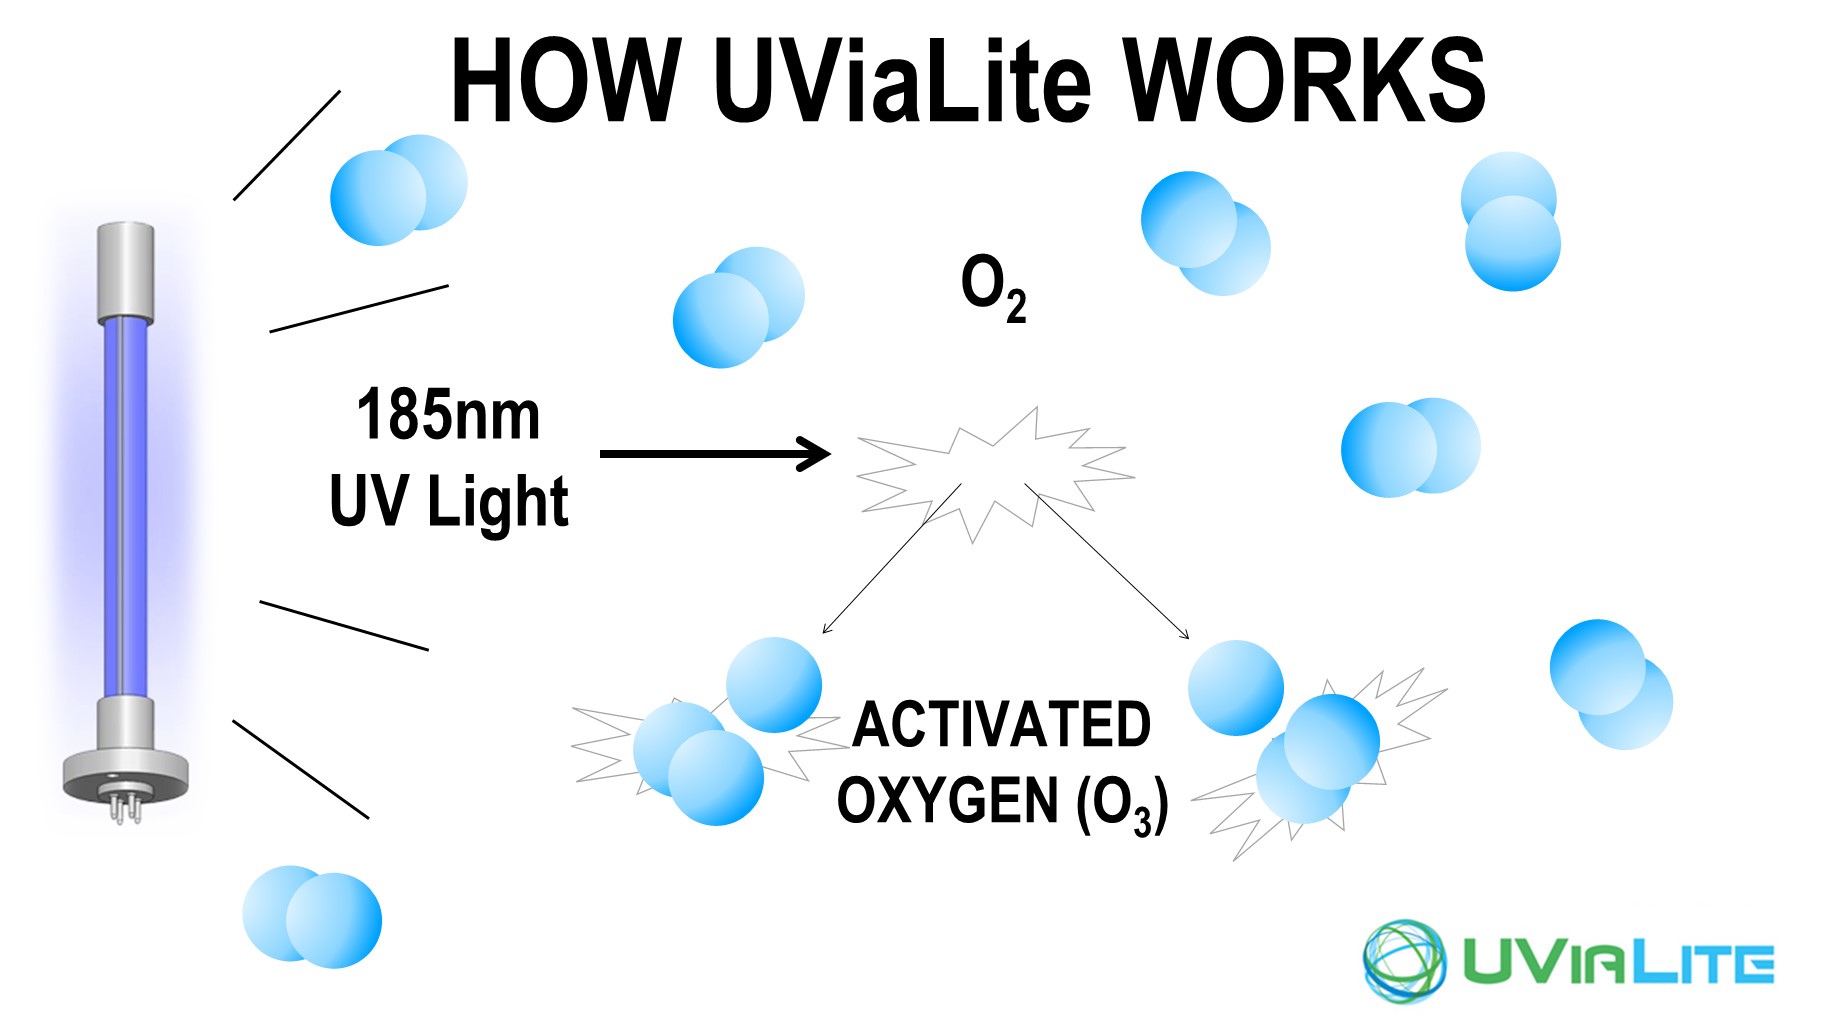
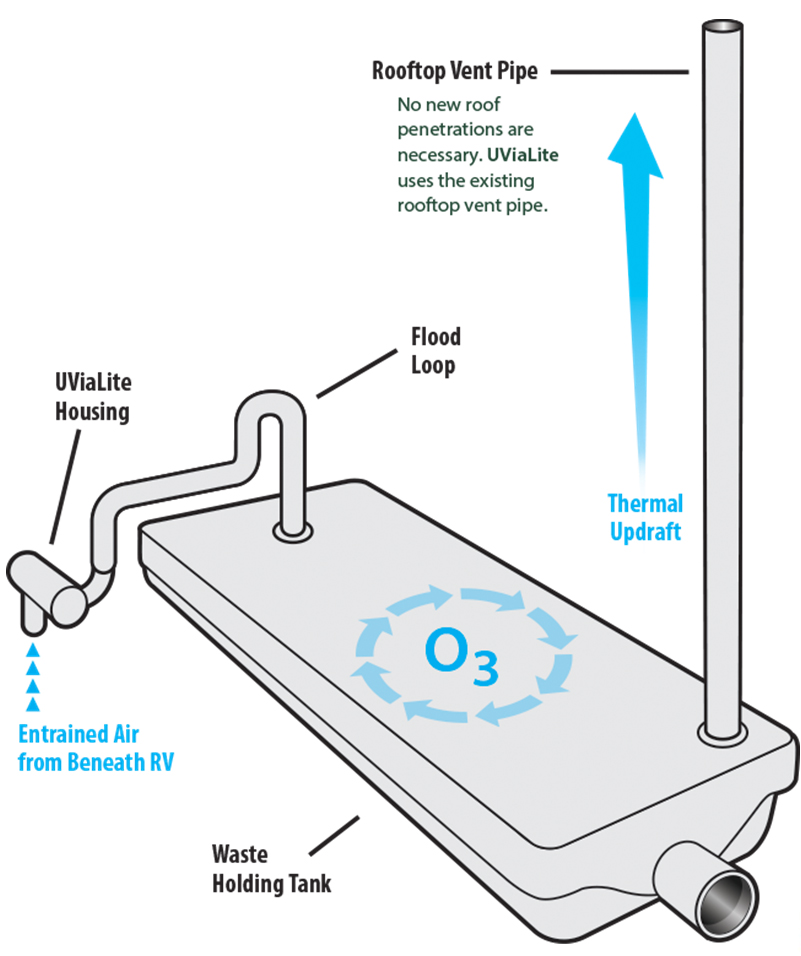
    UViaLite uses proven technology that uses an ultraviolet light set to a specific frequency of 185 nanometers to react with oxygen (O2) to create ozone (O3). This unit picks up fresh air from beneath the coach and passes it through the UV module and into the top of the tank via a 1-1/4” PVC pipe. There are no moving parts because the system uses the chimney effect of natural airflow rising through the tank’s vent stack. 6 to 20 PPM of ozone are created in the unit and the thermal updraft of the vent stack draws the ozone into the holding tank at less than 1 CFM. Once powered up, the unit can remain on and only draws 0.8 amps of 12 VDC power, which is around 10 watts. The unit can remain on until the user stores the RV at the end of the travel season.

    National-Indoor-RV-Centers-blog-RV-sanitation-systems-motorhome-sewer-tanks
    National-Indoor-RV-Centers-blog-RV-sanitation-systems-motorhome-sewer-tanks
    National-Indoor-RV-Centers-blog-RV-sanitation-systems-motorhome-sewer-tanks

    This image shows how the UV light creates O3 from O2

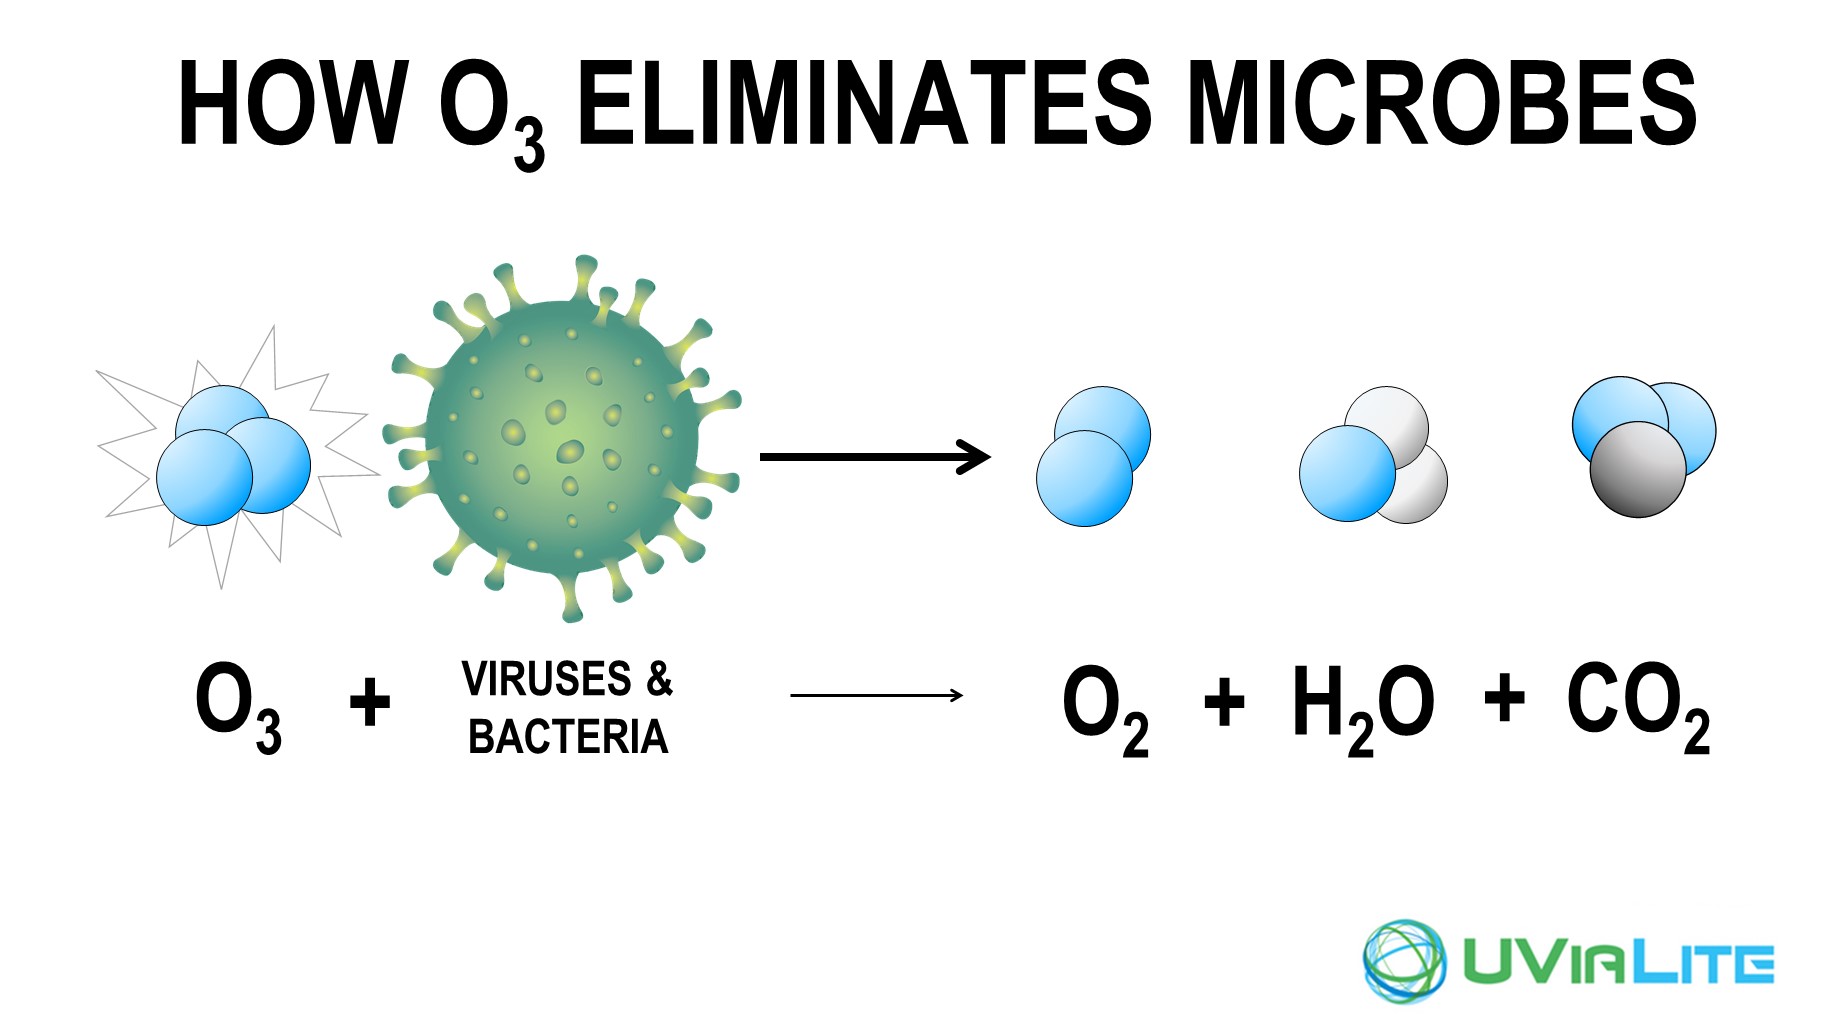
    Shows how Ozone attacks viruses and bacteria to form oxygen, carbon dioxide and water vapor.

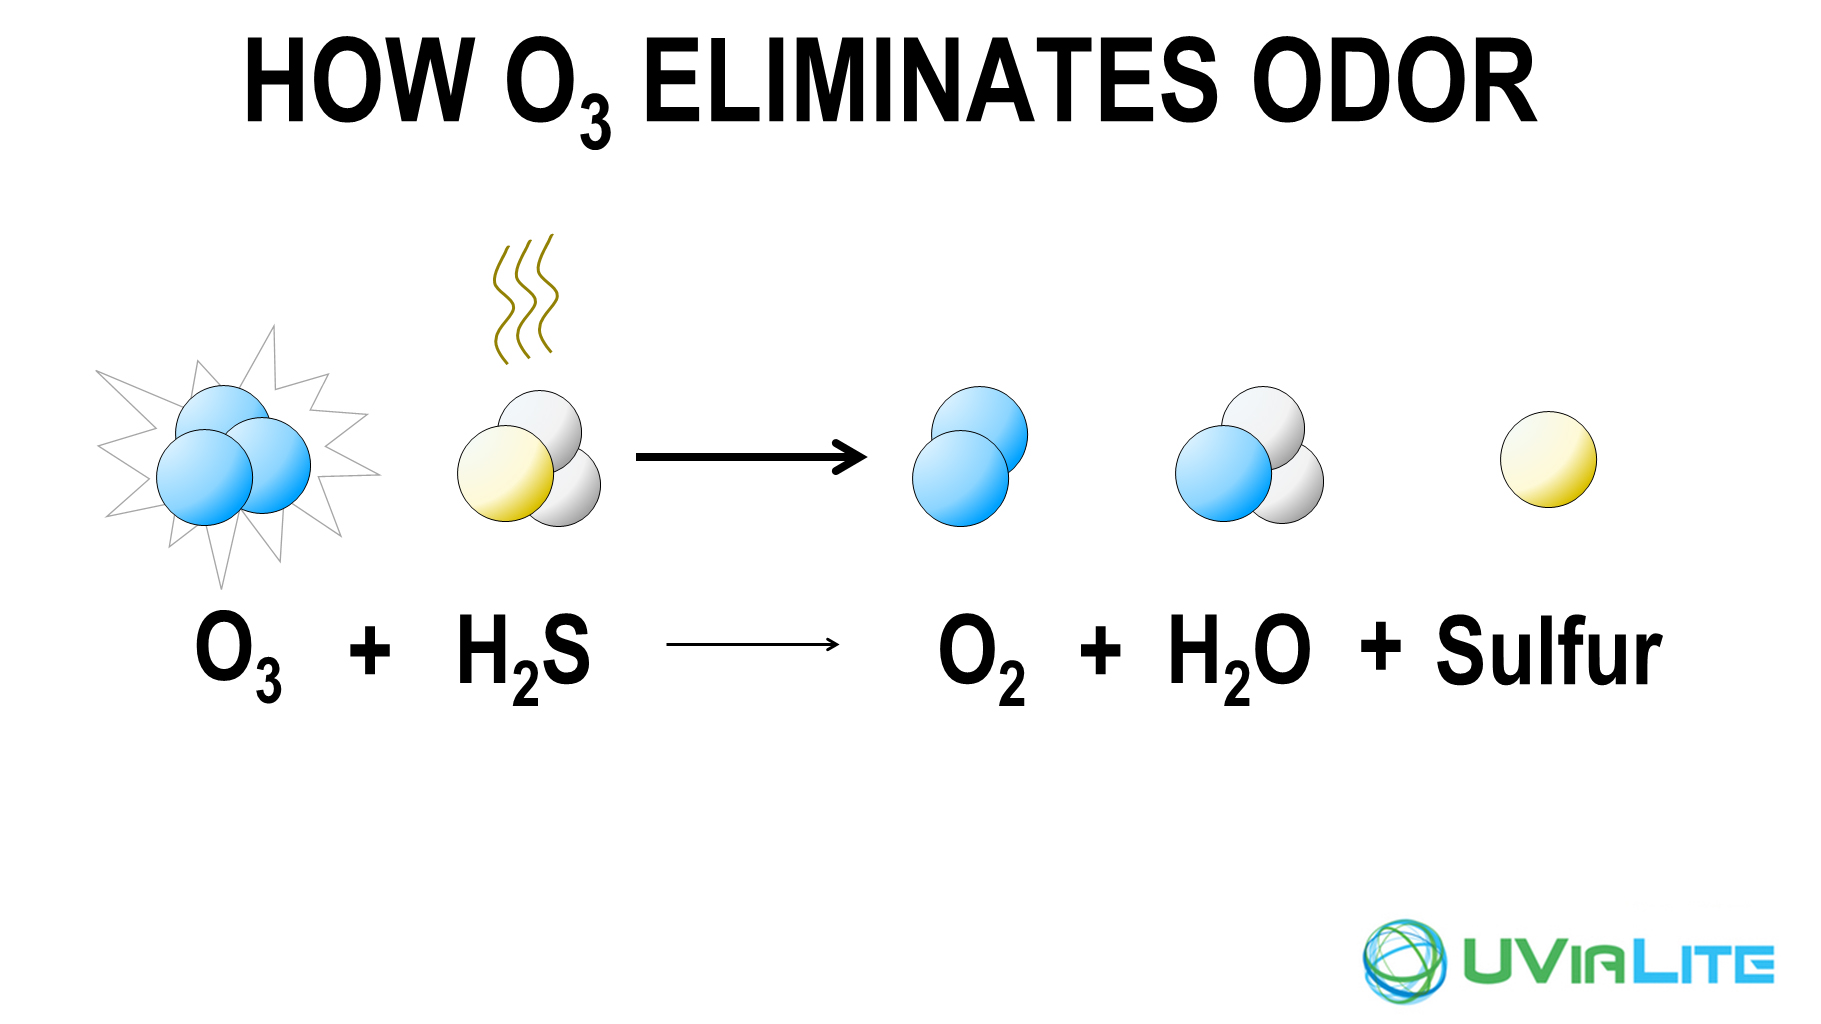
    Shows how odors are eliminated by converting the smelly hydrogen disulphide to water and sulfur that settle in the water and oxygen which vents out the stack.

    Ozone is a powerful oxidizer that will kill bacteria and chemically destroy viruses in seconds. The ozone generated by the eco-friendly UViaLite attacks the molecular bonds of viruses, bacteria & mold, breaking them up into harmless water vapor and carbon dioxide (CO2). UViaLite removes the stinky smell caused by hydrogen disulfide in the tank by converting it to freshwater vapor and sulfur that falls out of the air and into the tank.

    National-Indoor-RV-Centers-blog-RV-sanitation-systems-motorhome-sewer-tanks-uvialite-system

    This diagram shows how the air flows through a UViaLite system.

    Eliminating odors rather than masking them with a perfumed scent will make a big difference whenever someone flushes the toilet, especially when the bathroom exhaust fan is on. Because it also kills any pathogens, it will prevent viruses shed from a sick person from wafting up out of the tank and possibly infecting other people in and around the coach. UViaLite does not affect anything in the liquid portion of the tank so it won’t affect any chemicals you may have in there. It only affects the air above the liquid, which is where the odor is anyway.

    Keep in mind these few tips and you’ll qualify as an RV sanitation expert in no time!

    National Indoor RV Centers blogger Mark Quasius profile picture

    Mark Quasius is the founder of RVtechMag.com, the past Midwest editor of RV Magazine, writes for numerous RV-related publications and a regular Contributor to FMCA’s Family RVing Magazine. Mark and his wife Leann travel in their 2016 Entegra Cornerstone.

    Ultimate RV Road Trip Planner

    Here’s How to Plan a RV Trip 

    Essential RV Trip Checklist

    It can be tempting to load up the RV and hit the road as soon as the last snow of winter starts to melt. While the call of the open road can be irresistible, it’s important to make sure that you’re properly prepared for your trip before you leave. A little preparation and foresight can save you some massive headaches on the road while freeing up the focus to really enjoy the world around you. 

    Before you head out on the road, give some thought to these five things. 


    Maintenance Is Key

    Literally. Motorhome maintenance is important enough that you should view it as the key to getting on the road. Motorhomes are complex machines which require care and attention to ensure your coach’s systems are all in working order. You don’t want to find out about any engine issues while you’re driving on a busy highway or navigating a remote mountain road. 

    At the start of every RV season, consider taking your motorhome in for a checkup. In particular, focus on servicing your RV’s roof AC, batteries, and generators. You’ll also want to inspect the roof and body sealant to make sure you don’t have any leaks. Finally, having your coolant serviced and tires rotated is always a good idea — especially if you’re planning to get a lot of use out of your motorhome this summer. 


    Know Where You’re Going (and How to Get There)

    It can be easy to take navigation for granted in the era of Google Maps, but you shouldn’t always count on having a GPS app available. There’s an unspoken rule amongst experienced RV campers that cell phone service always seems to vanish at the moment when it’s most inconvenient. 

    Thankfully, you don’t have to worry about paper maps losing signal; and while they may not be as immediately intuitive as a phone app, they’re invaluable in a pinch. 

    Having a solid sense of where you’re driving before you leave can also save you from being stressed on the road. Identify alternate routes to get to your destination, so you have a backup on hand when needed. By being able to quickly pivot from Route A to Route B, you can minimize lost time while also taking advantage of any interesting destinations that your detour has to offer. 


    Hope for the Best, Prepare for the Worst

    Nobody plans to have an emergency during an RV trip. That’s why it’s all the more important to make sure that you’re prepared to react if something unexpected happens. You don’t have to map out every single RV service center between home and your destination, but you should be prepared if a tire bursts on the road. 

    Speaking of front-end tire blowouts, there are a couple simple (yet powerful) safety products which may not only save you a lot of headache but could potentially save your life and the lives of those you love. One such product is called RettroBand®. This revolutionary run-flat tire safety system is installed inside your RV’s front tires and provides a built in, highly-durable doughnut for your motorhome!

    How does it work? Well, should your RV’s front tires lose air for any reason, your motorhome will settle onto the RettroBand wheel enhancement band and will allow you to keep better control of your motorhome until you can find a safe place to pull over and stop. Learn more about RettroBand here.

    Another critical and potentially life-saving product that every coach owner should have installed in their motorhome is the one-of-a-kind THIA by Proteng Fire Suppression System. Fire safety in any situation is very important, however, when it comes to suppressing a fire within the tight confines of your RV, having a fire suppression system which can give you time to escape a deadly fire, as well as operates even when you’re not in your motorhome is a must and simply priceless! 

    The Proteng system is custom installed in your coach by placing Proteng tubes in areas of your motorhome where fires are likely to occur. Should a fire start up in your RV, these tubes are activated and rupture to release a non-toxic gas that lowers the temperature flash point of the fire, suppressing it completely or long enough for you to get to safety while not leaving any sort of residue. To learn more about Proteng, click here

    Hoping for the best, but planning for the worst goes doubly for the possibility of medical emergencies. Make sure to confirm any allergies before you prepare food for the trip, and make sure everyone has enough medicine to cover the trip, along with a few extra days worth in case of detours or delays. Lastly, before you leave, make sure that your RV’s first aid kit(s) is properly stocked as well. There aren’t any fun ways to find out that you’re low on Band-aids. 


    Don’t Forget Food

    When people think of “RV food,” their minds almost immediately jump to their favorite mid-drive snack. While good snacks are undoubtedly a part of any good RV adventure, dining exclusively on Doritos and gas station takeout can get exhausting and unhealthy (not to mention smelly!) really fast. While planning food for a motorhoming trip may not be your favorite part of the RVing lifestyle, there are a ton of advantages to doing so.

    Packing meals doesn’t just give you better control of what you eat, it also gives you extra control over where and when you eat! Being able to simply pull over to a rest station and dine on some sandwiches or burritos means saving time and money that would otherwise be spent pulling over to restaurants. Keeping yourself alert and full of energy during a long drive goes a long way towards maximizing your RV adventure, so you’ll want to make sure you’re packing meals that actually refresh you, instead of sending you into a slightly gassy food coma


    Take a Moment to Be Mindful

    If you can, try to set aside some time before your trip to take a deep breath and open yourself up to all of the exciting adventures ahead of you. In all the hustle and bustle of preparing for a trip, it can be easy to lose a bit of the excitement for the RV journey ahead and forget why you’re going on one in the first place.

    At the end of the day, RV trips are about adventure, regardless of what that specifically looks like for you. Whether you’re looking forward to attending group rallies with your motorhome club (check out the AIM Club which NIRVC is a sponsor), evenings sleeping alone under the stars, or cooking some barbecue while watching a movie with your entire family. These adventures are a chance to unwind, decompress, and focus on the things in life that bring you joy. 


    Happy travels!


    RV 101: Battery Maintenance

    RV Battery Maintenance: What You Need to Know

    It should go without saying, but your RV’s battery is pretty important. To some degree, almost everything in your coach is powered by your RV’s battery, from the fridge to the TV. Of course, this includes all of the complex systems that allow your RV to drive in the first place. Any issues or disruptions to your battery can quickly derail an RV trip.

    Let’s take a look at everything you need to know about keeping your RV battery happy and healthy.


    Your Motorhome Actually Has TWO Batteries

    Before we explore the nitty-gritty, it’s worth noting that your RV actually has two different battery systems: a 12-volt DC system and a 120-volt AC system. Additionally, virtually every motorhome also has a regular car battery that’s used to start the engine. 

    Like your air conditioner, major appliances and systems are run off of the 120-volt system. To use this battery, you generally need to be plugged into a shore power source or actively run a generator. These systems place a pretty heavy strain on your RV’s electricity use, which means they often don’t operate without a consistent charge on the road.

    Meanwhile, the smaller 12-volt coach battery in your RV is responsible for running systems like interior lights and water systems. As opposed to its larger counterpart, this system can comfortably run without being plugged in—as long as it has enough charge! 


    There’s No Single Rule on How Long Batteries Last

    If you’re driving a car like a sedan or SUV, then car batteries can generally be expected to last three years. In an RV, however, the lifespan of a battery depends on so many different factors that it’s impossible to give a general rule. 

    What’s more important than the age of a battery is how well it’s performing. Just like an old battery can function when properly maintained, a brand-new battery can experience issues fairly quickly if it’s not looked after. It’s always a good idea to check your batteries before you head out on an extended trip. 

    In addition, it’s also a good idea to clean battery terminals with a designated cleaning solution to remove any corrosion buildups. If your RV uses a flooded-cell battery, you’ll also want to top it off with distilled water and ensure it’s fully charged before cleaning it. 


    As a Rule of Thumb, Keep Your Batteries Charged

    Actually, ensuring a fully charged battery is a good idea for ANY RV battery. Allowing your batteries to deplete increases their rate of sulfation, which you want to avoid. Sulfation, which happens when particles begin to corrode your battery, begins to occur once a battery falls below an 80% charge.

    Letting your batteries consistently reach a low charge also decreases their overall life. For context, a battery that’s consistently kept above 50% charge will last more than twice as long as one that’s always allowed to drop to 20%.

    Of course, overcharging batteries can overheat (and damage) them, so it’s a good idea to stop charging once a battery maxes out.

    At NIRVC, we know how to maintain, service and replace RV batteries—we even offer competitive rates! Visit our service page to learn more!

    RV Electrical System Failure

    RV Electrical System Failure

    Sometimes these systems can fail, not that this will come as a shock to anyone. When electrical systems fail it’s time to do some testing to see where the failure is. A voltmeter is a huge help in this area although a test light can also be used to test low voltage circuits. Personally, if you are a motorhome owner you should have a multi-meter of some sort. It’s invaluable for checking high voltage circuits, campground pedestals, low voltage circuits, and continuity.

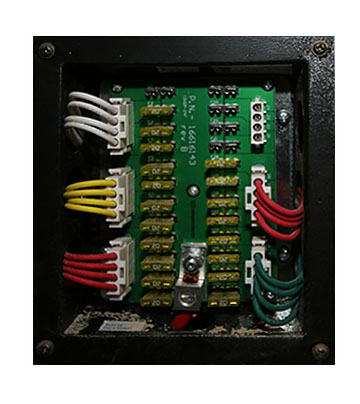
    Fuse Panel

    Fuse panels hold fuses for all 12-volt systems

    Check for Blown Fuses 

    The first thing to do is to check for blown fuses. Sometimes you can do this by removing the fuse and holding it up to the light to determine if the fusible link is blown. Sometimes it’s not so easy to see. The way many of these fuse panels are labeled, or more accurately, “not” labeled, you may have trouble figuring out which fuse does what. The common ATO fuses are blade type fuses with a plastic housing. There are bare spots on the end of the housing that can be used to test for voltage. If you have power going into the fuse, but not out of it, you’ll know you have a bad fuse. Another method is to use the ohms setting on a multimeter. Remove the fuse and check for continuity with the meter. If there is no continuity, the fuse is bad. If you have a critical circuit you can also replace those fuses with ATO style circuit breakers that plug right into place. There are also fuses with LED pilot lights that will illuminate if the fuse is blown. So, you have lots of options when it comes to fuses.


    Test for Voltage 

    If it’s not a fuse, then you need to look a little deeper. If the fuse does have power leaving it, test for voltage at the device that isn’t working. If you have power coming into the device, it’s either a bad device (light bulb, fan motor, water pump, etc.) or else you do not have a complete circuit. In that case, I’d check for a bad ground because an open ground won’t provide a complete circuit back to the battery. If you do not have power at the device, there is an open circuit between the fuse and the device. The first place to look would be at the switch. Test to see if there is power coming into the switch and power exiting the switch. If the power is getting to the switch but not leaving it, it’s time to replace the switch.

    Wire Gauge (AWG) Wire Diameter, in Inches Current Capacity, in Amps
    0000 .4600 600
    000 .4096 500
    00 .3648 400
    0 .3249 320
    1 .2893 250
    2 .2576 200
    4 .2043 125
    5 .1819 100
    6 .1620 65-80
    8 .1285 40-50
    10 .1019 30-33
    12 .0808 20-23
    14 .0641 15-17
    16 .0508 7.5-10
    18 .0403 5
    20 .0320 3.3
    24 .0201 1.3
    28 .0126 0.5

    This chart shows the current capacity for various wire gauge sizes

    Manufactured vs. Self-Build Vans

    Manufactured vs. Self-Build Vans

    Van life has been growing in popularity over the years as people seek flexibility and freedom and the ability to work remotely has become more common. If you’re considering joining the van life community, you’ve probably had the debate between choosing a manufactured van or converting a van yourself. Both options have their pros and cons, and the decision ultimately comes down to personal preference, skills, time and budget. In this post, I’ll share some of the reasons why you might choose a manufactured van over a conversion.

    I went through this same debate for about two years before ultimately deciding to purchase a manufactured van in the end. I know, I know… self-builds are always more aesthetically pleasing and you have the ability to configure your layout exactly how you want it. This was a huge internal debate for me as well, and I went back and forth about a million and two times (sorry mom and dad for the thousands of phone calls saying “I think I know what I want”, then changing my mind the next day). I really wanted the Instagram-worthy white cabinets with the raw wood and shiplap ceilings, you know the look. And, it took me quite a while to research why this wasn’t practical, for me at least. 

    Purchase Right off the Lot

    One of the biggest advantages of choosing a manufactured van is that it’s a ready-made solution that is ready to use right out of the box. Everything comes pre-built so you are able to hit the road right away. You don’t have to spend weeks, months or years (in some cases) sourcing and buying all the individual components, educating yourself, and building everything from scratch. This can save you a lot of time and effort, especially if you’re not experienced in building and construction.

    Warranty and After-Sales Support

    Another advantage of buying a manufactured van is the warranty and after-sales support from the manufacturer and their dealers. This means that if anything goes wrong with the van or any of the components, you can get it fixed or replaced under warranty. You also have the peace of mind of knowing that the van has been professionally built and tested to meet certain safety and quality standards. Most manufacturers also post their wiring and plumbing diagrams on their website with a list of parts. This helped me when I had a piece in my plumbing freeze this winter and I was able to go on the website, figure out the part number and find it at the hardware store for a quick fix. Another thing that has helped me tremendously is the community behind the manufactured products. Each van has a group on Facebook with members/owners that have either had the same issue or a similar one and can help walk you through yours.

    Dealer Support

    After sales support is a huge reason I went with a manufactured van. I wanted to know that if I had an issue while on the road, I could go to any Winnebago dealer and they would have the resources and knowledge to fix the problem. I know this is a touchy subject for some owners as dealerships have not always been the best to work with in the past if you didn’t purchase from them. Que National Indoor RV Centers – they are changing the game on how owners are treated, whether you purchased from them or not and with six locations across the US, you are sure to find service near you no matter where you are in the country. 

    They are also Flying W Award winners two years in a row, which is not easy to achieve. What does this mean for you? This means you’re working with a dealer who has been recognized by the manufacturer for going above and beyond for their owners.  

    With free overnight camping spaces, you are fully taken care of your entire stay. They also have a customer lounge for you to hang out in while you wait complete with docking stations, wifi, coffee and sodas, and the best popcorn around 🙂

    You will love working with NIRVC’s Adventure Van Specialists. They work hand in hand with all of the top outfitters like Owl Vans Engineering, Canyon Adventure Vans, Backwoods Adventure Mods, CAtuned Off-Road, S&B Filters, Van Compass, Agile Off-Road, Timberline Elwell, RoamRig, Baja Designs, Inhabit Design Works and TOURIG. What is really cool is the NIRVC’s  Adventure Van Specialists are incredibly knowledgeable about every product on the market and work with clients every day to customize their manufactured vans to meet their client’s needs. It is like getting the best of both worlds.

    Better Financing Options

    Because manufactured vans are RVIA certified and recognized by lenders, they can be easier to finance than a self-build. This can make it easier to get a loan or lease to purchase the van. In contrast, self-builds can be more difficult to finance, as they are not recognized as a specific type of vehicle and may not meet certain safety or legal requirements. It is also difficult for lenders to assess the value of self-built vans.

    Affordability

    Oddly enough, a manufactured van can be more affordable than a self-build, particularly factoring in your time and labor and the ability to finance as you aren’t paying for everything out of pocket up front. With a manufactured van, you are not paying for the time and effort of sourcing and building the individual components, especially with the price of materials right now. Manufacturers are also using economies of scale, which makes the vans more affordable. This means the manufacturers are able to purchase materials in bulk, reducing the cost per unit significantly.

     In contrast, there is always a chance that you are able to find someone that will donate their tools and time to help you with the build, if you don’t already have them yourself, and you could easily figure out a way to do your build as cheaply as possible. Another option to consider is doing the build gradually and starting off with the bare minimum. This way you aren’t paying for everything up front and are able to figure out what you need as you go.

    Insurance

    The majority of insurance companies will not insure a self-built van and even if they do, it is difficult to assess how much it is worth. The insurance company also does not know the quality of a self-build. So, it is easier to get a van through a manufacturer because the MSRP of the van is set and listed online. It is difficult to convince your insurance company that your van conversion meets the requirements to meet the standards of an RV. In the case of an accident, manufactured vans make it much easier on the insurance companies when it comes to having repairs done or replacing things with like/quality products. Most insurance companies will insure the empty van itself, but it is difficult to insure all the additional components like electrical and plumbing.

    RVIA Certified

    This is a big one. Getting RVIA certified is no easy feat. The RVIA has many rules to follow and while this makes it difficult on the manufacturers, it ensures that the consumers are safe and everything is up to code on quality and performance requirements. Some RVIA standards include electrical, plumbing, propane systems, structural standards, fire and life safety standards, and federal and state regulations for vehicle safety and emissions. These standards are regularly reviewed and updated to ensure they are up to code.

    Time and Knowledge

    I’m no plummer, and I sure as heck am no electrician. While I think it would be extremely satisfying to say I learned how to wire my own electricity thanks to TikTok and YouTube university, and I know I would learn eventually, I now have the peace of mind that it was done correctly and I didn’t need to spend fifty hours watching endless videos over and over. If something isn’t working correctly, I can either go to a dealer or to Winnebago’s website. Winnebago has so many resources listed online for each specific vehicle from wiring and plumbing diagrams to part numbers, their resources and customer support are incredible.

    Resale Value

    A manufactured van may have a higher resale value than a self-built van because it’s a brand and model that is well-known and recognized in the market. People are able to research the van extensively with the amount of information that is on the internet. A self-build is one-of-a-kind and may not appeal to everyone’s taste or needs. A manufactured van may also have a higher resale value because it has been built by professionals and is likely to have a more polished finish and higher quality, reliable components.

    Quality

    Another reason why it’s better to purchase a manufactured van is the quality of workmanship. When you purchase a manufactured van from a reputable manufacturer, you are getting a product that has been designed and built to high standards.

    Manufactured vans are built using advanced manufacturing techniques and equipment, ensuring that each unit is consistent in quality. With a self-build project, the quality of workmanship may vary depending on the skills and experience of the builder.

    Choosing between a manufactured van and a conversion ultimately comes down to your specific style, needs and preferences. Taking into consideration your budget, time, skills, and goals to choose the option that best fits you and what you need. If you want the convenience of a vehicle that is ready to go right away, a manufactured van may be your best option. However, if you prioritize being able to customize your build and have the time, skills, and tools to take on the project, building your own van may be a more rewarding option. Whatever you choose, the van life community will welcome you with open arms.

    Merrisa Blog Bio

    Having worked in the RV industry since 2017, Merrisa Petersen has been living and working on the road in her Winnebago Solis Pocket full-time since 2020. Her aim is to empower other women to seek adventure in order to instill confidence in their capabilities. Her travel companion is her dog, Jessa, and together they are committed to a sustainable lifestyle and leaving nature better than they found it.